How to Install the Stable Diffusion Tool on Windows: An Automated Guide for AI Image Generator Enthusiasts and Professionals
Contents
- 1 Introduction to Stable Diffusion on Windows
- 2 System Requirements for Stable Diffusion on Windows Device
- 3 Installation Steps for Stable Diffusion Windows Install Edition
- 4 Step 1: Installing Python
- 4.1 Option 3: Install Python from the Microsoft Store (Recommended)
- 4.2 Option 4: Use the 64-bit Windows Installer from the Python Website
- 4.3 Why the Recommendation for the Microsoft Store?
- 4.4 Post-Installation Check
- 4.5 Proceed with Caution
- 4.6 Verifying Your Python Installation
- 4.7 Troubleshooting
- 4.8 Wrapping Up
- 5 Step 2: Install Git for Managing AUTOMATIC1111
- 6 Step 3: Clone the Web UI for Stable Diffusion (AUTOMATIC1111)
- 7 Step 4: Download the Stable Diffusion Model File
- 8 Step 5: Run the Web UI for Stable Diffusion (AUTOMATIC1111)
- 9 Optimizing Performance with RTX 4000 Series Graphics Cards
- 10 How to keep Stable Diffusion Up-to-Date on your Windows Device
- 11 Troubleshooting: Resetting and Reverting the Stable Diffusion Windows UI
- 12 Frequently Asked Questions about Stable Diffusion Windows Install Guide
- 12.1 Q: What is Stable Diffusion Windows Install, and what are its requirements?
- 12.2 Q: How do I install Python for Stable Diffusion Windows Install?
- 12.3 Q: How can I check if Python is installed correctly for Stable Diffusion Windows Install?
- 12.4 Q: What are the steps to install Stable Diffusion on Windows?
- 12.5 Q: Can I speed up Stable Diffusion on Windows?
- 12.6 Q: How do I update AUTOMATIC1111 Version of Stable Diffusion on Windows?
- 12.7 Q: How can I reset or revert to a previous version of the Stable Diffusion Windows UI?
- 12.8 Q: What support is there for RTX 4000 series graphic cards?
- 12.9 Q: What if I encounter issues with my Stable Diffusion Windows installation or need to revert changes?
- 12.10 Q: What are the system requirements for installing Stable Diffusion on Windows?
- 12.11 Q: What alternatives are available if my PC doesn’t meet the requirements?
- 12.12 Q: How do I install Git for Stable Diffusion Windows Edition?
- 12.13 Q: Where can I find the AUTOMATIC1111 repository to clone for Stable Diffusion Windows Install?
- 12.14 Q: How do I download and place the Stable Diffusion model checkpoint file for Windows Install?
- 12.15 Q: How do I run the web user interface (webui) for Stable Diffusion?
- 12.16 Q: What options are available to customize the operation of Stable Diffusion on Windows?
- 12.17 Q: How do I use the latest RTX 4000 series graphic cards with Stable Diffusion on Windows?
- 12.18 Q: Can I revert to a previous version of Stable Diffusion if the latest one is broken?
- 12.19 Q: How do I reset the webui if I encounter errors during an update?
Introduction to Stable Diffusion on Windows
In this comprehensive guide, we’ll walk through the step-by-step process of downloading and installing the popular Stable Diffusion software, known as AUTOMATIC1111, on a Windows platform.
What is Stable Diffusion?
Stable Diffusion is a remarkable text-to-image AI tool designed to operate on consumer-grade PCs equipped with a GPU. It’s a must-have for AI image generator enthusiasts, both hobbyists, and professionals alike.
Ready to Get Started Installing Stable Diffusion on Windows?
By the end of this tutorial, you’ll have the ability to generate AI images on your very own PC using the Stable Diffusion software. Whether you’re a seasoned pro or just starting your journey in AI image generation, this guide will provide you with the knowledge and tools you need to unleash your creativity. Let’s dive in!
System Requirements for Stable Diffusion on Windows Device
Before diving into the installation process of Stable Diffusion, ensure your system meets the following requirements:
- Operating System: Windows 10 or higher.
- Graphics Processing Unit (GPU): A discrete Nvidia video card with 4 GB VRAM or more. Note that an integrated GPU will not suffice for this application.
What if My PC Doesn’t Meet the Requirements to Run Stable Diffusion on Windows?
Don’t worry; if your PC does not meet these specific requirements, there are still alternatives available for you to use Stable Diffusion:
- Cloud Service: Utilize Google Colab, a popular cloud service that provides access to GPU resources. It’s a flexible solution that allows you to work with the software without the need for powerful hardware.
- Mac Users: If you have a Mac system with Apple Silicon M1/M2, it’s also compatible with Stable Diffusion. This gives Mac users a convenient pathway to engage with the tool without requiring a Windows system.
Alternatively, try running Stable Diffusion via the Web UI.
By ensuring your system meets these requirements or exploring alternative options, you can set yourself up for a successful experience with Stable Diffusion.
Installation Steps for Stable Diffusion Windows Install Edition
The installation of Stable Diffusion Windows Install Edition is a streamlined process that entails several crucial steps. Beginning with the proper system setup, it requires a Windows 10 or higher system with a discrete Nvidia GPU having at least 4 GB VRAM.
The installation process consists of five main steps: installing the appropriate Python version, incorporating Git for repository management, cloning the AUTOMATIC1111 Stable Diffusion web interface, downloading the model file for Stable Diffusion, and finally running the web user interface through a provided batch file.
Careful adherence to the instructions for each step ensures a smooth installation, enabling users to run the powerful Stable Diffusion text-to-image AI on their personal computers.
Special options and configurations are also provided for those looking to customize their experience or utilize the latest RTX 4000 series graphic cards, adding flexibility and efficiency to the system.
Step 1: Installing Python
Before you can run Stable Diffusion, you’ll need to install Python 3.10.6 on your Windows machine. It’s crucial to note that versions Python 3.11 or newer are NOT compatible with Stable Diffusion, so make sure to specifically choose version 3.10.6.
There are two common methods to install Python on Windows:
Option 1: Using the Official Python Website
- Visit the Python Website: Go to the official Python website.
- Download Python 3.10.6: Look for the specific version, Python 3.10.6, and download the installer.
- Run the Installer: Open the installer and follow the on-screen instructions, making sure to select the option to add Python to your PATH.
- Verify the Installation: Once installed, open a command prompt and run the command
python --versionto verify that Python 3.10.6 is correctly installed.
Option 2: Use a Package Manager like Chocolatey
- Install Chocolatey: If you haven’t already, install Chocolatey, a package manager for Windows.
- Install Python: Open a command prompt as an administrator and run the command
choco install python --version 3.10.6. - Verify the Installation: Check the installation by running the command
python --version.
By adhering to the above guidelines, you’ll ensure that you have the correct version of Python installed, which is the foundation for running Stable Diffusion on your Windows machine.
In the next section, we’ll continue with additional installation steps. Stay tuned if you want to unlock the world of AI-driven image generation on your PC!
Certainly! Here’s an expanded version of your text, with further details and clarification:
Option 3: Install Python from the Microsoft Store (Recommended)
The Microsoft Store offers a streamlined way to install Python on your Windows device. It’s a method that integrates well with the Windows environment and ensures proper configuration. Here’s how to do it:
- Uninstall Previous Versions: If you have any previously installed versions of Python, it’s best to remove them first. Navigate to Control Panel → Add or Remove Programs, find Python, and uninstall it.
- Visit the Microsoft Store: Search for Python 3.10 on the Microsoft Store or visit the link.
- Install Python Software: Click on the ‘Get’ or ‘Install’ button to download and install Python 3.10.6.
Option 4: Use the 64-bit Windows Installer from the Python Website
Another viable method is to use the official installer provided by the Python website:
- Download the Installer: Go to the Python download page and select the 64-bit Windows installer for Python 3.10.6.
- Run the Installer: Open the downloaded file and proceed with the installation. Important: During installation, make sure to check the box that says “Add Python 3.10 to PATH” to ensure proper integration with your system.

Why the Recommendation for the Microsoft Store?
Installing Python from the Microsoft Store is often a more user-friendly experience and integrates seamlessly with Windows. It’s also easier to manage updates, and the installation process is typically smoother.
Post-Installation Check
After completing the installation through either option, it’s good to verify that everything went as planned:
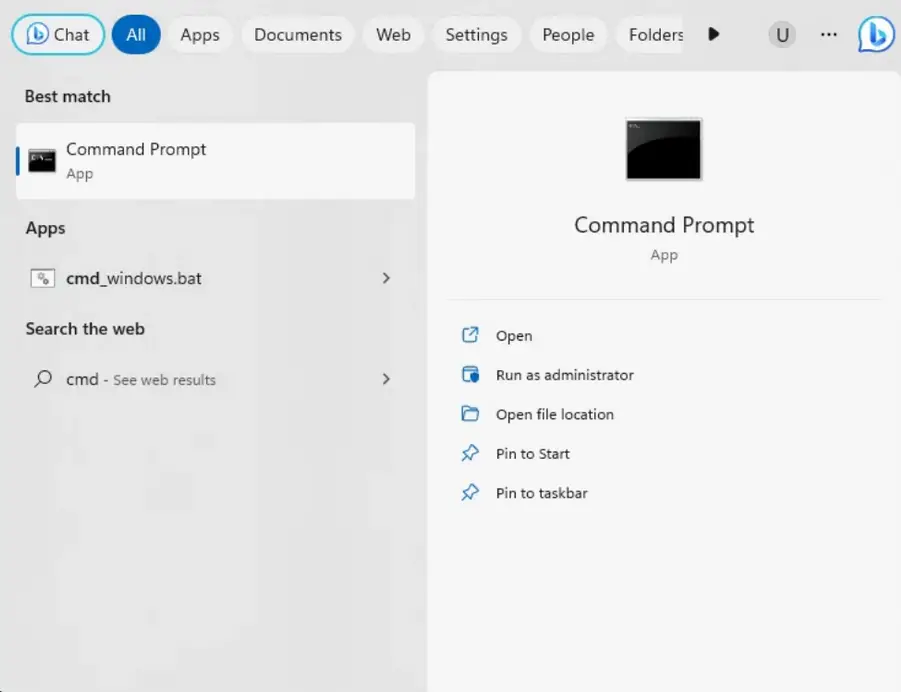
- Open Command Prompt: Press the Windows key on your keyboard and type “cmd” to find a program called “Command Prompt.”
- Verify Python Version: In the Command Prompt, type
python --versionand press Enter. You should see “Python 3.10.6” displayed, confirming the correct version is installed.
Proceed with Caution
This step is most likely to go wrong, so follow the instructions carefully and verify the installation to avoid potential issues down the road.
By following this comprehensive guide, you’ll have Python set up and ready to use for Stable Diffusion, paving the way for an exciting journey into AI image generation!
Verifying Your Python Installation
After installing Python, it’s crucial to verify that it has been installed correctly. Here’s how you can confirm the installation:
- Open Command Prompt App: Search for the Command Prompt on your computer and open it. You’ll be greeted by a black terminal window — it’s not just for hackers, but today, it’s your tool to verify the installation!
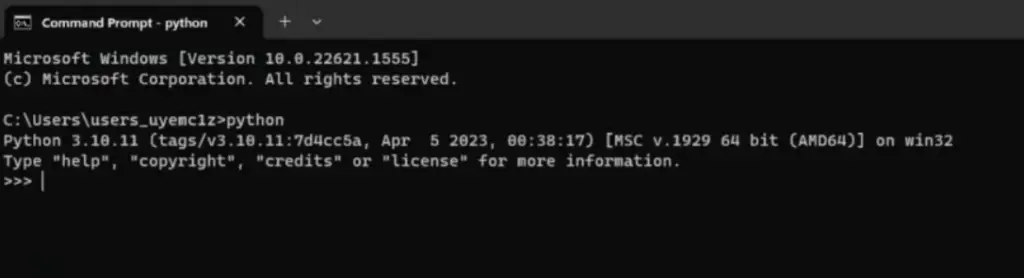
- Check Python Version: Simply type
pythonand press Enter. If everything went according to plan, you should see “Python 3.10” printed in the terminal. This message confirms that Python is installed correctly. - Close Command Prompt App: With the verification complete, you can close the Command Prompt window.
Important Notice
Do not proceed to the next step until you have successfully installed Python 3.10. This version is vital for running Stable Diffusion, and any issues here may lead to problems later.
Troubleshooting
If you don’t see Python 3.10 running as expected, here are some troubleshooting steps you can follow:
- Restart Your PC: Sometimes, a simple restart can resolve any lingering configuration issues.
- Reinstall Python: If the problem persists, consider removing all previous versions of Python and reinstalling from the Microsoft Store. This ensures that any conflicts with older versions are resolved.
- Try a Different Source: If the Microsoft Store version doesn’t work for you, remove it and try installing Python from the official Python website.
Wrapping Up
Verifying your Python installation is a crucial step in your journey towards using Stable Diffusion for AI image generation. By following the instructions carefully and ensuring that Python 3.10 is installed correctly, you set a strong foundation for the next exciting phases of your project. Take your time with this step, and don’t hesitate to explore the troubleshooting options if needed. The world of AI-driven creativity awaits you!
Certainly! Let’s enhance and structure the text for the installation of Git, focusing on its relevance to AUTOMATIC1111.
Step 2: Install Git for Managing AUTOMATIC1111
Git is an essential code repository management system that you will need to install and update the AUTOMATIC1111 component of Stable Diffusion. Installing Git is a straightforward process, and here’s how you can do it on a Windows system:
Downloading Git for Windows
- Visit the Git Download Page: Click here to navigate to the download page for the Windows version of Git.
- Download the Installer: Select the appropriate version for your system, and the download will begin automatically.
Installing Git
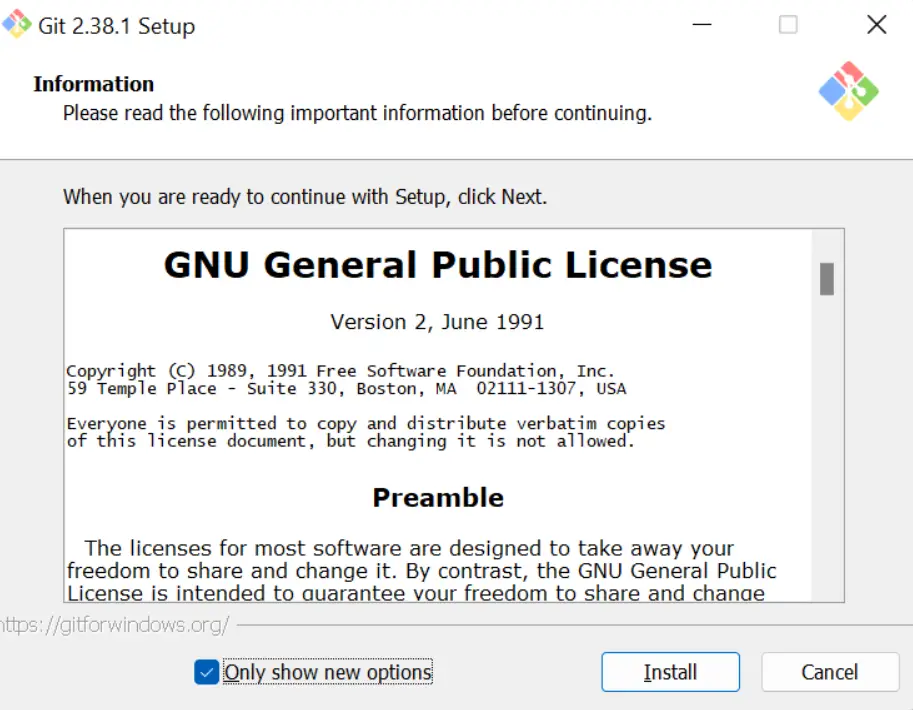
- Open the Installer: Locate the downloaded installer file, and double-click it to begin the installation process.
- Accept the License: Click ‘Install’ to accept the license terms and continue with the installation. You may be presented with various customization options, but the default settings are usually suitable for most users.
- Follow the On-Screen Instructions: Proceed through the installation wizard, following the on-screen instructions to complete the installation.
Verifying the Installation
- Open Command Prompt: Press the Windows key on your keyboard and type “cmd” to find the Command Prompt.
- Check Git Version: Type
git --versionand press Enter. If Git is installed correctly, you’ll see the version information displayed.
Why Git for Stable Diffusion AUTOMATIC1111?
Git plays an essential role in managing the AUTOMATIC1111 codebase, allowing seamless updates and version control. Whether you’re a hobbyist experimenting with AI image generation or a professional working on a large-scale project, Git ensures that you’re always working with the latest and greatest code.
Proceed with Confidence
With Git installed, you’ve taken another vital step towards setting up Stable Diffusion on your Windows machine. Make sure to follow the instructions carefully, and you’ll be well on your way to unlocking the full potential of AI-driven image generation with AUTOMATIC1111. The next step awaits!
Certainly! Below, you’ll find the enriched and structured version of Step 3, explaining how to clone the web UI for Stable Diffusion:
Step 3: Clone the Web UI for Stable Diffusion (AUTOMATIC1111)
This step involves downloading the Stable Diffusion software (AUTOMATIC1111) by cloning the repository. This is essential for obtaining the latest version of the software and ensuring you have all the necessary files.
Opening Command Prompt
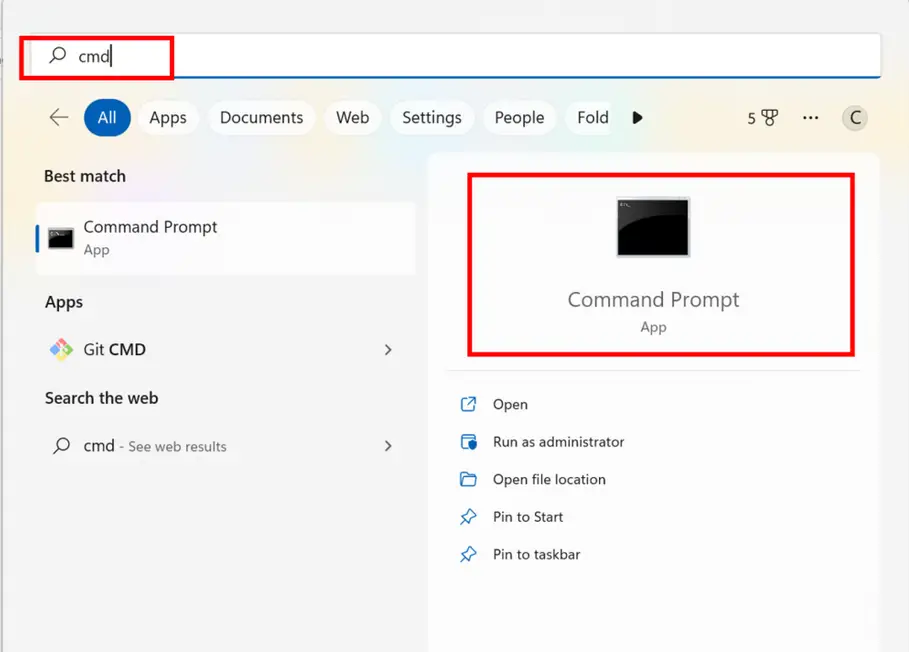
- Press the Windows Key: Locate the Windows key on the left of the space bar on your keyboard and press it. A search window will appear.
- Type “cmd”: In the search window, type “cmd.”
- Click on Command Prompt: Find the Command Prompt app and click on it. A new command prompt window will appear.
- Move to Your Home Folder: Type the following command and press Enter. This will navigate to your home directory:
cd %userprofile%Your prompt should now display something like C:\Users\YOUR_USER_NAME>.
Cloning the AUTOMATIC1111 Repository
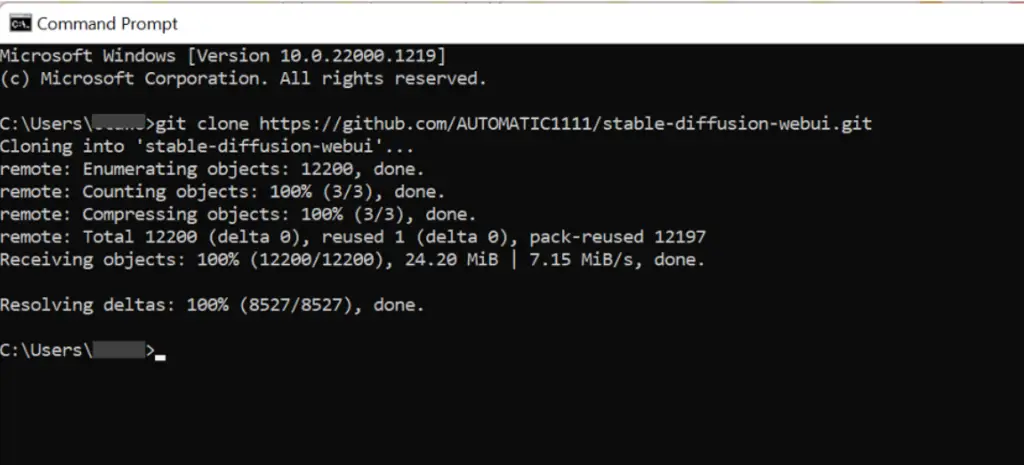
- Clone the Repository: Enter the following command to clone the AUTOMATIC1111 repository:
git clone https://github.com/AUTOMATIC1111/stable-diffusion-webui.gitThis will create a folder called stable-diffusion-webui in your home directory.
Note on Folder Location
- It’s entirely acceptable to clone the repository into a different folder instead of
%userprofile%. Just remember the location, as you’ll need to refer to it in the subsequent steps.
By completing this step, you’ve successfully downloaded the Stable Diffusion software, positioning yourself to delve into AI-powered image generation with AUTOMATIC1111. The repository contains all the necessary files and scripts to run the application, neatly packaged in the stable-diffusion-webui folder.
Step 4: Download the Stable Diffusion Model File
The Stable Diffusion software requires specific model files to function correctly. In this step, you’ll download the necessary Stable Diffusion v1.5 model checkpoint file and place it in the appropriate directory. Here’s how to accomplish this:
- Open File Explorer: Press
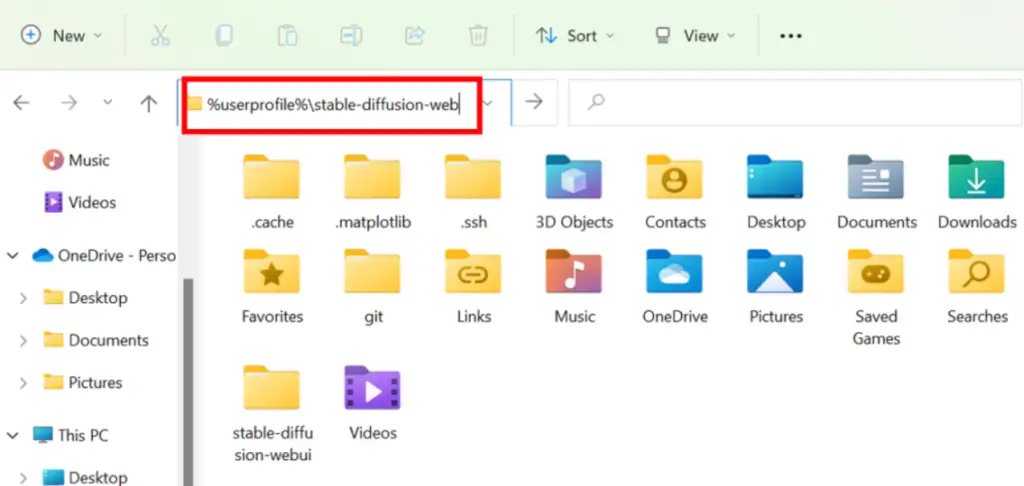
Windows + Eor click on the File Explorer icon from your taskbar. - Access the Stable Diffusion Folder: In the address bar, enter
%userprofile%\stable-diffusion-webuiand press Enter. This command will take you to the newly created folder for Stable Diffusion. - Find the Models Directory: Inside the
stable-diffusion-webuifolder, navigate to themodelsfolder, and then to theStable-diffusionsubfolder.
Download the Stable Diffusion v1.5 Model
- Locate the Placeholder File: You should see a file named
Put Stable Diffusion checkpoints here.txtwithin theStable-diffusionfolder. - Download the Model Checkpoint File: Click here (replace with the actual download link) to download the Stable Diffusion v1.5 model checkpoint file. Ensure that the downloaded file is compatible with your Stable Diffusion version.
- Place the Model File in the Folder: Once downloaded, move the model file into the
Stable-diffusionfolder, where the placeholder text file is located.

Important Notes
- Make sure to download the correct version of the Stable Diffusion model. Different versions may not be compatible with the software you have installed.
- Keep track of the folder location as you’ll be referring back to it in subsequent steps.
Step 5: Run the Web UI for Stable Diffusion (AUTOMATIC1111)
This final step involves running the Web UI for Stable Diffusion, allowing you to interact with AUTOMATIC1111 through an intuitive interface. Follow these instructions carefully, and you’ll be creating AI-generated images in no time!
- Return to the Stable Diffusion Directory: In File Explorer, go back to the
stable-diffusion-webuifolder. You can navigate up two levels or type%userprofile%\stable-diffusion-webuiagain in the address bar.
Run the Web UI
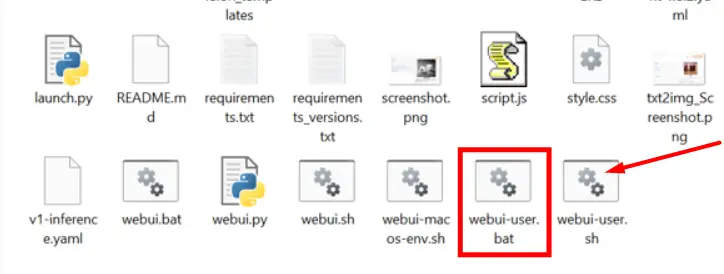
- Locate the Batch File: Find a file called
webui-user.batwithin the folder. This batch file contains the commands to run the Web UI. - Run the Batch File: Double-click
webui-user.batto run and complete the installation. This step may take some time, so please be patient.
Accessing the Web UI
- Wait for the Confirmation Message: Once the installation is complete, you’ll see a message displaying:
Running on local URL: http://127.0.0.1:7860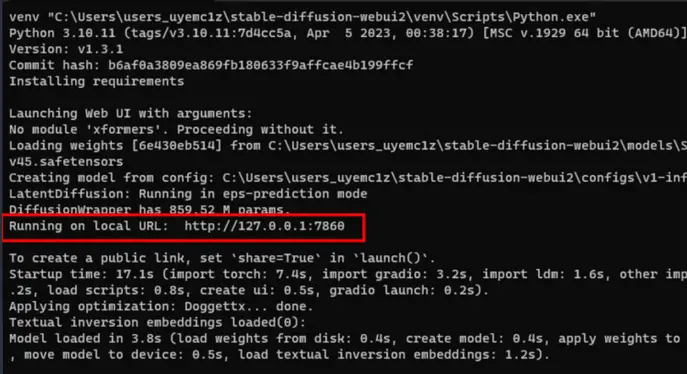
This message confirms that the Web UI is running.
- Open Your Web Browser: In your preferred web browser, navigate to the URL:
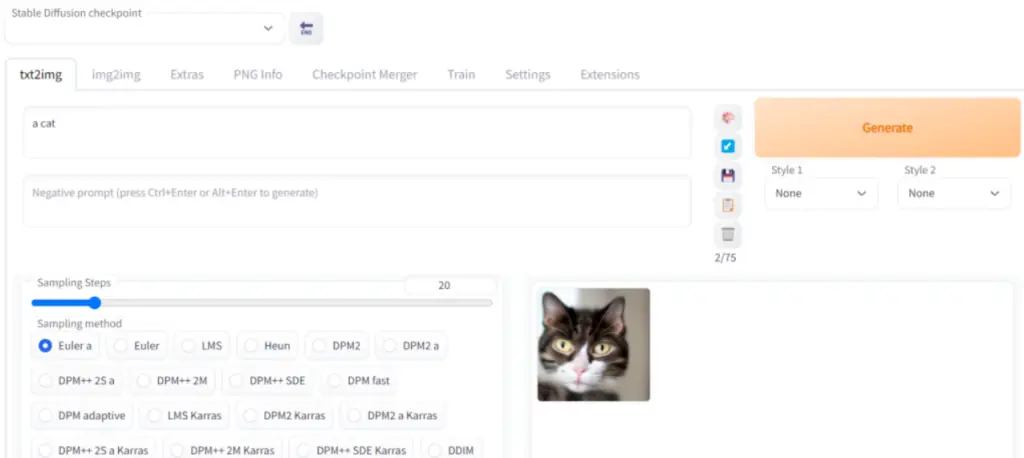
http://127.0.0.1:7860/- Explore the AUTOMATIC1111 Web UI: You should now see the AUTOMATIC1111 interface! Enter a prompt (e.g., “a cat”) and click “Generate” to test if Stable Diffusion is running correctly.
Managing Stable Diffusion
- Shutting Down: When you’re done using Stable Diffusion, simply close the Command Prompt window (the black window) to shut it down.
- Re-running: To use Stable Diffusion again in the future, simply double-click the
webui-user.batfile.
Options and Advanced Configuration for Stable Diffusion
Stable Diffusion offers various options to tailor the experience to your hardware and use case. These include speeding up the process, conserving GPU memory, and enabling specific tools or remote access. Here’s a guide to utilizing these options:
Optimizing Performance and Memory Usage
- Speed Up Stable Diffusion: Utilize the
--xformersoption to accelerate Stable Diffusion. - Conserve Memory on Low-VRAM GPUs: If your GPU has less than 8 GB VRAM, enable the
--medvramoption to generate more images without exceeding memory limits.
How to Enable These Options
- Right-Click on the Batch File: Find the
webui-user.batfile, right-click on it, and select “Edit.” (You may need to select “Show More Options” first if you’re using Windows 11). - Modify the Command Line Arguments: Replace the line:
set COMMANDLINE_ARGS=with:
set COMMANDLINE_ARGS=--xformers --medvram- Save and Close the File: Make sure to save your changes.
- Run Stable Diffusion: Double-click the
webui-user.batfile to run Stable Diffusion with the new settings.
Additional Arguments
- Enable Color Sketch Tool: Use the argument
--gradio-img2img-tool color-sketchto enable a color sketch tool that can be helpful for image-to-image tasks. - Remote Access: If you want to use your computer as a server and access the GUI from another machine, use the
--listenargument. Note that enabling remote access may require adjusting your firewall settings, which is beyond the scope of this installation guide.
Tailoring Stable Diffusion to Your Needs
These options allow you to customize the behavior of Stable Diffusion, ensuring a smooth experience that aligns with your hardware capabilities and specific requirements. Whether you’re looking to optimize performance, conserve memory, or tap into advanced features, these configurations put control in your hands.
Remember to proceed with caution and understand the implications of each change, especially when it comes to network settings. Happy experimenting, and enjoy the full power of Stable Diffusion, adapted to your unique creative journey!
And that’s it – congrats! You can also check out the quick start guide and our comprehensive guide on how to set up Easy Diffusion.
Optimizing Performance with RTX 4000 Series Graphics Cards
If you’re using Nvidia’s RTX 4070, RTX 4080, or RTX 4090 graphics cards, there’s excellent news! The latest version of AUTOMATIC1111 fully supports these video cards (with torch 2.0 and CUDA 11.8), allowing you to leverage their power for quicker and more efficient image generation.
Below, you’ll find details on how to benchmark your setup and optimize the speed using specific parameters.
Benchmarking Your Setup
To ensure your setup is working correctly, you can benchmark the speed of image generation. Here are the settings for the test:
- Batch Size: 4 (Note: Using a batch size of 1 is not recommended, as the measured speed may vary based on other system components)
- Batch Count: 10
- Image Size: 512×512 pixels
- Sampling Steps: 20
- Sampling Method: Euler a
- Model: SD v1.5
What to Expect
- Speed Measurement: You’ll see the speed of generating each image, expressed in iterations per second (it/s).
- Picking a Stable Value: Usually, a stable value like the 5th batch is a good representation. For example, with RTX 4090, you should get about 10 it/s (note that this is 4 images per iteration), representing the max speed achievable today.
Speed-Up Options
You can further enhance the speed with one of the following parameters:
Option 1:
- Command:
--xformers
Option 2:
- Command:
--opt-sdp-no-mem-attention --no-half-vae --opt-channelslast - Note: Option 2 is slightly faster, but it is recommended to test both options to determine what works best for your system.
Leveraging the Power of RTX 4000 Series
With the support for RTX 4000 series graphics cards, AUTOMATIC1111 unlocks new potentials in speed and performance. By benchmarking and applying the correct speed-up options, you can ensure that your setup is operating at peak efficiency.
Remember, these guidelines and optimizations are specific to the RTX 4000 series, so apply them accordingly. Your creative journey with Stable Diffusion has just gotten a significant boost, letting you generate more complex images faster than ever before. Enjoy the accelerated creativity that the latest GPU technology brings to your AI image-generation projects!
How to keep Stable Diffusion Up-to-Date on your Windows Device
Stable Diffusion’s AUTOMATIC1111 is a constantly evolving tool, with regular updates bringing new features, improvements, and fixes. However, your copy won’t be automatically updated. Depending on your needs and preferences, you have two main options for updating: either updating every time you run the tool or updating only as needed. Below, you’ll find guidelines for both methods.
Updating Every Time You Run
If you prefer to always have the latest version, you can configure AUTOMATIC1111 to update every time you run the webui. Follow these steps:
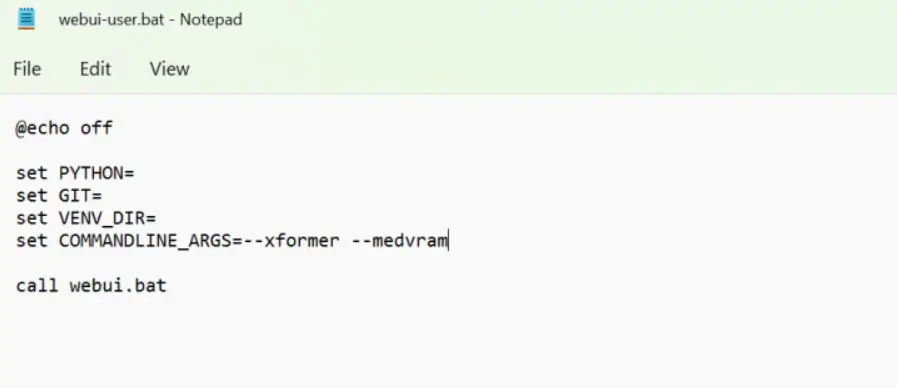
- Edit the File: Open
webui-user.batin a text editor. - Add a New Line: Insert
git pullbefore the line that callswebui.bat. The file should look something like this:
   @echo off
   set PYTHON=
   set GIT=
   set VENV_DIR=
   set COMMANDLINE_ARGS=--xformers --medvram
   git pull
call webui.bat- Save and Close: Save the changes to the file and close the editor. From now on, the
webuiwill update itself every time it starts, ensuring you always have the latest version.
Updating As Needed
For those who prefer a more controlled approach, updating only when needed might be more appropriate. This way, you can avoid potential issues with new releases that might contain unexpected bugs or changes.
Here’s how to update as needed:
- Open Command Prompt: Press the Windows key, type “cmd,” and click on Command Prompt.
- Navigate to Webui’s Directory: Type the following command (you’ll need to adjust
%userprofile%if you installed it in a different location):
cd %userprofile%\stable-diffusion-webui- Run the Update Command: Type the following command and press Enter:
git pullThe tool will fetch and apply the latest updates from the repository.
Conclusion: Choose Your Update Strategy
Whether you opt to update every time you run AUTOMATIC1111 or update only as needed, keeping your tool up-to-date ensures that you take advantage of the latest developments and enhancements.
Remember, always be mindful of potential instability in new releases, and consider your individual needs and workflow when deciding on an update strategy. By following these guidelines, you can keep your AUTOMATIC1111 installation current and aligned with your creative goals in AI image generation.
Troubleshooting: Resetting and Reverting the Stable Diffusion Windows UI
Sometimes, while working with Stable Diffusion’s AUTOMATIC1111, you might encounter issues with the webui, such as errors during an update or accidental modifications to some files. In these situations, you may need to reset the webui folder or even revert to a previous version. Below are the steps to perform both these actions.
Resetting the Webui Folder
If you run into errors while updating (e.g., with git pull), it’s likely that some files have been accidentally altered. You can reset the entire webui folder to its original state with the following commands:
- Open Command Prompt.
- Navigate to the
stable-diffusion-webuidirectory:
cd %userprofile%\stable-diffusion-webui- Reset the folder with:
git checkout -f master- Finally, run the update command again:
git pullWarning: This process will reset all files in the folder, including any changes you made to webui-user.bat. You’ll need to make those modifications again if necessary.
Reverting Back to a Previous Version
If the latest version of webui is causing issues, you might wish to revert to a previous version. Here’s how to do it:
- Find the Previous Version: Go to this page to view previous versions. Each row represents a different version.
- Select a Version: Choose the version you want to revert to, considering the date and comments.
- Copy the Hash Code: Press the copy button to grab the hash code of the chosen version.
- Apply the Reversion: Open Command Prompt and run the following commands, replacing the hash code with the one you copied:
   cd %userprofile%\stable-diffusion-webui
   git checkout YOUR_HASH_CODE_HERE
If you encounter errors during this process, refer to the section on resetting the webui and try again.
Conclusion: Managing Your Webui Versions
The flexibility to reset or revert your webui allows for greater control and stability in your AUTOMATIC1111 installation. Understanding these processes can help you troubleshoot issues quickly and efficiently, ensuring a smoother experience with your AI image generation activities.
Remember to exercise caution when making these changes, as they can overwrite modifications or even lead to temporary incompatibilities with your current setup. Always consult the release notes and other resources available on the AUTOMATIC1111 website for guidance on which version is most suitable for your needs.
Frequently Asked Questions about Stable Diffusion Windows Install Guide
The Stable Diffusion Windows Install Guide has addressed a range of topics that may lead to Frequently Asked Questions (FAQs) among users, both hobbyists and professionals alike.
These FAQs often center around the specific requirements for a system, including the necessary Windows version and GPU specifications. Users frequently inquire about the detailed installation process, encompassing steps from Python installation to running the web user interface.
Other common questions involve optimization options, such as utilizing the RTX 4000 series graphic cards for enhanced performance, the procedures for updating or resetting the software, and the methods for reverting to previous versions if needed.
The guide aims to provide comprehensive solutions and alternatives to these FAQs to ensure a smooth and error-free installation experience for all users.
Q: What is Stable Diffusion Windows Install, and what are its requirements?
A: Stable Diffusion Windows Install Edition is a popular text-to-image AI tool that requires Windows 10 or higher and an Nvidia video card with 4 GB VRAM or more. It can be run on consumer-grade PCs.
Q: How do I install Python for Stable Diffusion Windows Install?
A: Python 3.10.6 must be installed via the Microsoft Store or the Python website. Avoid using Python 3.11 or newer.
Q: How can I check if Python is installed correctly for Stable Diffusion Windows Install?
A: Open the Command Prompt and type “python.” Ensure it prints out Python 3.10. Follow the detailed troubleshooting steps if needed.
Q: What are the steps to install Stable Diffusion on Windows?
A: The installation involves multiple steps:
1. Install Python
2. Install Git
3. Clone the AUTOMATIC1111 repository
4. Download the model file
5. Run the web user interface (webui)
6. Configure options as desired
7. Utilize RTX 4000 series graphic cards (if applicable)
Q: Can I speed up Stable Diffusion on Windows?
A: Yes, with the --xformers and --medvram options. Other speed-up parameters are also available.
Q: How do I update AUTOMATIC1111 Version of Stable Diffusion on Windows?
A: AUTOMATIC1111 Stable Diffusion on Windows can be updated either every time you run it or as needed. Specific commands and modifications to the batch file are provided for both methods.
Q: How can I reset or revert to a previous version of the Stable Diffusion Windows UI?
A: The Stable Diffusion Windows UI folder can be reset with specific Git commands, and previous versions can be checked out using a hash code related to the desired version.
Q: What support is there for RTX 4000 series graphic cards?
A: Support is available for RTX 4070, 4080, and 4090 Nvidia graphic cards, along with benchmark speeds and various speed-up options.
Q: What if I encounter issues with my Stable Diffusion Windows installation or need to revert changes?
A: Detailed instructions for resetting the webui or reverting back to a previous version are provided, including using Git commands to manage versions.
Q: What are the system requirements for installing Stable Diffusion on Windows?
A: A PC running Windows 10 or higher with a discrete Nvidia video card (GPU) with 4 GB VRAM or more is required. Integrated GPUs are not suitable.
Q: What alternatives are available if my PC doesn’t meet the requirements?
A: Alternatives include utilizing a cloud service like Google Colab or using a Mac with Apple Silicon M1/M2.
Q: How do I install Git for Stable Diffusion Windows Edition?
A: Git can be downloaded from the official page for Windows, and installation can be completed by following the on-screen instructions.
Q: Where can I find the AUTOMATIC1111 repository to clone for Stable Diffusion Windows Install?
A: The repository can be cloned from https://github.com/AUTOMATIC1111/stable-diffusion-webui.git.
Q: How do I download and place the Stable Diffusion model checkpoint file for Windows Install?
A: The v1.5 model checkpoint file should be downloaded and placed in the folder %userprofile%\stable-diffusion-webui\models\Stable-diffusion.
Q: How do I run the web user interface (webui) for Stable Diffusion?
A: Locate and double-click the webui-user.bat file in the stable-diffusion-webui folder. The webui will be accessible at http://127.0.0.1:7860/. Or check out this guide https://stable-ai-diffusion.com/stable-diffusion-web-ui-online/
Q: What options are available to customize the operation of Stable Diffusion on Windows?
A: Various command-line arguments can be added to the webui-user.bat file to enable options like speeding up the diffusion process, saving memory, enabling color sketch tools, or setting up a server connection.
Q: How do I use the latest RTX 4000 series graphic cards with Stable Diffusion on Windows?
A: Support is provided for RTX 4070, 4080, and 4090 with specific settings, and different speed-up parameters can be applied to achieve optimal performance.
Q: Can I revert to a previous version of Stable Diffusion if the latest one is broken?
A: Yes, you can revert to a previous version by following the provided instructions, which involve using Git to checkout a specific hash code of the desired version.
Q: How do I reset the webui if I encounter errors during an update?
A: You can reset the webui folder using Git commands and re-run git pull. Note that all files will be reset, and changes to webui-user.bat will need to be reapplied.