Easy Stable Diffusion GUI Local Edition is here! We have scoured the internet, looking for easy to follow quick start guides for a local setup of Stable Diffusion, so you don’t have to.
Here you’ll find various easy-to-follow Stable Diffusion local install guides to various setup options for running Easy Stable Diffusion on your local device. We have prepared a thorough guide on multiple ways for you to enjoy using Stable Diffusion on your own computer.
If you’re seeking a straightforward and hassle-free way to use Easy Stable Diffusion locally on your own device and set Stable Diffusion locally, there’s a simple solution that requires no additional dependencies or technical know-how.
The following method is designed to be as easy as a single click:
Stable Diffusion GUI One-Click Installer: This installer simplifies the installation process, allowing you to set up Stable Diffusion on your machine without worrying about any dependencies or technical details. It’s as easy as downloading the installer and following the guided instructions.
This ‘plug-and-play’ solution is designed with ease of use in mind, making it accessible to users regardless of their technical proficiency. So, even if you’re a beginner in the realm of AI image generation, you can start using Stable Diffusion and create stunning images with minimal effort.
Click here to learn more about the impressive research behind Stable Diffusion.
Contents
- 1 Easy Stable Diffusion 2.5 Local Setup Guide – Navigate the AI World with AI Image Generator on Your Local Device
- 2 What is Easy Diffusion and How to Use It?
- 3 Easy Stable Diffusion 2.5 Installation Guide (Local Device Install)
- 4 Hardware Prerequisites for Easy Stable Diffusion GUI (Local Install Device Requirements)
- 5 Easy Stable Diffusion Local Edition: Installation Guide
- 6 Setting Up Stable Diffusion GUI on Windows (Quick and Easy Guide)
- 7 Setting Up Stable Diffusion 2.5 on Linux/Mac
- 8 Uninstalling Stable Diffusion 2.5 from Windows or Linux/Mac Devices
- 9 Easy Stable Diffusion 2.5 Features: Striking a Balance Between Simplicity and Power
- 10 Performance and Security with Stable Diffusion 2.5 Local Edition
- 11 Easy Stable Diffusion 2.5: A User-Friendly Platform for AI Enthusiasts
- 12 Advanced AI Image Creation with Easy Stable Diffusion 2.5 GUI for Professionals
- 13 Easy Stable Diffusion GUI 2.5 Demo Live Preview
- 14 Setting Up the Task Queue in Stable Diffusion 2.5 Local Version
- 15 (Guide) How to use Easy Stable Diffusion on your Device (After Setup)?
- 16 Join the Easy Stable Diffusion Development Community
- 17 READ: Disclaimer for Easy Stable Diffusion 2.5 Usage
- 18 Easy Stable Diffusion 2.5: Latest Updates and Features (Most Recent Version – v2.5.41)
- 19 Pro Tips for Using Easy Stable Diffusion GUI 2.5 Locally on your Device
- 20 Understanding Image Samplers in Easy Stable Diffusion 2.5
- 21 Troubleshooting Tips for Easy Stable Diffusion 2.5
- 22 Easy Diffusion UI Overview | Prompt and Base Image
- 23 Adjusting Settings in Easy Stable Diffusion GUI
- 24 Interacting with Rendered Images in Easy Stable Diffusion 2.5
- 25 Writing prompts for Easy Stable Diffusion GUI
- 26 Guide to Image Inpainting with Easy Stable Diffusion AI
- 27 Run Easy Diffusion Locally on Multiple GPUs
- 28 Multi-GPU Support with Easy Stable Diffusion
- 29 Model Merging with Easy Stable Diffusion (works only with version 2.5 or higher)
- 30 Easy Diffusion Custom Modifiers
- 31 Troubleshooting Your Easy Stable Diffusion Local Setup
- 31.1 Stable Diffusion Issue: RuntimeError: CUDA out of memory
- 31.2 Stable Diffusion Issue: urllib.error.URLError:
- 31.3 Issue: RuntimeError: Error(s) in loading state_dict fo UNet: size mismatch for model1.diffusion_model.input_blocks.0.0.weight
- 31.4 Issue: ‘conda-unpack’ is not recognized as an internal or external command
- 31.5 Issue: ImportError libSM.so.6 cannot open shared object file No such file or directory
- 31.6 Issue: basicsr module not found
- 31.7 Issue: Could not load the Qt platform plugin “xcb”
- 31.8 Issue: ImportError: DLL load failed while importing cv2: The specified module could not be found.
- 31.9 Issue: Killed uvicorn server:app –app-dir … –port 9000 –host 0.0.0.0
- 31.10 Getting Support and Troubleshooting Your Installation
- 32 Customizing Easy Stable Diffusion Local Configuration Settings
- 33 Joining the Easy Stable Diffusion Beta Development Channel
- 34 How to Use xFormers with Your Easy Stable Diffusion Local Version
- 35 Downloadable Content for Easy Stable Diffusion Local Edition
- 36 User Interface Plugins in Easy Stable Diffusion Local
- 37 VAE (Variational Auto Encoder) and Easy Stable Diffusion
- 38 Frequently Asked Questions about Easy Stable Diffusion GUI (Local Device Setup Guide)
- 38.1 Q1: What is Easy Stable Diffusion Local Edition?
- 38.2 Q2: How do I write prompts for Easy Stable Diffusion?
- 38.3 Q3: Can I emphasize parts of the prompt?
- 38.4 Q4: What is a “negative prompt”?
- 38.5 Q5: Can Easy Stable Diffusion utilize multiple GPUs?
- 38.6 Q6: How can I merge two Stable Diffusion models?
- 38.7 Q7: Can I add custom modifiers with sample images?
- 38.8 Q8: I’m encountering an error. How can I troubleshoot?
- 38.9 Q9: How do I install a custom model?
- 38.10 Q10: How do I use UI plugins?
- 38.11 Q11: How do I use a custom VAE (Variational Auto Encoder)?
- 38.12 Q12: How can I join the beta development channel of Easy Stable Diffusion?
- 38.13 Q13: Can I use xFormers with my Easy Stable Diffusion version?
- 38.14 Q14: How do I enter a conda environment in an existing installation?
- 38.15 Q15: What are the Easy Stable Diffusion Local Config settings?
- 38.16 Q16: How can I share model files with other UIs on my PC?
- 38.17 Q17: How can I troubleshoot common issues like CUDA out of memory, urllib.error.URLError, etc?
- 38.18 Q18: Can I use Easy Stable Diffusion with multiple GPUs?
- 38.19 Q19: What is automatic GPU selection?
- 38.20 Q20: How can I use Easy Stable Diffusion’s model merging feature?
Simplify your AI exploration with Stable Diffusion 2.5. It’s an accessible, user-friendly platform that brings the power of Stable Diffusion to your personal computer. No technical expertise or prior software installations are necessary, just a one-click install process to get you started.
Despite its ease of use, Stable Diffusion 2.5 doesn’t compromise on capabilities. It’s packed with robust features that cater to AI enthusiasts, artists, and graphic designers, offering a versatile tool for AI image generation.
Beyond the tool itself, Stable Diffusion 2.5 is supported by a vibrant, helpful community of users. This network of individuals share insights and creations, enhancing the Stable Diffusion experience.
Experience the synergy of simplicity and power with Stable Diffusion 2.5, where a world of AI image generation and a supportive community await.
What is Easy Diffusion and How to Use It?
Easy Diffusion is a user-friendly version of Stable Diffusion, the premier open-source AI software for text-to-image generation. Here’s a guide on how to run Stable Diffusion locally – Easy Diffusion. Designed with simplicity and ease of use in mind, Easy Diffusion streamlines the installation process by bundling all necessary software components required to run Stable Diffusion.
Moreover, it also provides a free, intuitive, and potent web interface. This allows even novice users to interact effectively with the Stable Diffusion software, enabling them to generate captivating AI images without getting tangled in the complexities of the underlying technology.
Essentially, Easy Diffusion aims to make the power and versatility of Stable Diffusion accessible to a broader audience, from beginners to advanced users.
Easy Stable Diffusion 2.5 Installation Guide (Local Device Install)
Easy Stable Diffusion GUI offers the simplest way to delve into the world of AI image generation. With this one-click installation guide process, you can quickly set up Stable Diffusion on your personal computer, eliminating any technical hurdles.
Once installed, Stable Diffusion 2.5 provides an intuitive browser-based user interface that simplifies the process of creating AI images. Whether you’re starting from a text prompt or an existing image, generating AI art is as easy as entering your input and watching the magic happen.
With a text prompt, the AI interprets your words and crafts an image that encapsulates your vision. If you’re working from an existing image, the AI can transform the image based on your specifications, adding a new layer of creativity to your original piece.
Stable Diffusion 2.5 strips away complexity, making AI image generation an accessible and exciting venture for everyone. Just one click, and you’re on your way to creating unique AI art.
Intiating your Stable Diffusion 2.5 local install is a mere click away. First, choose the download option tailored to your operating system:
- Download for Windows
- Download for Linux
- Download for macOS
Access the link below and open it in a new tab or a window. Scroll a bit down and look for the following symbols:

Each link corresponds to a custom version of Stable Diffusion 2.5, designed to work seamlessly with your chosen operating system. Click the relevant button, and you’re one step closer to unlocking the vast potential of AI image generation with Stable Diffusion.
Hardware Prerequisites for Easy Stable Diffusion GUI (Local Install Device Requirements)
To ensure an optimal experience with Stable Diffusion 2.5, your device should meet the following hardware requirements:
- Windows: An NVIDIA graphics card with at least 2 GB of RAM, or an option to run on your CPU.
- Linux: An NVIDIA or AMD graphics card with at least 2 GB of RAM, or an option to run on your CPU.
- Mac: An M1 or M2 chip, or an option to run on your CPU.
In addition, all systems should have a minimum of 8 GB of system RAM and at least 25 GB of hard disk space. These prerequisites ensure that Stable Diffusion 2.5 can operate effectively, letting you dive into the world of AI image generation without interruption.
The installer is designed to take care of all the necessary setup. If you encounter any issues during the installation, don’t hesitate to join the supportive Discord community where help and advice are readily available. Dive into the world of Stable Diffusion, backed by a community eager to assist and inspire.
Easy Stable Diffusion Local Edition: Installation Guide
Easy Stable Diffusion Local Edition is a powerful tool for generating images from textual descriptions. This guide provides detailed instructions on how to install and use this tool.
System Requirements
Before you start the installation process, ensure your system meets the following requirements:
- Operating System: Windows 10/11, Linux, or Mac.
- Graphics Card: Preferably an NVIDIA graphics card with 4GB or more of VRAM or an M1 or M2 Mac. If you don’t have a compatible graphics card, you can still use the tool with a “Use CPU” setting. It’ll be slow, but it should still work.
- Memory and Storage: At least 8GB of RAM and 20GB of disk space.
Please note that you do not need additional software like WSL, Docker, or Conda. The installer will take care of everything.
Use CPU Settings.
Easy Stable Diffusion Installation Guide
Windows
- Download the Easy-Diffusion-Windows.exe file from the official website.
- Run the downloaded file.
- Once the installation finishes, run Easy Diffusion. You can start it from your Start Menu or from your desktop if you created a shortcut.
Linux
- Download the Easy-Diffusion-Linux.zip file from the official website.
- Extract the file using your favorite file manager, or use
unzip Easy-Diffusion-Linux.zipin a terminal. - After extracting the .zip file, open a terminal and go to the easy-diffusion directory.
- In the terminal, run
./start.sh(orbash start.sh).
MacOS
- Download the Easy-Diffusion-Mac.zip file from the official website.
- Extract the file using your favorite file manager, or use
unzip Easy-Diffusion-Mac.zipin a terminal. - After extracting the .zip file, open a terminal and go to the easy-diffusion directory.
- In the terminal, run
./start.sh(orbash start.sh).
The installation process is automated. It will install Easy Diffusion, set it up, and start the interface. You don’t need to take any additional steps.
Uninstall
To uninstall the software, simply delete the easy-diffusion folder.
Updates
Easy Stable Diffusion updates itself every time you start it. By default, it will update to the latest stable version. If you want to test out new features, you can switch to the beta channel in the system settings.
This powerful tool allows you to generate high-quality images from text descriptions. Follow these instructions to get started with Easy Stable Diffusion Local Edition.
Setting Up Stable Diffusion GUI on Windows (Quick and Easy Guide)
Getting Stable Diffusion 2.5 up and running on your Windows device is straightforward. Follow these steps:
Execute the downloaded ‘Easy-Diffusion-Windows.exe’ file.
Run the downloaded Easy-Diffusion-Windows.exe file.Once the installation is complete, launch Easy Diffusion. You can do this either directly from your Start Menu or via a shortcut on your desktop if you’ve created one.
Run Easy Diffusion once the installation finishes. You can also start from your Start Menu, or from your desktop (if you created a shortcut).If Windows SmartScreen hinders you from running the program, simply click ‘More info’ and then ‘Run anyway’.
Pro Tip for Windows 10 Users: To circumvent the common issue of file path length limits in Windows 10, it’s recommended to install the program at the top level of your drive. For instance, you could use a path like ‘C:\EasyDiffusion‘ or ‘D:\EasyDiffusion‘. This way, your path to creativity with Stable Diffusion remains unblocked.
Setting Up Stable Diffusion 2.5 on Linux/Mac
If you’re using a Linux or Mac system, setting up Stable Diffusion 2.5 requires a few more steps, but it’s still a straightforward process:
Begin by unzipping or extracting the ‘easy-diffusion‘ folder. By default, this should be in your downloads folder unless you’ve specified a different default downloads destination.
Unzip/extract the folder easy-diffusion which should be in your downloads folder, unless you changed your default downloads destination.Next, open a terminal window and navigate to the ‘easy-diffusion‘ directory.
Open a terminal window, and navigate to the easy-diffusion directory.To start the program, type ./start.sh or bash start.sh in the terminal and hit enter.
Run ./start.sh (or bash start.sh) in a terminal.These steps ensure that your Linux or Mac system is primed and ready for generating AI art and images with Stable Diffusion 2.5.
Uninstalling Stable Diffusion 2.5 from Windows or Linux/Mac Devices
If you ever need to uninstall Stable Diffusion 2.5 from your system, the process is as simple as the installation. All you need to do is delete the ‘EasyDiffusion’ folder.
This action will remove all the downloaded packages related to Stable Diffusion 2.5, leaving no remnants on your system. It’s a clean and hassle-free way to manage your system’s resources.
Easy Stable Diffusion 2.5 Features: Striking a Balance Between Simplicity and Power
Stable Diffusion 2.5 is designed with a dual focus: to offer an effortless experience for newcomers, while providing a host of powerful features for advanced users. Here’s a breakdown of its key features:
Seamless User Experience on your own Stable Diffusion GUI:
- Hassle-Free Installation: No technical prowess or pre-installed software is required. Just download and run!
- Streamlined UI: A clutter-free and intuitive interface that packs a punch with a host of robust features.
- Task Queue: No need to wait for one task to complete before starting the next. Queue up all your ideas and let Stable Diffusion 2.5 handle the rest.
- Intelligent Model Detection: The system automatically determines the YAML config file to use for the selected model from a comprehensive models database.
Stable Diffusion GUI Local Edition comes with Feature-Rich Functionality Environment:
- Live Preview: Watch the AI create your image in real-time, giving you a dynamic view of the artistic process.
- Image Modifiers: A library of modifier tags, such as “Realistic”, “Pencil Sketch”, “ArtStation”, and more, lets you experiment with a variety of styles with ease.
- Multiple Prompts File: Queue multiple prompts by entering one per line or running a text file, boosting your creative productivity.
- Save Functionality: Keep your AI-generated masterpieces by saving the images directly to your PC.
Personalizable Interface on your Local edition of Stable Diffusion GUI
- UI Themes: Customize the program’s appearance to suit your aesthetic preferences.
- Searchable Models Dropdown: Keep your models organized in sub-folders and easily navigate through them with the searchable UI feature.
In essence, Stable Diffusion 2.5 offers a delightful balance of simplicity and power, making it an ideal tool for both AI novices and seasoned users alike.
Creating AI Images Locally Using Easy Stable Diffusion 2.5 GUI
Stable Diffusion 2.5 offers an interactive GUI to generate AI images right on your local machine. It supports both “Text to Image” and “Image to Image” functionalities, making it an all-encompassing tool for AI image generation. Here’s a rundown of its key features in this stable diffusion local install guides:
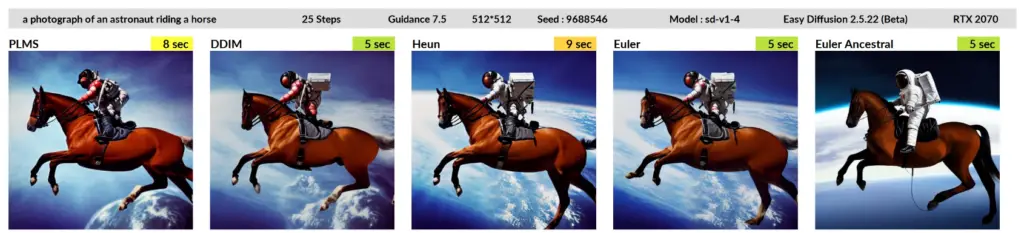
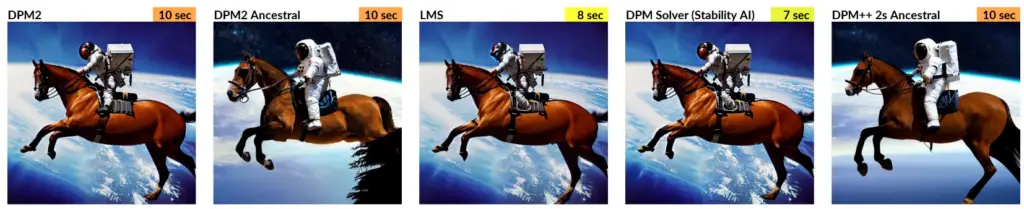
Sampling Techniques
Stable Diffusion 2.5 provides a choice of 21 samplers, including ‘ddim’, ‘plms’, ‘heun’, ‘euler’, and more. These samplers offer different ways to control the randomness in the image generation process, allowing you to experiment with various techniques.
Image Modification Tools
- In-Painting: Highlight specific areas of your image for the AI to enhance.
- Simple Drawing Tool: Sketch basic images to guide the AI’s generation, eliminating the need for an external drawing program.
- Face Correction (GFPGAN): Improve the quality of faces in your images using the GFPGAN model.
- Upscaling (RealESRGAN): Enhance the resolution of your images using the RealESRGAN model.
Advanced Features
- Loopback: Use the output image as the input for the next ‘Image to Image’ task, allowing for iterative image transformations.
- Negative Prompt: Indicate elements to remove from the image.
- Attention/Emphasis: Utilize parentheses ‘()’ to increase the model’s focus on enclosed words, and square brackets ‘[]’ to decrease it.
- Weighted Prompts: Assign weights to specific words in your prompt to adjust their significance, e.g., ‘red:2.4 dragon:1.2’.
- Prompt Matrix: Quickly generate multiple variations of your prompt, such as ‘a photograph of an astronaut riding a horse | illustration | cinematic lighting’.
Additional Enhancements
- 1-Click Upscale/Face Correction: Upgrade or correct an image immediately after its generation.
- Generate Similar Images: Generate multiple variations of a created image at the click of a button.
- NSFW Setting: Control NSFW content directly from the UI.
- Multiple File Formats: Save your creations in JPEG, PNG, or WEBP formats.
With these features, Stable Diffusion 2.5 provides a comprehensive, user-friendly platform for creating and modifying AI images locally.
Advanced Features Capabilities of Local Version Easy Stable Diffusion 2.5
Stable Diffusion 2.5 local version caters to advanced users with a suite of sophisticated features that offer greater flexibility and customization:
Custom Easy Stable Diffusion Models
Use your own ‘.ckpt’ or ‘.safetensors’ files by simply placing them in the ‘models/stable-diffusion’ folder. This allows you to harness your own trained models to generate unique AI art.
Easy Stable Diffusion Compatibility
Stable Diffusion 2.5 is backward compatible, supporting models trained with Stable Diffusion 2.1. This ensures that you can continue to leverage your previous work with newer versions of the software.
Model Merging with Easy Stable Diffusion
Combine different models to harness their collective strengths and create novel images.
Custom VAE Models of Easy Stable Diffusion
Utilize your own Variational Autoencoder (VAE) models to explore the wide landscape of generative art.
Easy Stable Diffusion use of Pre-Trained Hypernetworks
Leverage pre-trained hypernetworks to achieve high-quality results with less computational resources.
Custom GFPGAN Models in Easy Stable Diffusion
Use your own GFPGAN models to improve the quality of faces in your images.
UI Plugins of Easy Stable Diffusion
The platform offers a growing list of community-generated UI plugins, extending the functionality of Stable Diffusion 2.5. If you have a unique feature in mind, you can even write your own plugin and contribute to the growing Stable Diffusion community.
These advanced features make Stable Diffusion 2.5 a versatile and adaptable tool for those looking to push the boundaries of AI image generation.
Performance and Security with Stable Diffusion 2.5 Local Edition
Stable Diffusion 2.5 stands out not only for its rich feature set but also for its impressive performance and robust security measures.
Performance
- Speed: The platform is optimized for speed. For instance, it can generate a 512×512 image using the ‘euler_a’ sampler in just 5 seconds on an NVIDIA 3060 12GB.
- Low Memory Usage: Even with limited GPU RAM, you can generate high-resolution images — 512×512 images with less than 2 GB of GPU RAM, and 768×768 images with less than 3 GB of GPU RAM.
- CPU Support: If you lack a compatible graphics card, you can still run Stable Diffusion 2.5 on your CPU.
- Multi-GPU Support: If you have multiple GPUs, the platform automatically distributes tasks across them for faster performance.
Security
- Malware Protection: Stable Diffusion 2.5 uses picklescan to auto-scan and prevent the use of malicious models.
- Safetensors Support: The platform supports loading models in the safetensor format, enhancing safety by preventing arbitrary code execution.
- Auto-Updater: This feature ensures that you’re always working with the latest version of Stable Diffusion 2.5, benefiting from ongoing improvements and bug fixes.
Advanced Options
- Developer Console: For those who want to tinker with the Stable Diffusion code or modify the conda environment, Stable Diffusion 2.5 offers a developer-mode.
And there’s more. Stable Diffusion 2.5 continues to evolve, constantly adding new features and enhancements to improve your AI art creation experience. It’s a platform that couples power with ease, ensuring both performance and security.
Easy Stable Diffusion 2.5: A User-Friendly Platform for AI Enthusiasts
Easy Stable Diffusion 2.5 is designed to be remarkably accessible, even for those who are new to AI image generation. Its user-friendly interface and easy setup process make it an ideal platform for beginners to start their journey in AI art creation.
Effortless Installation
With no prerequisite technical knowledge or pre-installed software needed, Stable Diffusion 2.5 offers a hassle-free installation process. It’s as simple as downloading the program and running it on your system.
Intuitive Easy Stable Diffusion User Interface
The platform features a streamlined and clutter-free user interface, making it easy to navigate through various features. It’s designed to reduce complexity and ensure a smooth user experience, allowing new users to focus on the creative process.
Comprehensive Guidance
Stable Diffusion 2.5 provides clear instructions and guidance throughout the process. Whether you’re setting up the platform or generating your first AI image, you’re never left guessing.
Supportive Community
For any questions or issues that arise, Stable Diffusion 2.5’s vibrant community is always ready to assist. You can join the community, ask for help, share your creations, and learn from others’ experiences.
In sum, Stable Diffusion 2.5 ensures that the exciting world of AI image generation is accessible to everyone, regardless of their tech-savviness or prior experience with AI tools. It’s the perfect platform to kickstart your AI art creation journey.
Advanced AI Image Creation with Easy Stable Diffusion 2.5 GUI for Professionals
For seasoned users in the AI arena, Stable Diffusion 2.5 offers a wealth of advanced features. These functionalities empower you to dive deeper into AI image generation, exploring novel ideas and refining your creative vision.
Advanced Sampling Techniques
With a selection of 21 samplers, Stable Diffusion 2.5 allows you to tweak and fine-tune the randomness inherent in the image generation process. This provides unprecedented control over your creations.
Custom Models and Hypernetworks
The platform supports the use of custom models, enabling you to harness your own trained models for unique outputs. Additionally, you can use pre-trained hypernetworks to achieve high-quality results with less computational resources.
Innovative AI Tools
Stable Diffusion 2.5 includes cutting-edge AI tools like in-painting for enhancing specific areas of your image, loopback functionality for iterative image transformations, and weighted prompts for controlling the significance of specific elements in your image.
Plug-In Ecosystem
The platform supports a growing list of community-generated UI plugins. You can also create your own plugin to introduce new features to the project, making Stable Diffusion 2.5 a highly customizable tool.
Developer Console
For those who wish to modify their Stable Diffusion code or edit the conda environment, Stable Diffusion 2.5 offers a developer-mode, providing direct access to the underlying codebase.
In essence, Stable Diffusion 2.5 is more than just an AI image generation tool; it’s a comprehensive platform that allows advanced users to push the boundaries of AI art and explore their creative potential to the fullest.
Easy Stable Diffusion GUI 2.5 Demo Live Preview
Eager to see Stable Diffusion 2.5 in action? Try it now with a Demo Live Preview! This feature lets you watch the AI draw your image in real-time. It’s a dynamic way to observe the image generation process and provides a unique insight into how AI art comes to life.
What sets the Live Preview feature apart is its utility for quick decision-making. You don’t have to wait for the image to finish rendering to assess it. If the image isn’t evolving as per your expectations, you can stop the process right away, saving valuable time and computational resources.
So, take Stable Diffusion 2.5 for a spin with the Demo Live Preview. It’s your window into the fascinating world of AI image generation, where you can witness AI and creativity intertwining in real time.
Setting Up the Task Queue in Stable Diffusion 2.5 Local Version
Stable Diffusion 2.5’s Task Queue feature is designed to streamline your AI image generation process. It allows you to line up multiple image generation tasks, which the platform will execute one after another. Here’s how to set it up:
Access the Task Queue: Once you’ve launched Stable Diffusion 2.5, locate the Task Queue option within the platform’s user interface. It’s typically located on the main screen or within a menu, depending on your interface.
Add Tasks to the Queue: In the Task Queue, you can add your image generation tasks. These might be “Text to Image” tasks, where you provide a textual prompt for the AI to generate an image, or “Image to Image” tasks, where the AI transforms an input image according to your specifications. Each task you add will be lined up in the Task Queue.
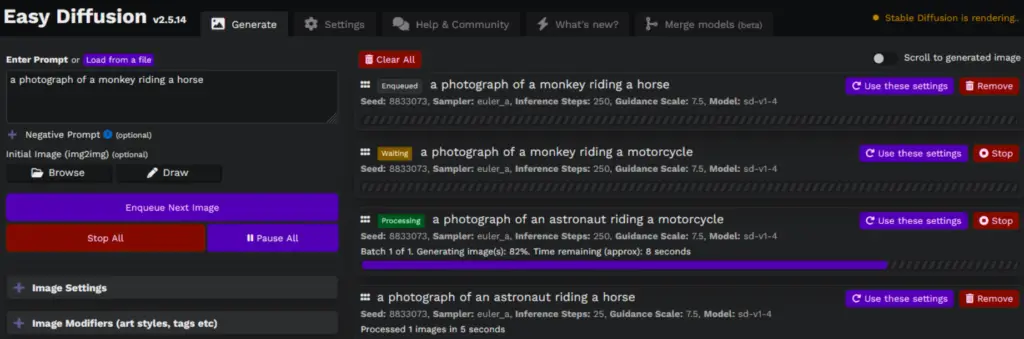
Start the Queue: After you’ve added all your tasks, simply start the Task Queue. Stable Diffusion 2.5 will start executing the tasks in the order they were added.
Monitor the Queue: You can monitor the progress of the tasks within the Task Queue interface. The platform will show which task is currently being processed and how many tasks remain in the queue.
Edit the Queue: If you need to modify the queue while it’s running, you can do so in the Task Queue interface. You can add new tasks, remove existing tasks, or change the order of tasks.
With the Task Queue feature, you can set up multiple tasks and let Stable Diffusion 2.5 handle the rest. It’s a great way to manage your workflow, particularly when you have numerous ideas you want to experiment within a single session.
(Guide) How to use Easy Stable Diffusion on your Device (After Setup)?
Here’s How to Use Easy Stable Diffusion 2.5 on your device.
Open Your Browser: Launch your preferred web browser. We recommend using Chrome, Edge, or Firefox for optimal compatibility with Stable Diffusion 2.5.
Navigate to the Project: In your browser’s address bar, type http://localhost:9000 and hit Enter. This will take you to the Stable Diffusion 2.5 interface.
Wait for the Project to Load: Please note that it may take a few seconds for the project to initialize and load. This is a normal part of the process as the software prepares the necessary resources for AI image generation.
Explore the Interface: Once the project has loaded, you should see the main interface of Stable Diffusion 2.5. This is your control panel for creating AI images.
Remember, Stable Diffusion 2.5 is designed to be user-friendly, whether you’re new to AI or a seasoned pro. So, dive in, experiment with the various features, and start creating your unique AI art.
Join the Easy Stable Diffusion Development Community
Stable Diffusion 2.5 is a continually evolving platform, and we welcome your input to make it even better. If you encounter any issues, have suggestions for improvements, or wish to contribute to the project, we encourage you to reach out.
Bug Reports and Suggestions
If you come across any bugs or have ideas for enhancements, don’t hesitate to share them on our Discord server or file an issue. Your feedback is valuable in helping us improve the platform.
Code Contributions to Easy Stable Diffusion
If you’re interested in contributing to the project, we’d love to hear from you. We particularly welcome help in the following areas:
- User Interface: Help us make our UI more intuitive and user-friendly.
- Engine: Contribute to improving the core engine that powers the AI image generation process.
- Installer: Assist in refining our installation process to make it even more seamless.
- Documentation: Help us enhance our documentation to provide clearer guidance to users.
To discuss your code contributions or any development-related topics, join us on our Discord server. This is where our development community gathers to discuss improvements, troubleshoot issues, and help users navigate the platform.
We’re excited to have you join the Stable Diffusion 2.5 community. Your contribution, no matter how small, can make a big difference in shaping the future of AI image generation.
READ: Disclaimer for Easy Stable Diffusion 2.5 Usage
While Stable Diffusion 2.5 is a powerful tool for AI image generation, it’s important to note that the authors of this project do not take responsibility for any content created using this interface. Users are solely responsible for the images they generate and how they choose to use them.
The license associated with this software prohibits the generation and dissemination of content that:
- Violates any laws.
- Causes harm to any individual or group of individuals.
- Spreads personal information with malicious intent.
- Promotes misinformation.
- Targets vulnerable groups.
These restrictions are put in place to ensure that Stable Diffusion 2.5 is used responsibly and ethically. For a comprehensive list of restrictions, we encourage users to read the full License associated with the software.
By using Stable Diffusion 2.5, you agree to abide by these terms. This helps maintain a safe, respectful, and creative community for all users.
Easy Stable Diffusion 2.5: Latest Updates and Features
(Most Recent Version – v2.5.41)
The team behind Stable Diffusion 2.5 is constantly at work to enhance the platform’s capabilities and user experience. The recent version 2.5.41 brings a host of exciting new features and bug fixes:
New Features
- CodeFormer: An alternative option for fixing faces and eyes in images.
- AMD Support for Linux: A welcome addition for AMD GPU users on Linux systems.
- Latent Upscaler: A new option for upscaling images.
- Sharing on Cloudflare: Share your Easy Diffusion instance using Cloudflare.
- Experimental Beta Channel: Enables support for cutting-edge features like LoRA, Textual Inversion embeddings, Tiled Images, additional samplers, and improved VRAM usage.
Easy Stable Diffusion Bug Fixes
Several bugs related to VRAM usage, multi-GPU rendering, and Latent Upscaler have been addressed. Improvements have also been made to the handling of black images, the VRAM usage of Latent Upscaling, and the functioning of CodeFormer.
Community Contributions
A number of enhancements have been implemented thanks to contributions from our community. These include the ability to share an Easy Diffusion instance via Cloudflare, download options for tiled images, drag functionality for zoomed-in images, and a range of UI tweaks and bug fixes.
We encourage users to update to the latest version to take advantage of these improvements. If you have any issues or suggestions, or if you’d like to contribute to the project, feel free to reach out on our Discord server.
As always, our primary goal is to make AI image generation more accessible, efficient, and exciting. We look forward to your continued support and feedback. More Release info is available here.
Pro Tips for Using Easy Stable Diffusion GUI 2.5 Locally on your Device
To help you get the most out of Stable Diffusion 2.5, here are a few tips and tricks to enhance your AI image generation experience:
Leverage the Task Queue: You can line up multiple jobs in the Task Queue, and Stable Diffusion 2.5 will process them one after another. There’s no need to wait for one job to finish before starting the next. This feature is great for times when you have a burst of inspiration and want to experiment with multiple ideas.
Batch Rendering: If you have many prompts you want to render, you can enter them all at once. Just input one prompt per line in the text box, and when you click ‘Make Image’, Stable Diffusion 2.5 will create a job for each prompt.
Face Correction and Upscaling: To refine your generated images, consider using the Face Correction or Upscaling features. These can help to enhance the quality and resolution of your images.

Sequential Refinement: If you want to refine a generated image further, simply click ‘Use as Input’ on the image. This will use the image as the base for your next generation task. It’s an easy way to iteratively improve your creations.
Aspect Ratio Considerations: When generating images, consider the aspect ratio of your input images. Images that match the aspect ratio of your generated images (e.g., 1:1 for 512×512 images) tend to yield the best results.
Remember, Stable Diffusion 2.5 is a tool for creativity, so feel free to experiment and explore its capabilities. Happy creating!
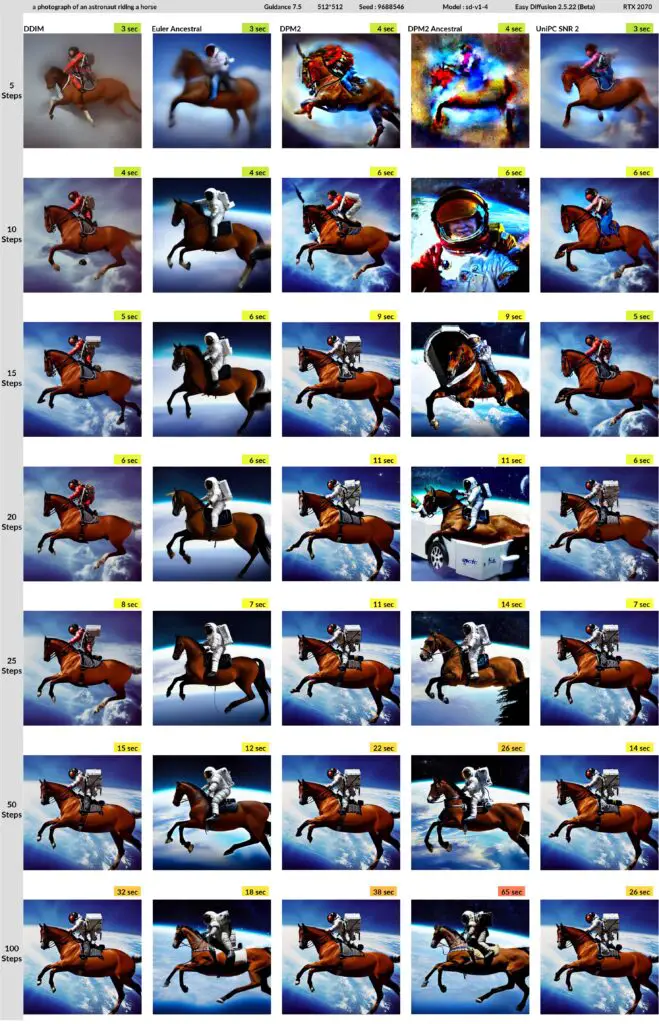
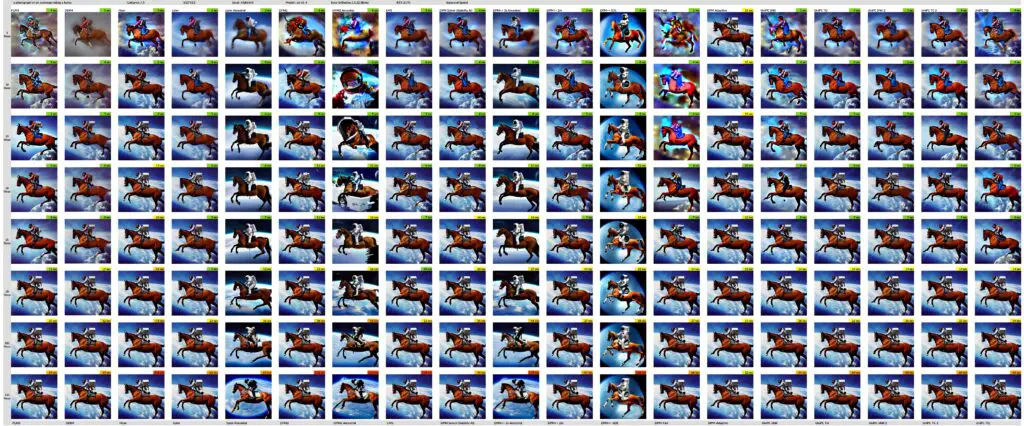
Understanding Image Samplers in Easy Stable Diffusion 2.5
Samplers play a crucial role in the AI image generation process. They control how the AI explores the possibilities of the image space, leading to variations in the output. Here’s a quick overview of how the samplers function in Stable Diffusion:
Stable Diffusion (SD) Samplers
Stable Diffusion (SD) samplers are the primary samplers used in Stable Diffusion 2.5. A key characteristic of these samplers is their deterministic behavior. That means if you use the same seed and settings and rerun the generation process, you will get the same image. This is because the random elements in the process are controlled by the seed, which ensures a consistent outcome each time.
In addition to the deterministic property, you also have the option to increase the step size in Stable Diffusion samplers. Adjusting the step size can sometimes help clear up artifacts in the generated image. However, it’s important to note that changing the step size may also slightly alter the resulting image.
Understanding the role of samplers can help you gain more control over the AI image generation process. It allows you to experiment with different settings and seeds to create a diverse range of AI images.
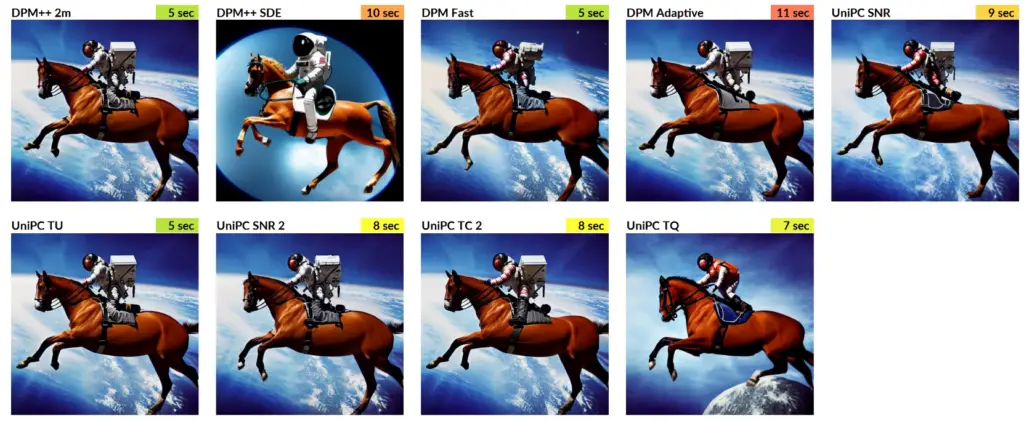
Considerations for Certain Samplers in Easy Stable Diffusion 2.5
While many samplers in Stable Diffusion 2.5 are deterministic, there are some exceptions that users should be aware of:
Ancestral Sampler: This sampler may produce different images when run with different batch sizes. This is because it uses a stochastic process that is sensitive to the number of samples processed simultaneously.
Euler_a, dpm2_a, and dpmpp_2s_a: Similar to the Ancestral sampler, these samplers can also generate different images when run with varying batch sizes. This is due to the inherent randomness introduced during the sampling process.
Dpm_adaptive: This sampler employs an automatic step count algorithm. As a result, it ignores the user’s Inference Steps setting and determines the number of steps based on its own internal logic.
It’s important to understand these characteristics when using these specific samplers, as they can influence the outcome of your AI image generation tasks. Remember, part of the beauty of AI image generation is the element of surprise and discovery that comes with each new image!
Troubleshooting Tips for Easy Stable Diffusion 2.5
Even with the most user-friendly tools, users may occasionally encounter hiccups. If you run into issues while using Stable Diffusion 2.5, here are some steps to help resolve them:
Troubleshooting Common Issues with Easy Stable Diffusion Local Version
While Stable Diffusion 2.5 is designed to be user-friendly, you may occasionally run into issues. Here are some common problems you might encounter, along with suggested solutions:
- RuntimeError: CUDA out of memory: If your PC has less than 6GB of GPU RAM, you might run into this error. Try setting a lower “VRAM Usage Level” in the “Settings” tab and generate smaller sized images.
- urllib.error.URLError: : This error might occur if a Firewall, Antivirus, Proxy, or VPN is blocking your network connections. You can try switching to Google’s DNS server or Cloudflare’s DNS server.
- RuntimeError: Error(s) in loading state_dict for UNet: This error usually occurs when you try to use the v1.5 inpainting model, which isn’t compatible with this version of Stable Diffusion.
- ‘conda-unpack’ is not recognized as an internal or external command: If you encounter this error, try copying the stable-diffusion-ui folder from inside the zip file and paste it in the target drive.
- ImportError libSM.so.6 cannot open shared object file No such file or directory: On Linux, you can fix this error by running
apt install libsm6 libxext6 libxrender-dev -y. - basicsr module not found: If you’re on Windows, download and extract basicsr, placing the basicsr folder inside the stable-diffusion-ui\stable-diffusion\env\lib\site-packages folder. If you’re on Linux, please ask for help on the discord server.
- Could not load the Qt platform plugin “xcb”: On Linux, run
export QT_QPA_PLATFORM=offscreenbefore runningstart.sh. - ImportError: DLL load failed while importing cv2: The specified module could not be found.: If you’re running Windows 10 N or Windows 10 KN, you’ll need the Microsoft Media Feature Pack to run Stable Diffusion.
- Killed uvicorn server:app –app-dir … –port 9000 –host 0.0.0.0: This error occurs if your PC ran out of RAM. Stable Diffusion requires a lot of RAM and needs at least 10 GB to work well. Try closing all other applications before running Stable Diffusion UI.
If these solutions don’t work, or if you encounter a different issue, don’t hesitate to ask for help on the Discord server or file an issue.
- Common Troubleshooting Steps: Start by checking the common troubleshooting guide provided with the software. This guide offers solutions for the most frequently encountered problems.
- Ask on Discord: If the common troubleshooting steps don’t resolve the issue, consider reaching out to the Stable Diffusion 2.5 community on Discord. Many members have extensive experience with the platform and may be able to offer advice or solutions.
- File an Issue: If all else fails, or if you think you’ve encountered a bug or an error in the software, please file an issue. When you do this, make sure to include as much detail as possible about the problem you’re experiencing. This will help the development team identify and fix the issue more efficiently.
Remember, encountering problems is a normal part of working with complex tools like Stable Diffusion 2.5. Don’t get discouraged; with a little patience and troubleshooting, you’ll be back to creating AI art in no time!
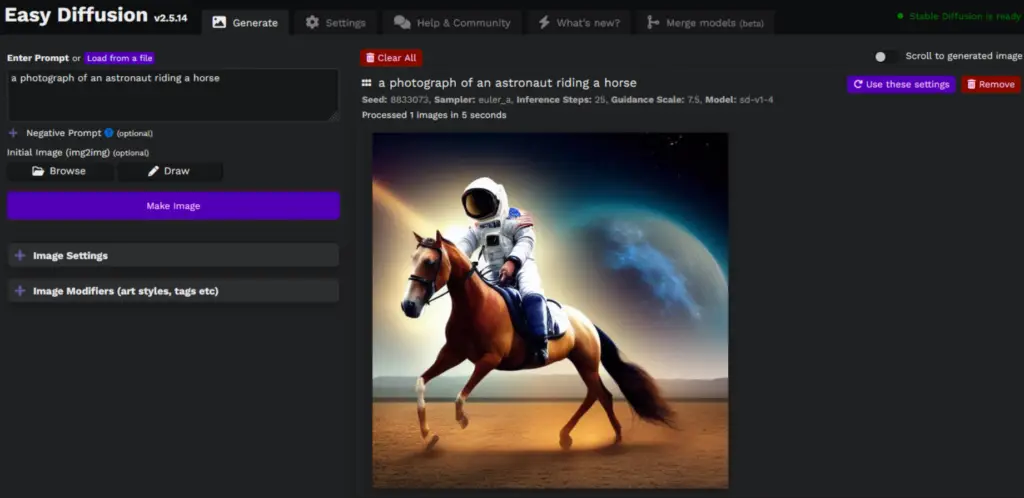
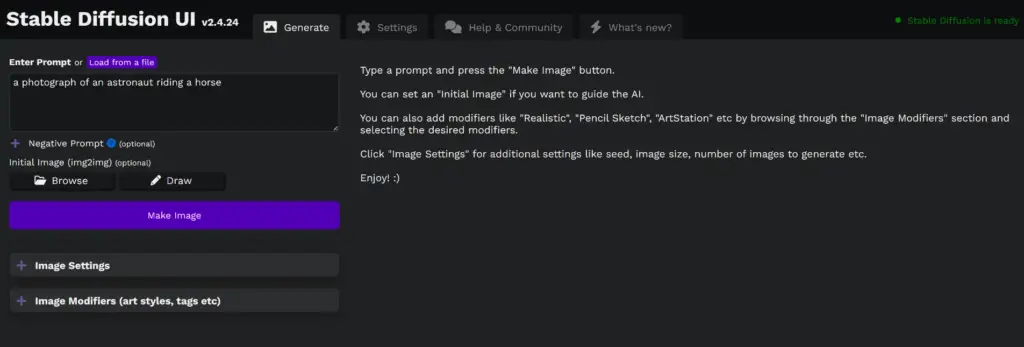
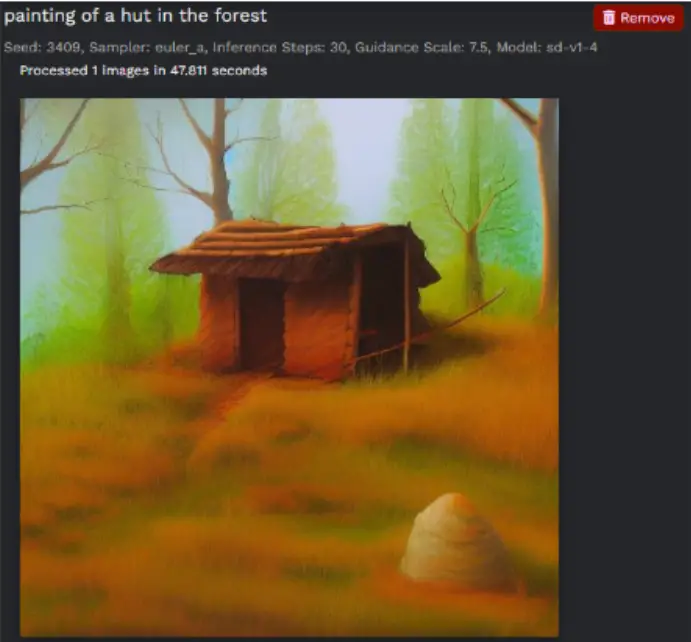
Easy Diffusion UI Overview | Prompt and Base Image
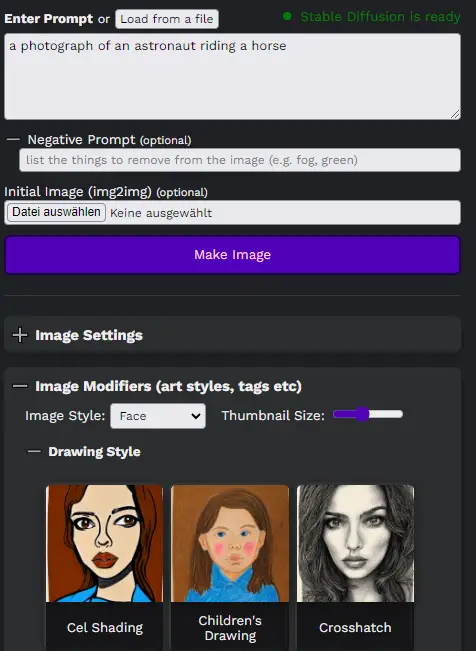
In the next few paragraphs, we will show you how to use a local version of Easy Stable Diffusion through its GUI. Below is an image of an interface:
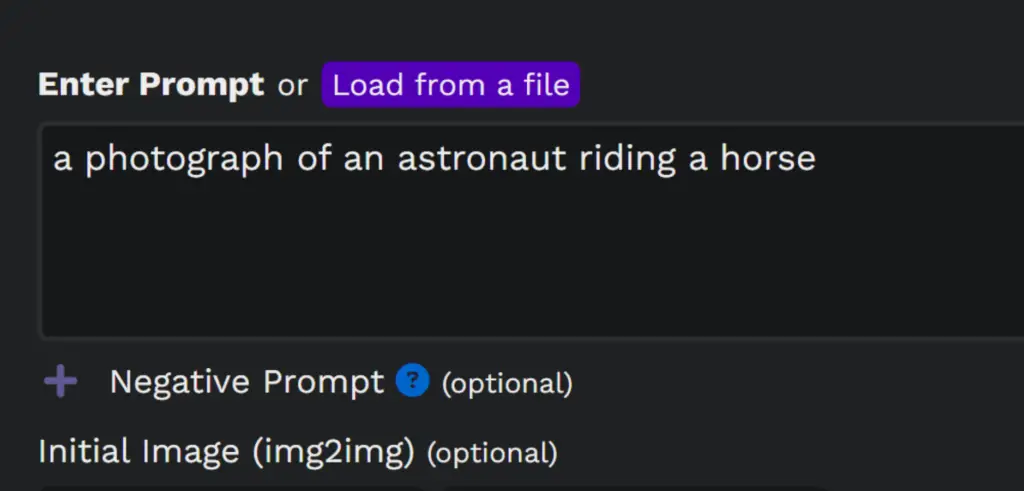
Input Options in Easy Stable Diffusion 2.5
Easy Stable Diffusion 2.5 provides a variety of input options to guide the generation of AI images. Here’s what each option does:
Prompt: This is a text input where you describe the image you want Stable Diffusion to generate. For instance, if you input “a sunset over the ocean,” the AI will attempt to generate an image that matches this description.
Load from a file: This option allows you to load prompts from a .txt file, with one prompt per line. This can be helpful if you want to generate a series of images based on multiple prompts.
Negative Prompt: This is another text input, but instead of guiding the AI towards a certain image, it tells the AI what to avoid. For instance, if you input “rain” as a negative prompt while your main prompt is “a sunny day at the beach,” the AI will attempt to avoid including elements of rain in the image.
Initial Image: With this option, you can provide an existing image for Stable Diffusion to use as a starting point. The AI will then attempt to generate an image that blends elements of your prompt with the initial image.
These input options allow you to have more control over the images that Stable Diffusion generates, enabling you to experiment with a wide range of artistic ideas.
Image Settings in Easy Stable Diffusion 2.5
Exploring Image Generation Options in Stable Diffusion 2.5
Stable Diffusion 2.5 provides a variety of settings to control the image generation process. Here’s what each setting does:
- Seed: This is a number used to initialize the random number generator for image creation. Changing the seed will result in a different image, even with the same prompt.
- Number of Images:
- (total): This setting specifies the total number of images to be generated.
- (in parallel): This setting determines how many images should be generated simultaneously.
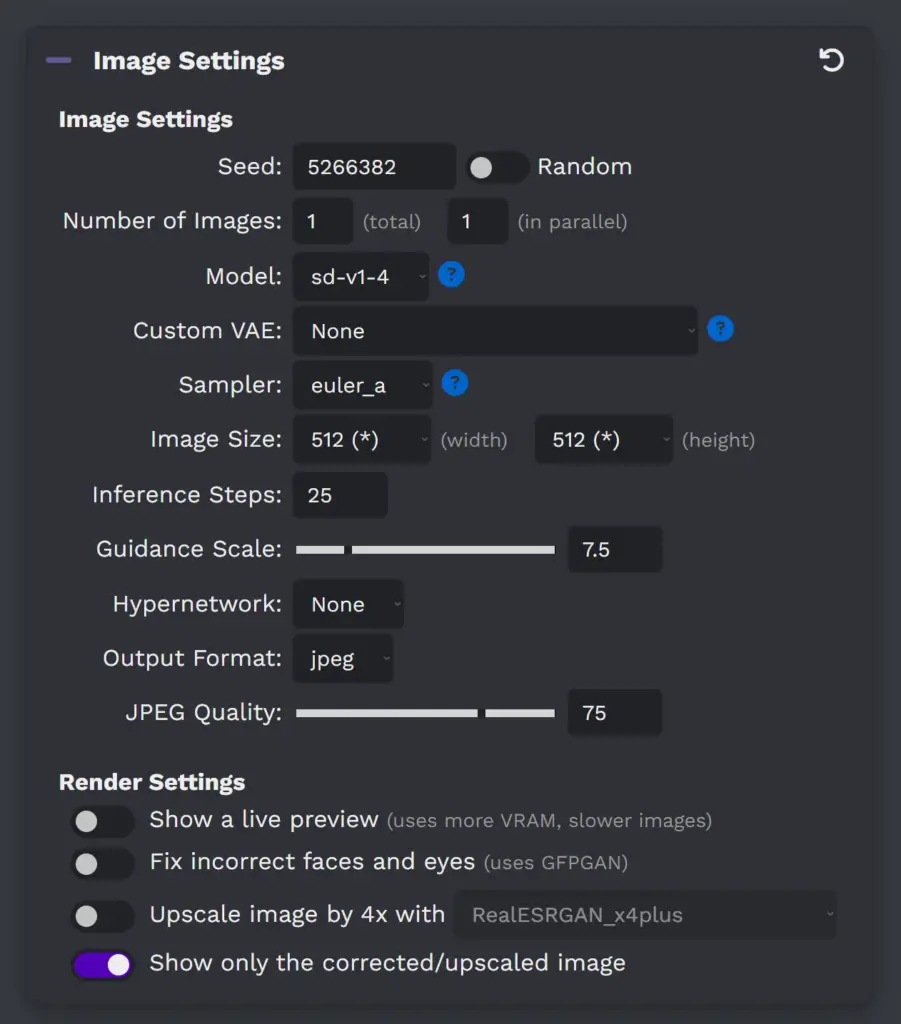
Model: This is where you select the pre-trained model to use for generating your image. Different models might interpret the same prompt differently.
Custom VAE: A Variational Auto Encoder (VAE) is a type of machine learning model. If you have a custom VAE, you can select it here.
Image Size: This allows you to choose the resolution of the generated image.
Inference Steps: This is the number of iterations Stable Diffusion will make while generating your image. More steps could potentially result in more detailed images, but will also take longer.
Guidance Scale: This controls how closely the generated image should follow the prompt. A higher value will make the image adhere more strictly to the prompt.
Output Format: Here, you can choose whether the final image should be saved in JPEG or PNG format.
These options provide a powerful set of tools for controlling how Stable Diffusion 2.5 generates images, allowing you to create a wide variety of AI art.
Customizing Render Settings in Stable Diffusion 2.5
Stable Diffusion 2.5 offers several render settings to enhance the quality and user experience of image generation. Here’s what each setting does:
Show a live preview: This option, if enabled, displays a real-time preview of the image as it’s being generated. If it’s turned off, the image will only be displayed once it’s fully rendered. This setting is off by default to conserve computational resources.
Fix incorrect faces and eyes: When checked, this feature utilizes GFPGAN, a face restoration algorithm, to correct any anomalies in faces and eyes that may occur during the AI image generation process.
Upscale image by 4x: This feature uses RealESRGAN to enhance the final image’s resolution to four times its original size. For instance, an image initially set to be 512×512 pixels would be upscaled to 2048×2048 pixels.
- RealESRGAN_x4plus is a general-purpose upscaling model suitable for a variety of images.
- RealESRGAN_x4plus_anime_6B is an upscaling model specifically optimized for anime-style images.
These render settings allow you to enhance the appearance of your AI-generated images and improve your experience with Stable Diffusion 2.5.
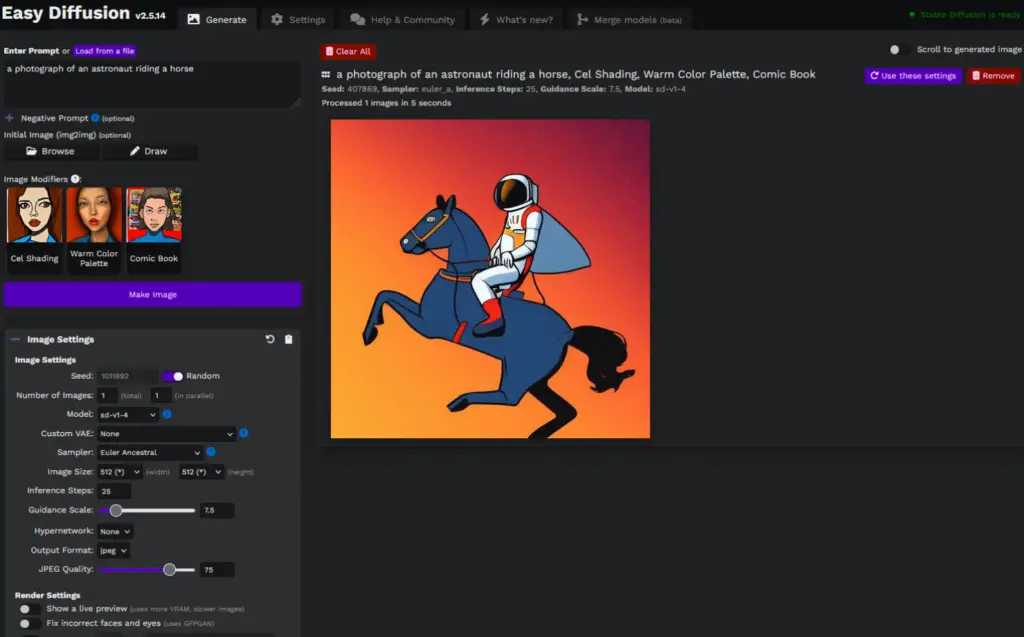
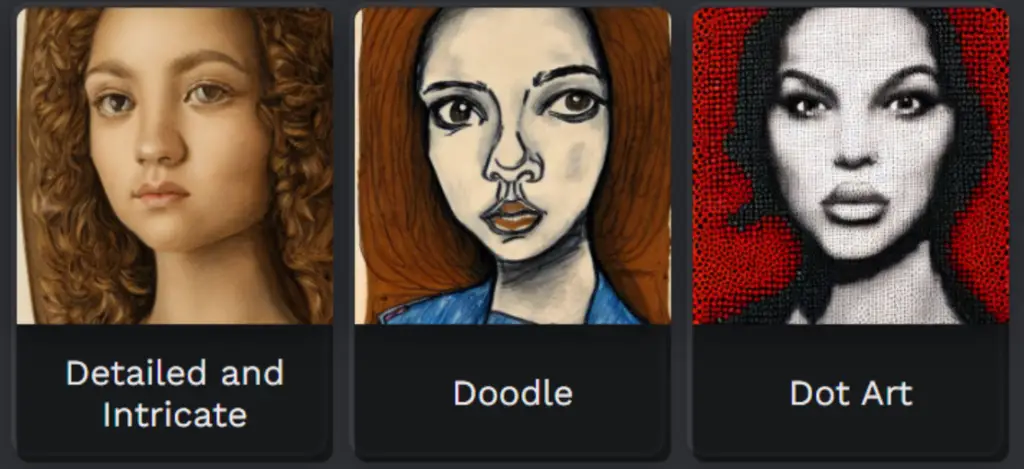
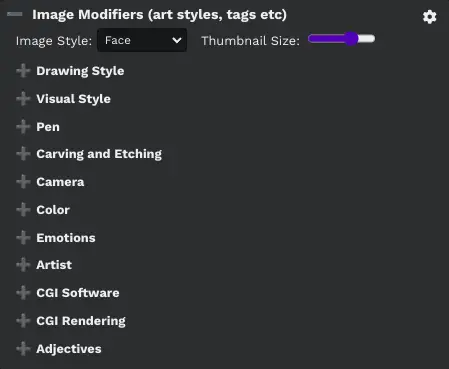
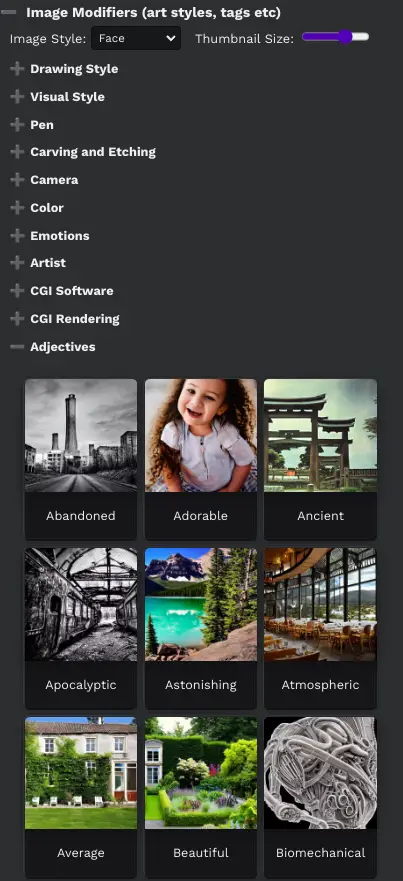
Image Modifiers in Local Easy Stable Diffusion GUI
How to Customize Image Modifiers in Stable Diffusion Locally?
GUI of Easy Stable Diffusion 2.5 provides various options for customizing image modifiers to better suit your creative needs. Here’s what each setting does:
Cogwheel Icon: This icon leads to a settings menu where you can define custom image modifiers, adding a personal touch to your AI-generated images.
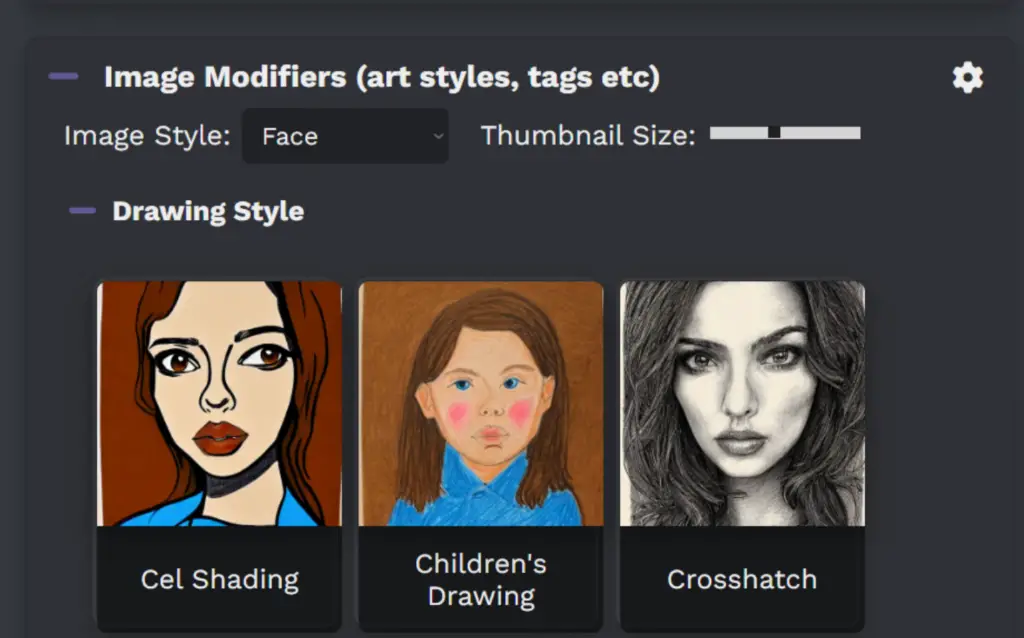
Image Style: This setting changes the visual representation of the predefined modifiers. The icons that correspond to the modifiers will reflect the chosen style.
Face: If this option is selected, the icons for the modifiers will display faces, giving you a quick visual indication of the effect each modifier might have on human-like subjects in your images.
Landscapes: If this option is selected, the icons for the modifiers will display landscapes, providing a visual preview of how each modifier might affect landscape elements in your images.
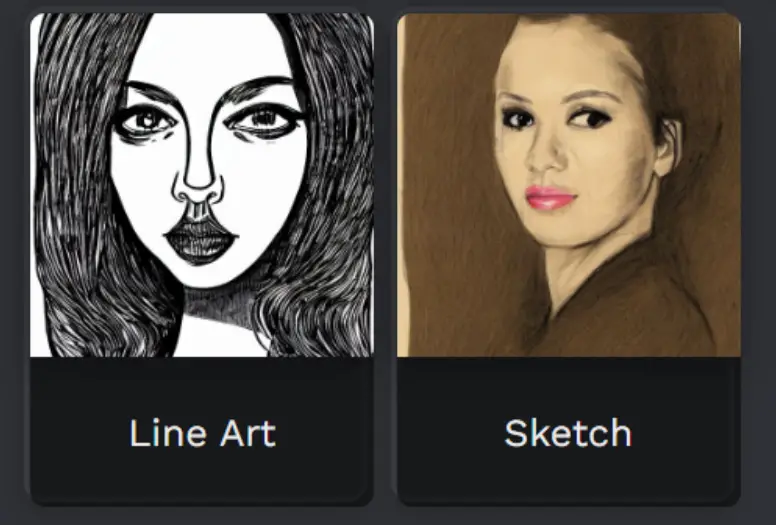
Thumbnail Size: This slider adjusts the size of the clickable modifier icons. You can increase or decrease the size based on your visual preference and screen space.
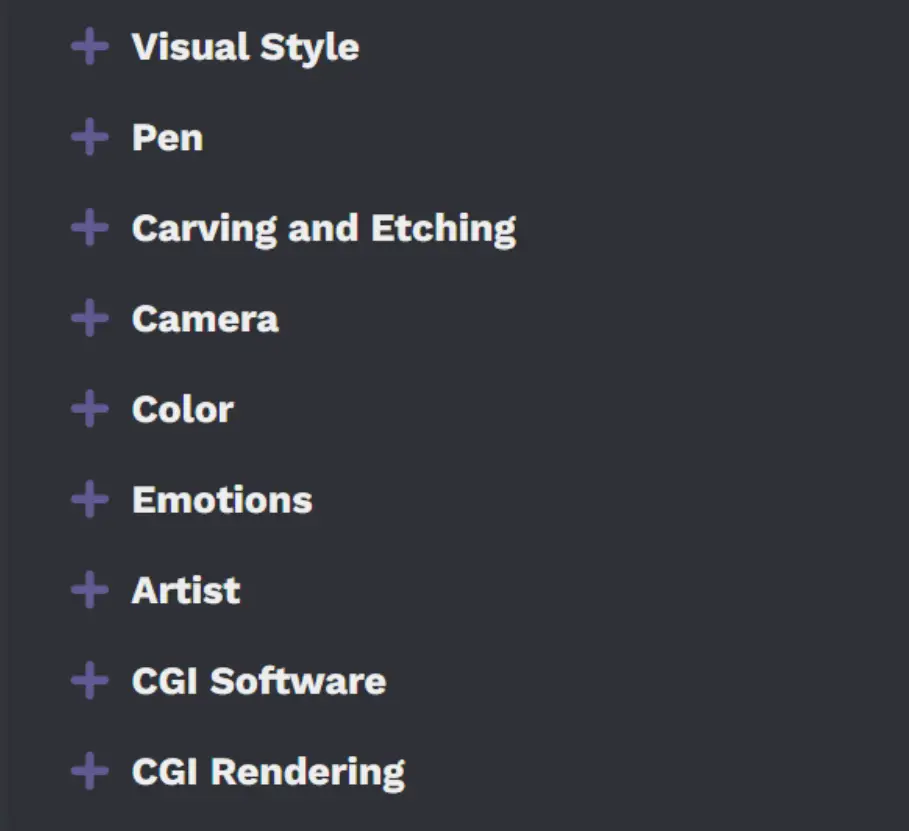
These customization options allow you to personalize the image generation process in Easy Stable Diffusion 2.5, making the platform even more flexible and enjoyable to use.
Adjusting Settings in Easy Stable Diffusion GUI
Stable Diffusion 2.5 provides an array of settings to customize your user experience and optimize the performance of the platform. Here’s a rundown of what each setting does:
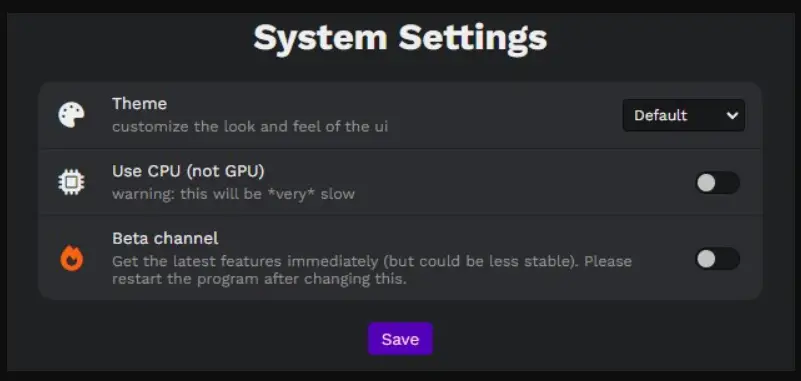
Theme: This setting allows you to choose a color theme for the user interface, offering a personalized visual experience.
Auto-Save Images: If enabled, this feature automatically saves generated images and a .txt file containing the corresponding settings to your designated location.
Save Location: This setting lets you choose the folder where your generated images will be stored.
Enable Sound: If this setting is on, a sound will play upon the completion of a task.
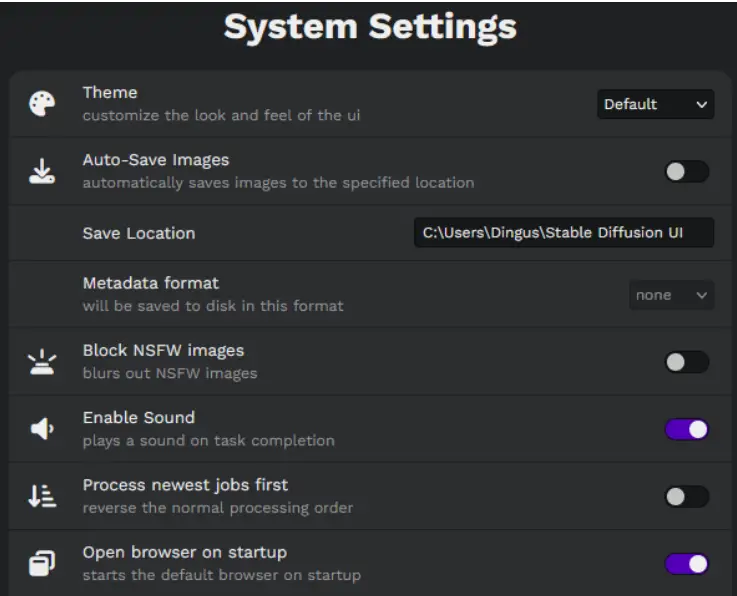
Open browser on startup: When this setting is enabled, your default browser will automatically open upon startup, with http://localhost:9000/ as the URL.
VRAM Usage Level: This setting, with options for Low, Balanced, and High, allows you to adjust the balance between image generation speed and GPU memory usage.
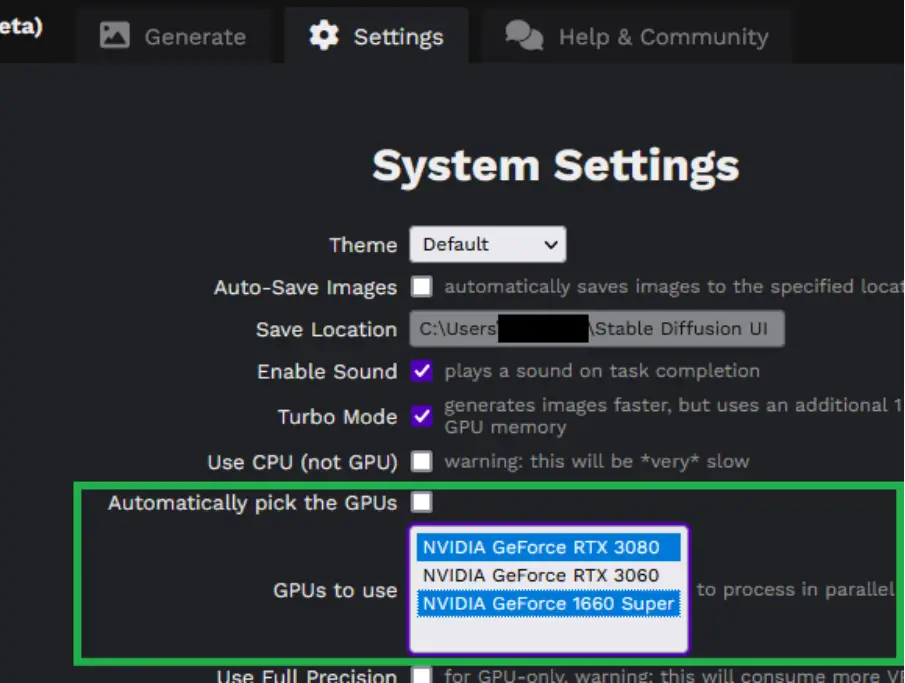
Use CPU (not GPU): This setting forces the program to use CPU rendering. It is significantly slower than rendering with GTX/RTX graphics cards but can be useful if a compatible GPU is not available.
Automatically pick the GPUs (experimental): If enabled, this setting automatically selects a GPU for image rendering.
GPUs to use: This setting displays a list of available GPUs, including their CUDA-ID, for you to choose from.
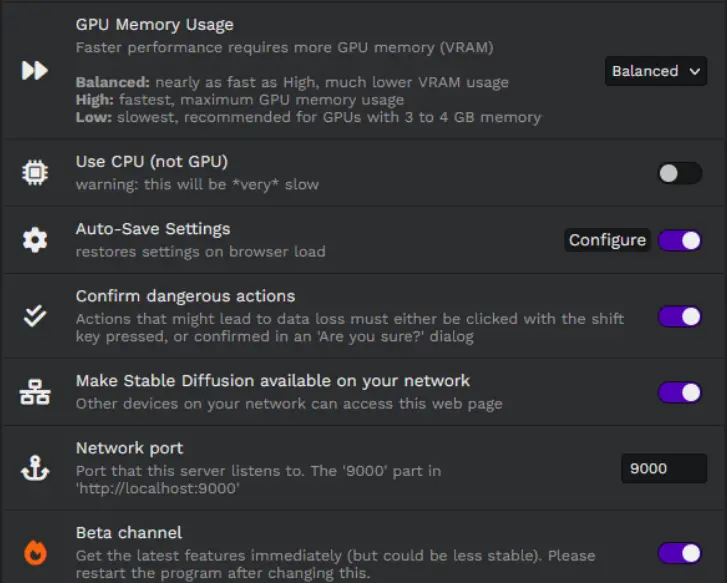
Use Full Precision: This setting increases GPU memory usage but is necessary for NVIDIA GTX 1650/1660.
Auto-Save Settings: This feature restores your settings each time the browser loads, ensuring a consistent user experience.
Configure: This button opens a menu where you can choose which settings to store.
Beta Channel: If enabled, you’ll receive the latest features immediately, although this may result in decreased stability. A program restart is necessary after changing this setting.
These settings allow you to tailor the Easy Stable Diffusion GUI platform to your specific needs, optimizing both your creative process and the performance of the tool.
Interacting with Rendered Images in Easy Stable Diffusion 2.5
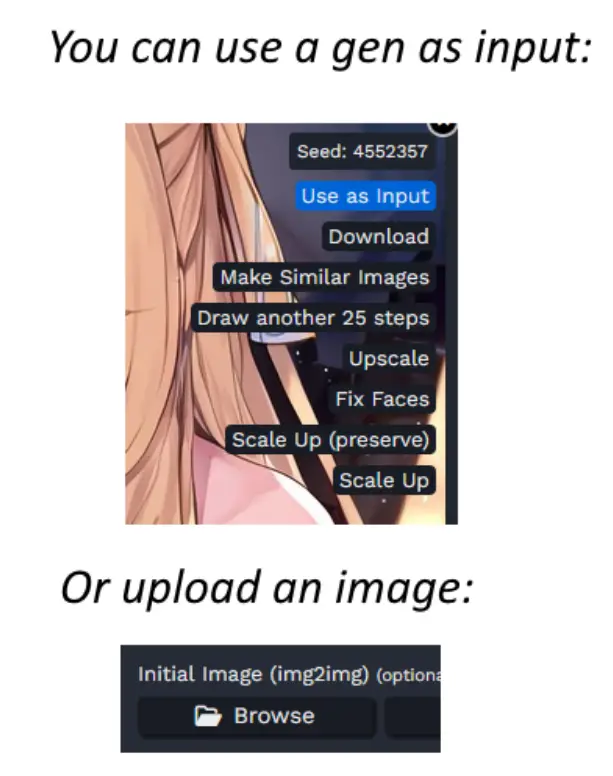
Stable Diffusion 2.5 offers several ways to interact with your rendered images. When you hover your mouse over a rendered image, a selection of options appears. Here’s what each button does:
- Seed: Displays the seed used to generate this specific image.
- Use as Input: This option uses the selected image as the input for the ‘img2img’ function, allowing you to use the generated image as a starting point for further modifications.
- Download: Allows you to download the generated image.
- Make Similar Images: This option generates five images similar to the selected one by enqueuing a task using the image for the ‘img2img’ function.
- Draw another 25 steps: Enqueues a task using the settings of the selected image and increases the Inference Step Count by 25, refining the image further.
- Upscale: Rerenders the image with 4x Upscaling enabled. This option is visible if the image hasn’t been upscaled already.
- Fix Faces: Fixes incorrect faces and eyes in the image using the GFPGAN algorithm.
NSFW Filter: To prevent NSFW images from being displayed, you can enable the ‘Blur NSFW’ option in the Settings tab. This feature blurs images that the system identifies as NSFW, allowing you to maintain a safe and comfortable working environment.
Writing prompts for Easy Stable Diffusion GUI
Stable Diffusion 2.5: Prompt Writing Basics
When using Stable Diffusion 2.5, the key to effective prompt writing is brevity and separation. Rather than full sentences, use short, concise phrases separated by commas to describe the different elements of your desired image. For instance:
"girl on a swing, green grass, pink trousers"
Stable Diffusion considers only the first 75 “tokens” in a prompt. A token can be a whole word or even a digit in a number. For example, “1920s” would count as 5 tokens.
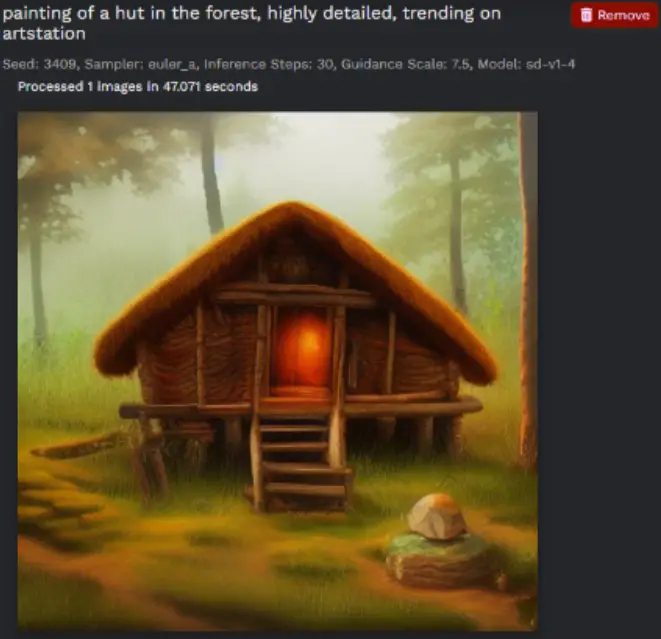
Leveraging the way Stable Diffusion has been trained, certain phrases can enhance the quality of your generated images. Including terms like “highly detailed” or “trending on ArtStation” can often yield more refined results. So, experiment with your prompts and let your creativity shine through Stable Diffusion 2.5!
Artistic Influence in Easy Stable Diffusion 2.5
Stable Diffusion 2.5 offers a unique feature that allows you to incorporate the styles of various artists, art movements, or even computer programs into your AI-generated images. By simply incorporating the names of these influences into your prompts, you can guide the AI to produce images that mimic specific aesthetics or techniques.
Moreover, Easy Stable Diffusion 2.5 provides a comprehensive selection of Image Modifiers. These are essentially built-in style options that can be applied to your image generation. They can help you quickly experiment with different artistic styles and effects, further enhancing the versatility of your AI-powered image generation. Explore the Image Modifiers section to discover the vast range of visual possibilities at your fingertips.
Leveraging Modifiers with Easy Stable Diffusion Prompts
With Stable Diffusion 2.5, you’re not limited to using the Image Modifiers section to experiment with different styles. You can integrate these modifiers directly into your text prompts.
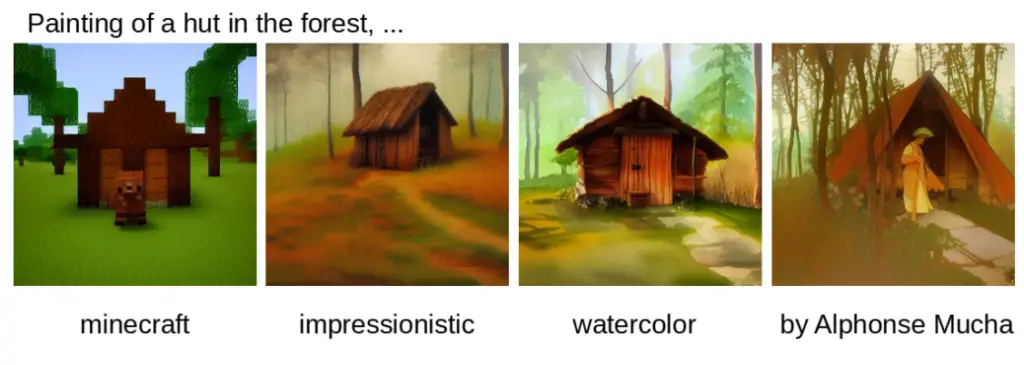
This approach allows you to quickly generate numerous variations of your AI image with diverse artistic influences. By simply inserting different style modifiers into your prompt, you can guide Stable Diffusion 2.5 to render a myriad of unique image interpretations.
This feature underscores the flexibility and creative possibilities offered by Stable Diffusion 2.5.
Highlighting Key Elements in Stable Diffusion Prompts
In Stable Diffusion 2.5, you can strategically emphasize certain aspects of your prompt by assigning them numerical weights. This feature provides a means to convey the relative importance of different elements in your image generation.
For example, with the prompt “girl on a swing:1.2 green grass:1.0 pink trousers:0.8”, the AI places greater emphasis on the “girl on a swing” (weight 1.2), followed by “green grass” (weight 1.0), and then “pink trousers” (weight 0.8).

These weights serve as separators in the prompt, meaning that you don’t need to follow them with a comma. However, they must be followed by a space. If a comma or bracket is used after a weight, Easy Stable Diffusion will issue a warning to notify you of the potential error. This feature allows you to fine-tune your AI image generation, prioritizing certain components according to your creative vision.
Exploring Variations of Prompts for Easy Stable Diffusion
Stable Diffusion 2.5 provides easy-to-use syntax for exploring various prompt combinations, allowing for a broad range of creative possibilities.
You can use curly brackets ({}) to test different words within the same context. For example, the prompt “man riding a {horse, motorcycle}” will generate two separate rendering tasks: one for “man riding a horse” and another for “man riding a motorcycle”.
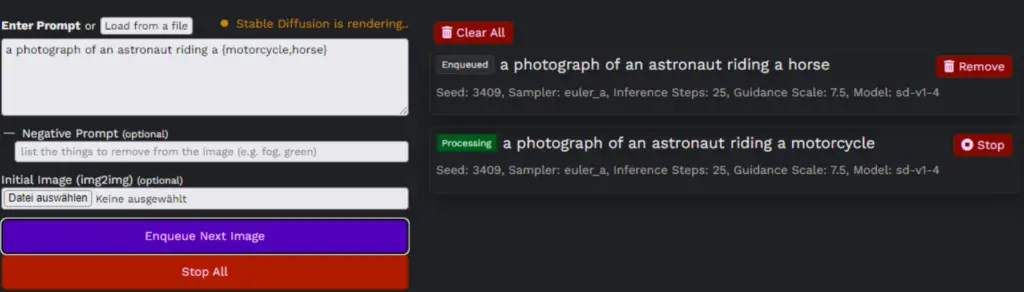
Furthermore, Stable Diffusion 2.5 offers a ‘Prompt Matrix’ feature. By separating parts of your prompt with the “|” character, you can generate multiple combinations automatically. The prompt “girl holding a rose | illustration | cinematic lighting” will result in four tasks:
“girl holding a rose”
“girl holding a rose, illustration”

“girl holding a rose, cinematic lighting”

“girl holding a rose, illustration, cinematic lighting”

This feature allows for quick exploration of stylistic variations, enhancing your creative process with AI image generation.
How to use Negative Prompts in Easy Stable Diffusion GUI
Easy Stable Diffusion 2.5 offers the ability to use negative prompts – descriptions of what you don’t want in your generated image. This can be a powerful tool to guide the AI and prevent undesirable elements from appearing in your final output.
For instance, if you input “shoes” as a negative prompt, the AI might generate an image with a barefoot person or an image where the feet are out of frame, effectively excluding shoes from the final image.
However, it’s worth noting that the AI sometimes ignores parts of the negative prompt, especially if the prompt and negative prompt contain very similar terms. Therefore, the impact of negative prompts can be variable, but in some cases, they significantly influence the composition of the image.
A useful negative prompt could be:
“Deformed, blurry, bad anatomy, disfigured, poorly drawn face, mutation, mutated, extra limb, ugly, poorly drawn hands, missing limb, blurry, floating limbs, disconnected limbs, malformed hands, blur, out of focus, long neck, long body, mutated hands and fingers, out of frame”
By utilizing these prompts, you can better steer the AI towards generating the image you envision.
Guide to Image Inpainting with Easy Stable Diffusion AI
Let’s start with an image to inpaint. There are two primary methods to achieve this:
- You can use a generated image as input. This is often done by generating an image using a specific text prompt, and then using that image for further modifications.
- Or, you can upload an image of your choice to serve as the basis for your modifications.
Regardless of your chosen method, your initial image will appear under your prompt.
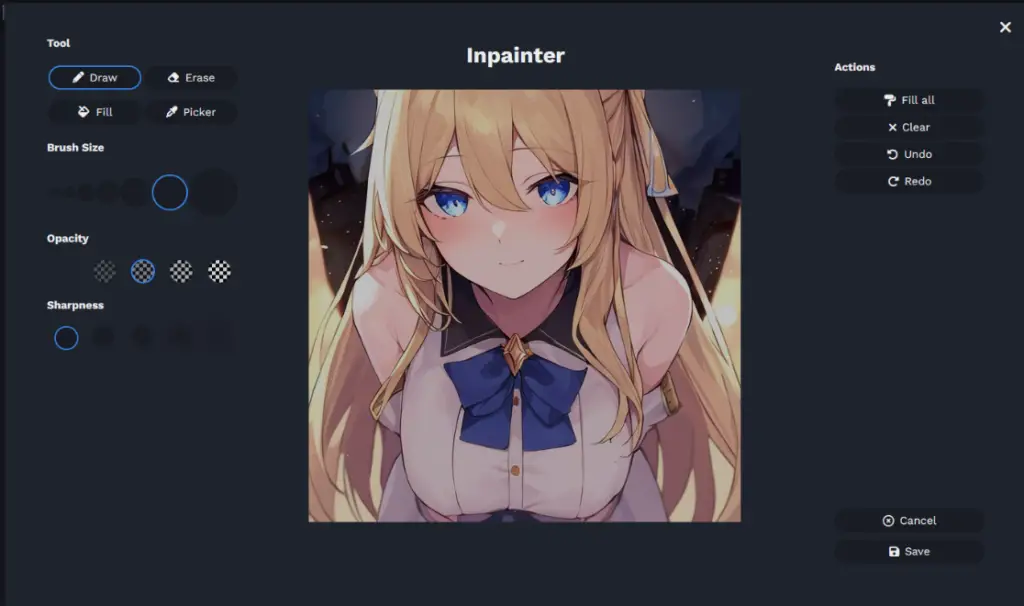
How to Use the Inpainting Feature with Easy Stable Diffusion
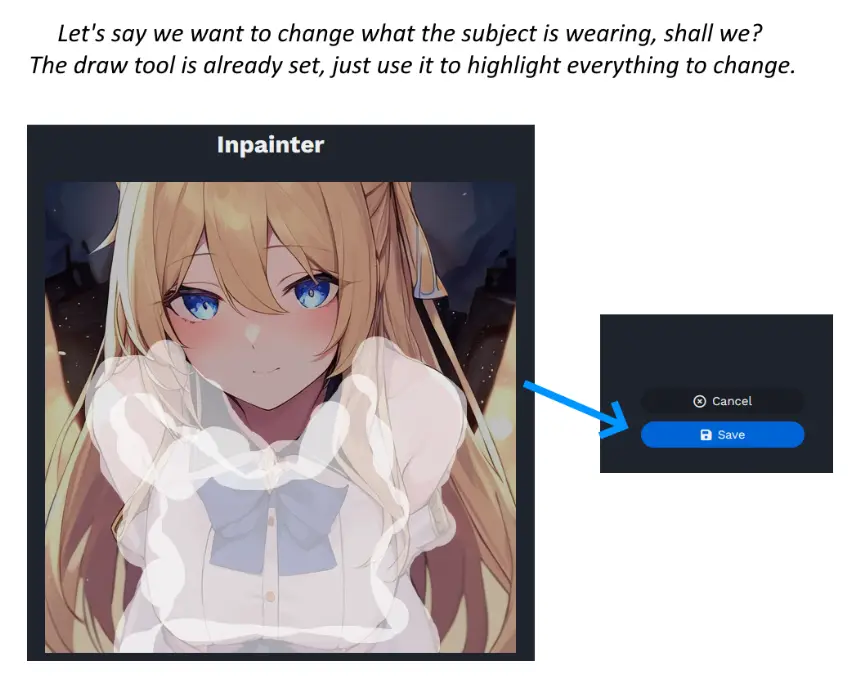
First, select the ‘Inpaint’ option. This will open a new interface that allows you to draw on your image. Let’s say we want to change what the subject is wearing. The draw tool is already set. Just use it to highlight everything you want to change.

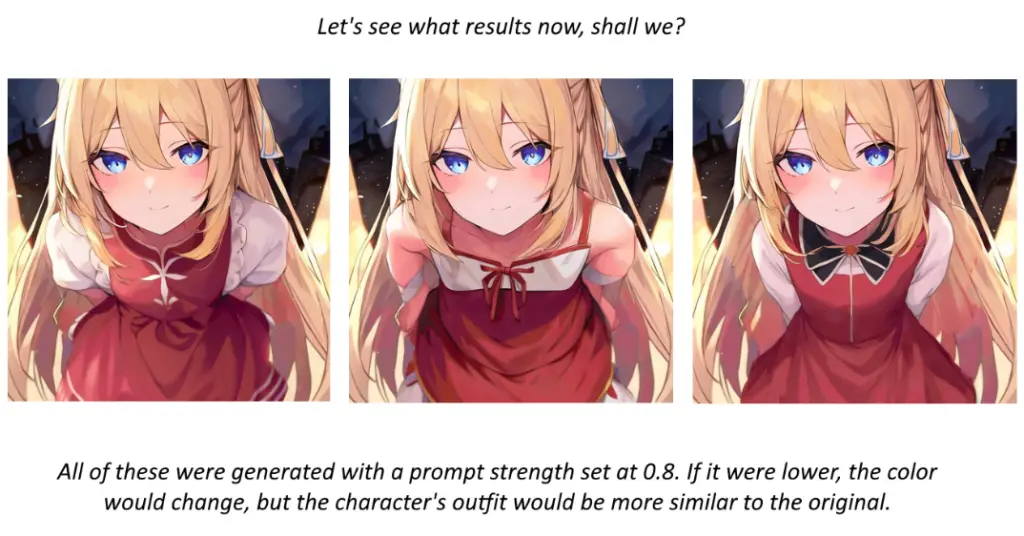
When you added an image-to-image (img2img) input, a new option called ‘Prompt Strength’ appeared in the settings. The higher this is set, the more the result will stray from the original image. A lower number will stick closer to the original input.
You can, but do not have to, change your text prompt as well. I find it helpful to write what we want at the beginning of our prompt, without deleting the rest of the prompt afterwards.
Adding Color with Easy Stable Diffusion
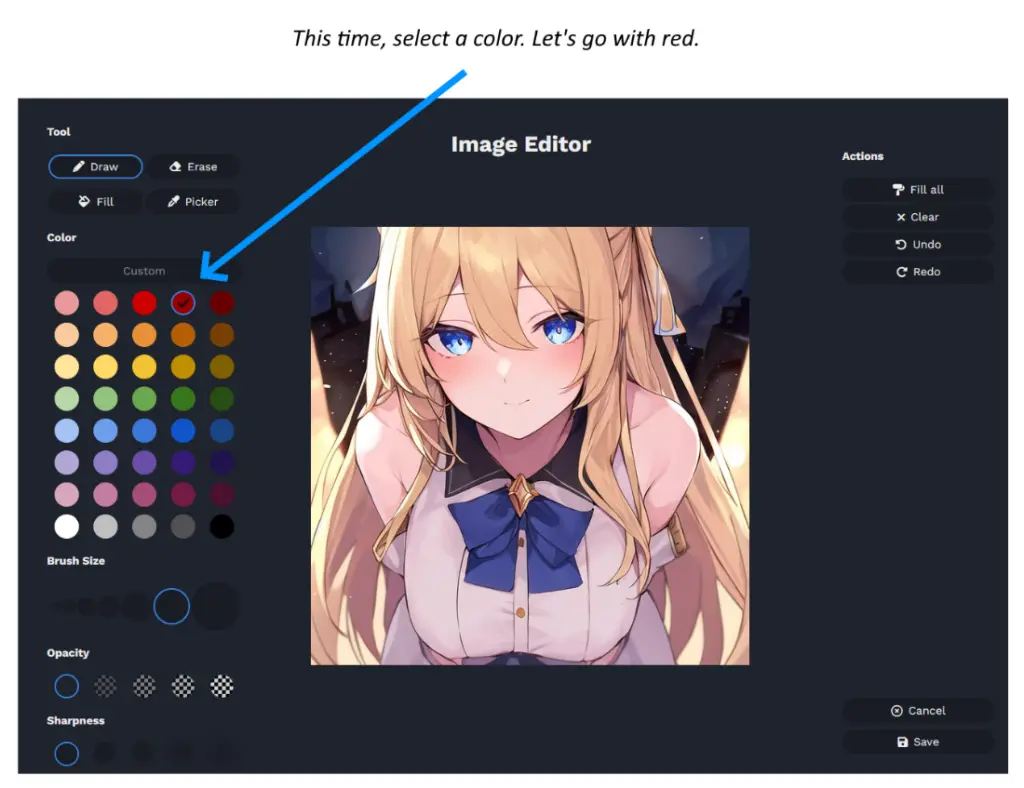
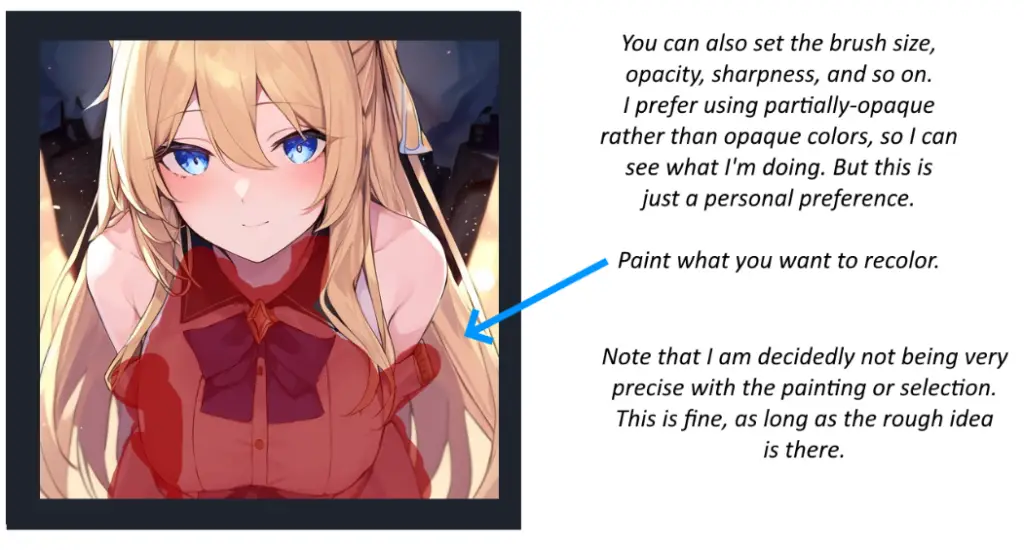
To add color, select the ‘Draw’ button again. This time, select a color. For this example, let’s go with red. You can also set the brush size, opacity, sharpness, and so on. I prefer using partially-opaque rather than opaque colors, so I can see what I’m doing. But this is just a personal preference.
Paint what you want to recolor. Note that I am decidedly not being very precise with the painting or selection. This is fine, as long as the rough idea is there.
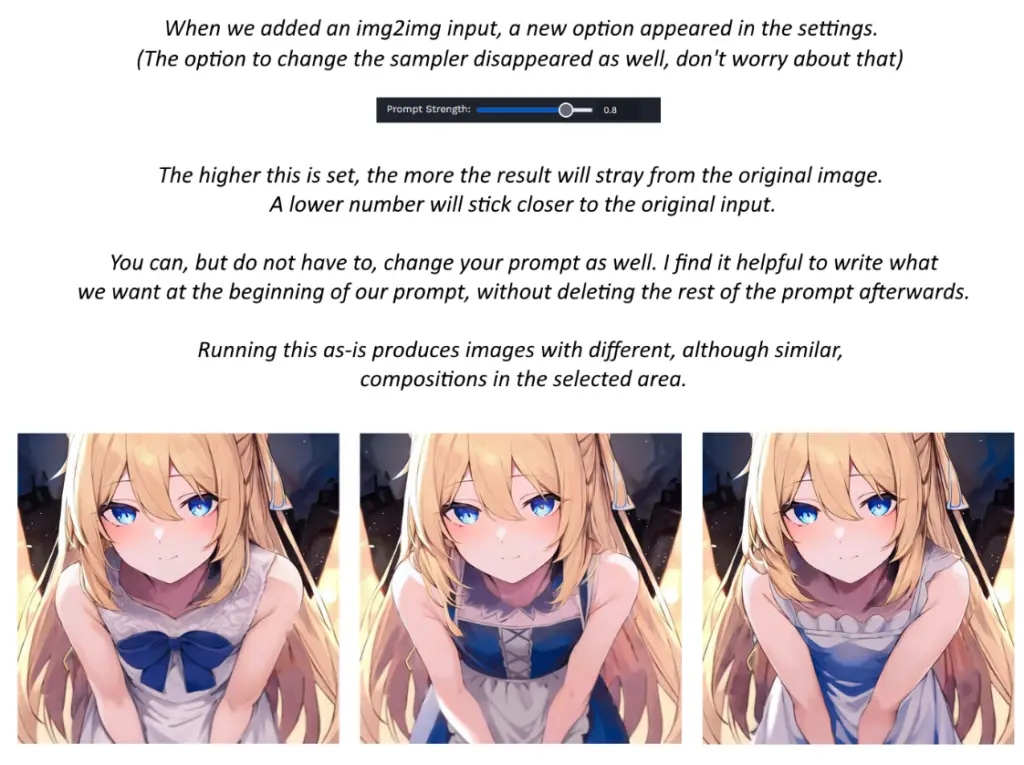
Let’s see what results now, shall we? All of these were generated with a prompt strength set at 0.8. If it were lower, the color would change, but the character’s outfit would be more similar to the original.

And there you have it! That’s the basics of inpainting with AI.
Inpainting is indeed a feature of stable diffusion that allows for selective modification of an initial image, while preserving the rest of the image. The process of inpainting involves highlighting or selecting a specific area of the image that you wish to modify, and then instructing the AI on how to fill or “paint in” that area based on a given prompt.
The resulting image retains the unselected portions of the original image while incorporating the AI’s interpretation of the prompt in the selected areas. This is particularly useful for tasks such as object removal, object alteration, or the addition of new elements into an existing image. The creative possibilities with inpainting are vast, as it essentially provides a tool for interactive, AI-assisted image editing.
Happy creating!
Run Easy Diffusion Locally on Multiple GPUs
Support for multiple GPUs is an experimental feature that can significantly enhance the performance of stable diffusion. If your system has multiple GPUs, the stable diffusion process can distribute the computational load across these GPUs, thereby accelerating the image generation process.
This feature is particularly beneficial for high-resolution image generation or when running multiple tasks in parallel, as it can help reduce the time required to complete these computationally intensive tasks. However, as this feature is experimental, it might not be fully optimized and could potentially lead to unexpected results or issues.
If you have multiple GPUs in your system, you can enable this feature from the settings panel. Remember to monitor the system’s performance and stability while using this feature, and report any issues to the development team for further improvements.
Multi-GPU Support with Easy Stable Diffusion
Multi-GPU support is now available for Stable Diffusion, which means that it can now leverage multiple GPUs to accelerate the image generation process. This feature is enabled by default, and if your system has more than one GPU, the software will automatically distribute tasks across these GPUs. For example, if you have two GPUs, two tasks can run in parallel, one on each GPU.
How to Use Multi-GPU Support
To take advantage of this feature, you need to open one browser tab per GPU and distribute your image tasks across these tabs. Once you start your tasks in each browser tab, they’ll run in parallel on your GPUs. We’re currently working on an update that will eliminate the need to open multiple browser tabs.
Manual GPU Selection and Settings
If you need more control, you can manually select which GPUs you want to use from the Settings tab. If you don’t specify this, the program will decide which GPUs to use based on their available memory. The multi-GPU option will only be visible in the UI if your system has more than one GPU. After changing your GPU settings, remember to click the Save button.
Automatic GPU Selection for Optimal Performance
The program also supports automatic GPU selection. This is a handy feature that ensures the program uses GPUs that are not currently being used for other tasks, like gaming. Once a GPU becomes free, the program will automatically start using it.
Working Principle of Automatic GPU Selection
Automatic GPU selection works by choosing the GPUs that have similar free memory (it picks the 65th percentile of GPUs by free memory). This means that the program will choose GPUs that are similar in terms of free memory. For instance, if your PC has two GPUs with similar memory (a 2070 8GB and a 2060 6GB), it’ll start on both GPUs by default.
However, if your PC has very different GPUs (a 3060 8GB and a 1660 4GB), it’ll only start on the 3060 by default as it will be much faster overall. You can still choose to start on both 3060 and 1660 by selecting both GPUs in the Settings tab in the UI.
The choice will be saved across restarts. If one of the GPUs is heavily used (for example, for gaming and hence low on free memory), that GPU won’t be selected even if it’s a powerful GPU. However, if a previously heavily-used GPU becomes free in the future, it’ll automatically start getting used without requiring you to restart the program or take any action.
Model Merging with Easy Stable Diffusion
(works only with version 2.5 or higher)
This feature is available in versions 2.5.0 and higher. You can merge two Stable Diffusion models (in .ckpt or .safetensors formats), to combine features and art-styles from two different models.
Step-by-step Guide to Model Merging with Easy Diffusion Local Version
Step 1: Accessing the Merge Models Tab
Open the Merge models tab, at the top of the UI.

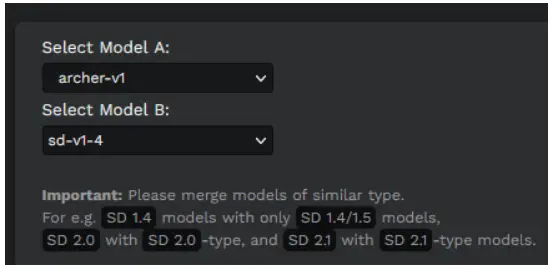
Step 2: Selecting Models
Select the two model files (which you want to merge). Important: Please merge models of similar type. For e.g. SD 1.4 models with only SD 1.4/1.5 models, SD 2.0 with SD 2.0-type, and SD 2.1 with SD 2.1-type models.
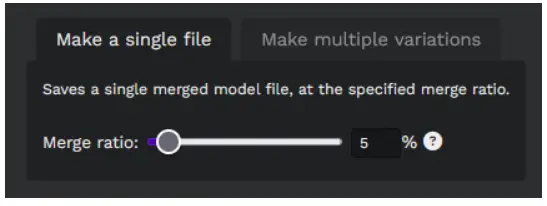
Step 3: Setting the Merge Ratio
Choose the merge ratio. For e.g. a 5% merge ratio will result in 5% of Model A and 95% of Model B in the final merged model.
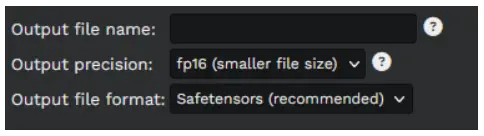
Step 4: Naming the Output File
Set the filename for the merged model, in the Output file name textbox. The merge ratio and file extension will be added automatically, you don’t need to include them in the filename.
Merging the Models
Finally, click the Merge models button to produce the merged model file(s).
Advanced Usage: Creating Multiple Merge Files
You can also automatically create multiple merge files, at increasing merge ratios.
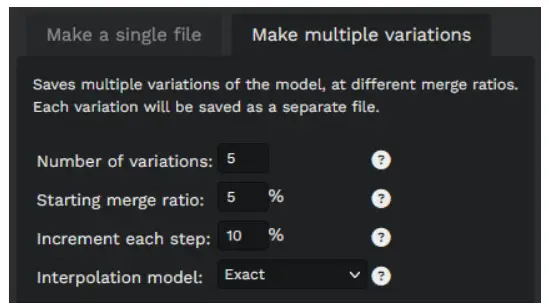
This is useful for experimenting with different merge ratios. Note: this will create one model file per merge ratio, so it can consume a lot of disk space quickly!
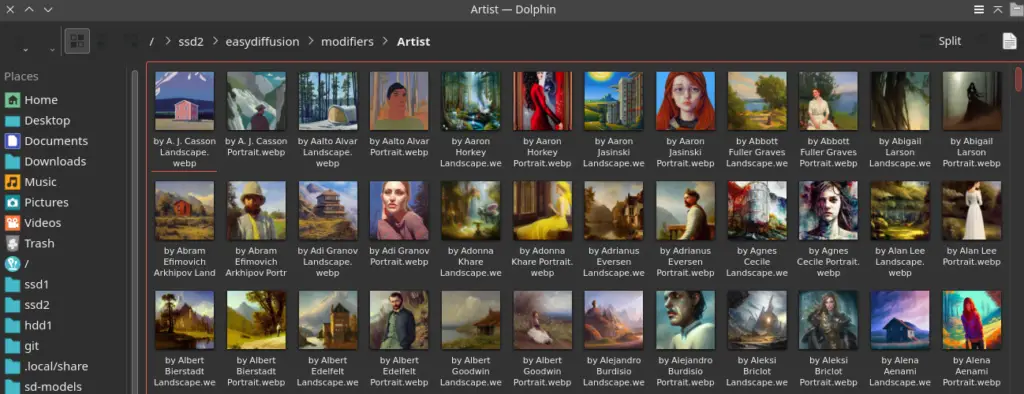
Easy Diffusion Custom Modifiers
Adding Custom Modifiers with Sample Images in Easy Diffusion
This feature in Easy Diffusion enables you to add custom modifiers using sample images, offering a more dynamic way to enhance your creations beyond the use of plain text values.
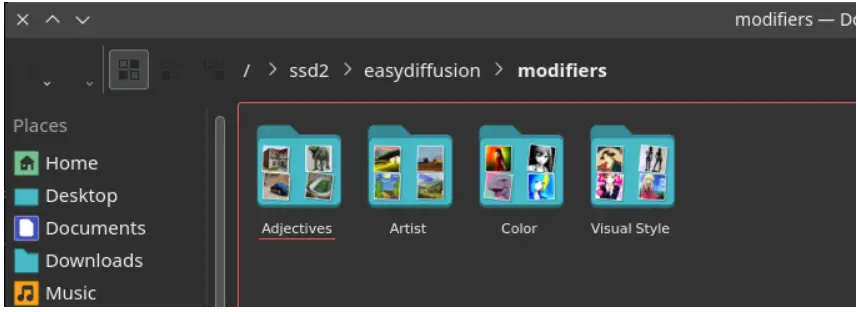
Locating the Modifiers Folder
To get started, navigate to your Easy Diffusion install folder and locate the modifiers folder. If this folder doesn’t exist, you’ll need to create it. This is where you’ll place your custom modifier images.
Preparing Your Custom Modifier Images
For best results, generate your sample images at a 512×512 resolution to maintain the correct aspect ratio. If an image is placed directly within the modifiers folder, it will be added to a ‘Modifiers’ category.
If the image is within a subfolder, the subfolder’s name will be used as the category. For images in deeper subfolders, the entire folder path will be used as the category (for example, an image in ‘modifiers/Foo/Bar’ will fall under the ‘Foo/Bar’ category). The original order of categories, as defined in modifiers.json, will be preserved, with new categories added at the end in alphabetical order.
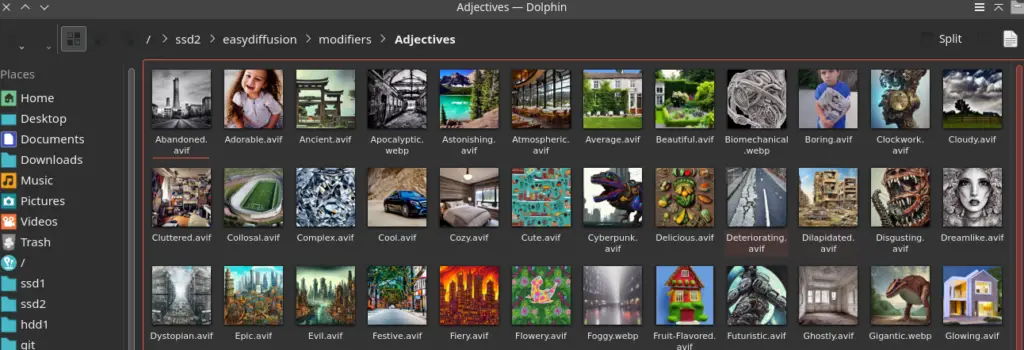
Naming Your Images
To ensure your modifiers work correctly, rename your images to reflect the actual text of the modifier prompt, followed by the appropriate file extension (such as .png).
Designating Portrait and Landscape Modifiers
Easy Diffusion allows you to designate whether an image is a portrait or landscape modifier. If an image file name ends with ‘Portrait’, ‘.Portrait’, ‘-Portrait’, or ‘_Portrait’ (case insensitive), it will be treated as a portrait image. If it ends with ‘Landscape’, it will be treated as a landscape image, and the ‘Portrait’ or ‘Landscape’ suffix will be removed from the modifier name.
If neither suffix is used, the image will be used as both a portrait and landscape modifier.
Activating Your Custom Modifiers
Once you’ve added your images and organized your folders, restart the Easy Diffusion server to make the images appear.
A Note on Windows Path/Filename Limitation
If you’re using Windows, be aware that there may be a limitation on the size of your path/filename combination. Please adjust your file and folder names accordingly to avoid any issues.
Troubleshooting Your Easy Stable Diffusion Local Setup
Here are solutions to some common issues that you might encounter when setting up Easy Diffusion locally. If these solutions don’t solve your problem, don’t hesitate to ask for help on the discord server or file an issue.
Stable Diffusion Issue: RuntimeError: CUDA out of memory
This error usually occurs when your PC has less than 6GB of GPU RAM. Here are a couple of things you can try:
- Lower the “VRAM Usage Level” setting in the “Settings” tab.
- Try generating images with smaller sizes.
Stable Diffusion Issue: urllib.error.URLError:
This error might be due to a Firewall, Antivirus, Proxy, or VPN blocking your network connections. Please check your settings for these applications.
Another solution you can try is to switch to Google’s DNS server or Cloudflare’s DNS server. You can find instructions on how to do this here:
Remember, troubleshooting is a process of elimination. Be patient and methodical, and you’ll likely be able to resolve your issues.
Issue: RuntimeError: Error(s) in loading state_dict fo UNet: size mismatch for model1.diffusion_model.input_blocks.0.0.weight
This error typically arises when you attempt to use the v1.5 inpainting model. Regrettably, this model isn’t compatible with the current version of Stable Diffusion.
Issue: ‘conda-unpack’ is not recognized as an internal or external command
To resolve this issue, copy the stable-diffusion-ui folder from inside the zip file and paste it into your C: drive (or any other drive). Make sure you’re copying the folder directly from inside the zip file rather than extracting the zip file first.
If you encounter this error, you’ll need to install some additional libraries. Run the following command:
apt install libsm6 libxext6 libxrender-dev -y(Note: you may need to prefix the command with sudo depending on your permissions.)
After running this command, try running your task again.
Issue: basicsr module not found
For Windows users, you will need to download and extract the basicsr module. Place the basicsr folder inside the stable-diffusion-ui\stable-diffusion\env\lib\site-packages folder. Afterward, run the Start Stable Diffusion UI.cmd file again.
For Linux users, please seek assistance on the Discord server.
Issue: Could not load the Qt platform plugin “xcb”
If you are using Linux, you will need to run the following command before starting the program:
export QT_QPA_PLATFORM=offscreenIssue: ImportError: DLL load failed while importing cv2: The specified module could not be found.
If you’re running Windows 10 N or Windows 10 KN (or any of its Pro, Education, etc. variants), you will need the Microsoft Media Feature Pack to run Stable Diffusion.
Issue: Killed uvicorn server:app –app-dir … –port 9000 –host 0.0.0.0
This error typically occurs when your PC runs out of RAM. Stable Diffusion requires a significant amount of RAM, ideally at least 10 GB, to operate effectively. Try closing all other applications before running Stable Diffusion UI to free up more memory.
Getting Support and Troubleshooting Your Installation
If you encounter issues or need support, you can enter the conda environment in your existing installation. This allows you to run commands and forcefully install any necessary packages.
It’s important to note that users no longer need to have the Anaconda Prompt installed, as the installer now includes a portable version of conda. Simply follow these steps:
For Windows Easy Stable Diffusion Users:
- Navigate to the project folder and double-click on the “Developer Console.cmd” file.
- In the console that appears, type
python --versionand press enter. You should see “3.8.5” displayed.
For Linux Easy Stable Diffusion Users:
- Open the terminal.
- Navigate to your stable-diffusion-ui folder by typing
cd /path/to/stable-diffusion-uiand pressing enter. - Run the developer console by typing
./developer_console.shand pressing enter. - Check your Python version by typing
python --versionand pressing enter. You should see “3.8.5” displayed.
After following these steps, you will have an activated conda environment. From here, you can run conda or pip commands to install or change packages as needed.
Customizing Easy Stable Diffusion Local Configuration Settings
Settings at Installation Time
- Network ports During installation, the installer attempts to start a web server on port 0.0.0.0:9000. If this port is already in use, the startup will fail. However, you can specify a different port by creating a
scripts/config.jsonfile before starting EasyDiffusion:
   {
     "net": {
       "listen_port": 9000,
       "listen_to_network": true
     }
   }
The listen_to_network setting determines whether the server should only listen on localhost (false) or on all interfaces (true).
- Prevent browser start If you’re installing on a headless system, you might need to prevent the automatic browser startup that normally occurs during installation. To do this, create a
config.jsonfile in thescriptsfolder with the following content:
   {
     "render_devices": "auto",
     "update_branch": "main",
     "ui": {
       "open_browser_on_start": false
     }
   }
Settings at Runtime
The settings for runtime are stored in the following files:
scripts/config.jsonscripts/user_config.shscripts/user_config.bat
The user_config files can be used to set environment variables for some of the AI runtimes. For example, you might need to set ROCm settings.
Joining the Easy Stable Diffusion Beta Development Channel
The Beta Development Channel for Easy Stable Diffusion is where new features and updates are first introduced. If you’re excited about getting early access to new features and don’t mind encountering a few bugs along the way, then joining the Beta Development Channel could be a great option for you. New beta versions are announced in our discord community.
Here’s how you can join:
Open the Easy Stable Diffusion application and navigate to the “Settings” tab in the UI.

Scroll to the bottom of the Settings tab and enable the “Beta Channel” setting.

Press the “Save” button and restart the program. You can do this by closing the command prompt window (or terminal on Linux/Mac), and starting Easy Diffusion again.

After you restart, you should see a “(beta)” label next to the version number, in the top-left corner of the UI.

Leaving the Beta Program
If you ever want to return to the stable version of Easy Stable Diffusion, you can do so by simply unchecking the “Beta Channel” checkbox in the Settings tab.
If the beta version breaks and you’re unable to start the program, you can manually leave the beta program:
- Navigate to the “scripts” subdirectory in your Easy Diffusion installation directory (e.g., “C:\EasyDiffusion\scripts”).
- Edit the “config.json” and “config.bat” files (or “config.sh” if you’re on Linux) in this directory. Replace the word “beta” in both files with “main”.
- Restart the Easy Diffusion application.
How to Use xFormers with Your Easy Stable Diffusion Local Version
xFormers is now experimentally supported in Easy Stable Diffusion. This technology can speed up image generation, but it may produce non-deterministic results, meaning the same prompt and settings might not always yield the same results.
Installing xFormers
To install Stable Diffusion xFormers, follow these steps:
- Open the Developer Console by double-clicking on “Developer Console.cmd” (on Windows) or by running “./developer_console.sh” (on Linux/Mac).
- Run the command
python -m pip show torch torchvision. Please make a note of the torch and torchvision versions displayed, as you may need to revert back to these versions later. - Install xFormers by running the following command:
python -m pip install --upgrade torch==2.0.0+cu118 torchvision==0.15.1+cu118 xformers==0.0.19 --extra-index-url https://download.pytorch.org/whl/cu118 - That’s it! You can now start Easy Diffusion as usual.
Removing/Uninstalling Easy Stable Diffusion xFormers
If you encounter issues after installing xFormers, you can uninstall it by following these steps:
- Open the Developer Console by double-clicking on “Developer Console.cmd” (on Windows) or by running “./developer_console.sh” (on Linux/Mac).
- Run the command
python -m pip uninstall xformersto remove xFormers. - Optionally, you can revert the torch and torchvision versions back to the ones you noted earlier:
- On Windows or Linux, run:
python -m pip install torch==version_noted_above torchvision==version_noted_above --index-url https://download.pytorch.org/whl/cu116 - On Mac, run:
python -m pip install torch==version_noted_above torchvision==version_noted_above
- On Windows or Linux, run:
Downloadable Content for Easy Stable Diffusion Local Edition
Understanding and Using Stable Diffusion Custom Models
Stable Diffusion UI leverages ‘models’ to generate images. These models are trained on a multitude of images and corresponding descriptions. During installation, a default model, sd-v1-4, is downloaded. However, there are other models available that have been trained on additional images or built from scratch, each providing a unique look and understanding of prompts.
Installing a New Easy Stbale Diffusion Custom Model
If you’ve downloaded a new model and want to use it with Stable Diffusion UI, follow these steps:
- Copy the model file to the
models\stable-diffusionfolder inside the installation directory. The model file should have the suffix.ckptor.safetensors. - If the model comes with a
.yamlfile, place it alongside the model with the same name. For example, if your model issome-model.ckpt(orsome-model.safetensors), rename the.yamlfile tosome-model.yamland place it in the same folder as the model file. - Refresh the model list using the “reload” icon in the “Models” section of the image settings. Your new model should now appear in the “Models” dropdown menu.
Troubleshooting Easy Stable Diffusion – Are Your Images Turning Out Black?
If you’re facing issues with your images turning out black, try adding the following line to the end of the .yaml file that came with your model:
extra:
  attn_precision: "fp32"
For reference, you can check out the end of this file.
Sharing Model Files Across Multiple Stable Diffusion UIs
If you’re using multiple Stable Diffusion UIs on your PC, you can save disk space by maintaining a common copy of the model files. By creating a linked folder, you can share the models folder between different Stable Diffusion software instances.
Please replace C:\EasyDiffusion with the path where you’ve installed Easy Diffusion on your PC.
For Windows users:
- Press
Win+R, typecmd, and pressEnter. - Delete the
C:\EasyDiffusion\models\stable-diffusionfolder. - Type and run the following command:
mklink /j "C:\EasyDiffusion\models\stable-diffusion" "D:\CommonStableDiffusion\models\Stable-diffusion"Make sure to change the second parameter to the actual folder on your PC that contains the stable diffusion model files.
For Linux/Mac users:
- Open a terminal.
- Delete the
/path/to/easy-diffusion/models/stable-diffusionfolder. - Type and run the following command:
ln -s "/path/to/common/models/Stable-diffusion" "/path/to/easy-diffusion/models/stable-diffusion"Make sure to change the first parameter to the actual folder on your PC that contains the stable diffusion model files.
Web Resources for Stable Diffusion Models
Please note that the following links lead to websites outside of the Stable Diffusion UI project and downloading models from these sources may pose a risk. Always scan for viruses before using any downloaded models.
- Civitai – Provides an overview of many stable diffusion models. Only models of the type ‘checkpoint’ can be used by Stable Diffusion UI.
- Rentry – Lists stable diffusion models from various sources.
User Interface Plugins in Easy Stable Diffusion Local
User interface plugins provide an excellent way to add extra functionality to the Stable Diffusion UI.
Please exercise caution when using plugins as they are not reviewed for malicious code. Use plugins from sources you trust.
Installing Easy Stable Diffusion Plugins
Unless otherwise specified in the plugin description, right-click on the plugin link and save the plugin to the C:\EasyDiffusion\plugins\ui directory (or the equivalent directory based on where you’ve installed Easy Diffusion). The filename must have the .plugin.js suffix.
Post-processing Plugins for Stable Diffusion
Mad’s Render Tasks by Marc-Andre Ferland: This plugin provides a Resize option with a UI to select the output resolution, change the prompt, guidance scale, etc. It also adds a Redo button for quickly retrying with a new seed and an option to keep only the last N tasks. Github Repo
Scaleup by Avidgamefan#4035: Modest scaling up, maintaining close ratio, with img2img to increase resolution of output while adding minor details. Maximum output is 1536 along one axis, but generally, things are kept at 1024×1024 and below. One-click workflow!
OutpaintIt by Avidgamefan#4035: OutpaintIt generates a new area outside of your existing image, in any one of the 4 directions with one click — or all 4 directions at once! Fix those cut-off heads!
Down the Rabbit Hole by Andrew Nuttall: Generates a grid of prompts to run against. Can be used to step through Inference Steps, samplers, Guidance Scales or all modifiers. More information and download is here.
Easy Stable Diffusion Local User Interface Plugins: General UI Changes
- History by rbertus2000: This plugin adds a new column to keep a history of all prompts/settings that were used in this session. You can view the Github Repo here.
- More resolutions by Super.Skirv and JeLuF: This plugin adds all resolutions from 128 to 2048 in steps of 64 to the width and height dropdowns. You can view the Github Repo here.
- Scaled Up Resolutions by Super.Skirv: This plugin overwrites or appends all resolutions from 128 to 2048 in steps of 64 to the width and height dropdowns. You can view the Github Repo here.
- DateFolders by JeLuF: This plugin changes how autosave’s session folders are named. Instead of a series of numbers, folders will have names like
2022_11_05T18_58_05_757Z. You can view the Github Repo here. - Disable Source Image Zoom by Patrice: This plugin adds a system setting to disable the source image zoom on hover in the task list.
- Accessibility Improvements by Patrice: This plugin adds a system setting to allow the user to change the action to display the buttons on an image (rather than just hovering over it).
- Image Editor Improvements by Patrice: This plugin shows the actual brush in the image editor for increased precision and allows adding img2img source image via drag & drop from external file or browser image.
- Restore Image Modifiers by Patrice: This plugin restores the image modifier cards upon reloading the page.
- Seed Randomizer by Patrice: This plugin adds a system setting to randomize, thus increasing the variability of images ran in batches.
- Scrolling Panes by Patrice: This plugin allows editor and preview panes to scroll independently, and adds the ability to toggle the editor.
- Patrice’s Plugin Manager by Patrice: A simple plugin manager to easily install plugins and seamlessly keep them updated.
- RemoveHelpButtons by JeLuF: This plugin removes the help buttons from the image settings and other areas of the UI.
- Switch Width & Height Settings by ogmaresca: This plugin adds a button to switch the width and height values in the Image Settings panel.
For more information, check out the respective Github Repositories provided.
Information Plugins and Third Party Site Integration Plugins
- Copy Settings (JSON) by JeLuF: This plugin allows you to copy the settings used to create the image as a machine-readable JSON string to the clipboard. You can view the Github Repo here.
- Copy Settings (TXT) by JeLuF: This plugin allows you to copy the settings used to create the image as a human-readable text string to the clipboard. You can view the Github Repo here.
- Open in Photopea by JeLuF: This plugin allows you to open the image in Photopea, a commercial web service that can be used to edit photos. You can view the Github Repo here.
Prompt Related Plugins
- Surprise Me! by Marc-Andre Ferland: This plugin adds a button that generates a random prompt. You need to download these three files and put them into the plugins\ui folder: Surprise Me! Plugin, rita.js, rita_grammar.json. You can view the Github Repo here.
- Spell tokenizer by Solid Dissipation: This plugin provides a script to help with spell (prompt) building. It allows you to create individual spell tokens to rearrange and modulate by using commas. You can view the Git Repo here.
- Tag autocomplete by nedius: This plugin provides tag autocomplete for prompts using booru style tags. You can view the Gist here.
For more information, check out the respective Github Repositories provided.
VAE (Variational Auto Encoder) and Easy Stable Diffusion
A Variational Auto Encoder (VAE) is a type of generative model that uses deep learning techniques to create new data that is similar to the data it was trained on. In the context of Easy Stable Diffusion, a VAE can be used to improve the quality of the generated images. For instance, the default VAE bundled in the UI, vae-ft-mse-840000-ema-pruned, is specifically trained to improve the depiction of eyes in the generated images.
When you install the Stable Diffusion UI, it automatically installs and starts using the vae-ft-mse-840000-ema-pruned VAE file. This file works with all Stable Diffusion models and uses the official one from the following location: https://huggingface.co/stabilityai/sd-vae-ft-mse-original
Keep in mind that while a VAE can significantly enhance the quality of the generated images, it is just one of many components in the image generation process. Other factors, such as the choice of model and the quality of the training data, also play a crucial role in determining the final image quality.
Using a Custom VAE in Easy Stable Diffusion
If you have a custom Variational Auto Encoder (VAE) that you’d like to use with the Easy Stable Diffusion UI, here’s how you can do it:
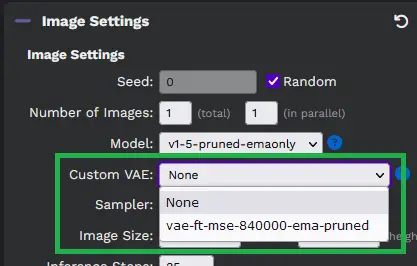
- Make sure that your custom VAE file has the extension
.ckptor.vae.pt. - Navigate to the
models/vaefolder in your Stable Diffusion installation directory. - Copy your custom VAE file into this folder.
- Refresh your browser.
- Now, when you go to the “Image Settings” in the Stable Diffusion UI, you should be able to select your custom VAE from the dropdown menu.
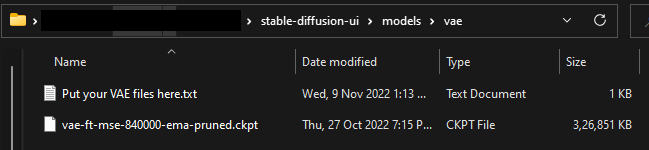
Please note that the effectiveness of a custom VAE will depend on various factors, such as how well it was trained and whether it’s compatible with the specific type of images you’re generating. Always make sure to use trusted and reliable VAE models to get the best results.
Frequently Asked Questions about Easy Stable Diffusion GUI (Local Device Setup Guide)
Q1: What is Easy Stable Diffusion Local Edition?
A1: Easy Stable Diffusion Local Edition is an AI tool that generates images based on textual descriptions, leveraging OpenAI’s Stable Diffusion models. This tool allows users to generate high-quality images locally on their machine, providing a wide range of options for customization and control.
Q2: How do I write prompts for Easy Stable Diffusion?
A2: Prompts should be short and descriptive. You should separate different aspects of your image by commas. For instance, “girl on a swing, green grass, pink trousers”. Stable Diffusion only takes 75 “tokens” into account. Tokens can be entire words, or parts of words for longer ones.
Q3: Can I emphasize parts of the prompt?
A3: Yes, you can assign “weights” to parts of your prompt to influence their importance. For example: “girl on a swing:1.2 green grass:1.0 pink trousers:0.8”. The weights act as separators, so you don’t need a comma behind them.
Q4: What is a “negative prompt”?
A4: A negative prompt describes what you do not want to see in the image. For example, if you put “shoes” into the negative prompt, you might get a barefoot person.
Q5: Can Easy Stable Diffusion utilize multiple GPUs?
A5: Yes, from version 2.5.0, Easy Stable Diffusion supports multi-GPU operations. It automatically distributes tasks across multiple GPUs if they are available. Users have the option to manually select the GPUs to be used via the “Settings” tab.
Q6: How can I merge two Stable Diffusion models?
A6: You can merge two Stable Diffusion models to combine their features and art styles. This can be done via the “Merge models” tab, where you select two model files and set the merge ratio. After setting the output file name, click the “Merge models” button to produce the merged model file(s).
Q7: Can I add custom modifiers with sample images?
A7: Yes, you can add custom modifier images. These should be placed in the “modifiers” folder in your Easy Diffusion installation directory. The images should be generated at a 512×512 resolution to preserve aspect ratio.
Q8: I’m encountering an error. How can I troubleshoot?
A8: The Easy Stable Diffusion documentation provides solutions for common issues, such as CUDA out of memory, network errors, or module loading problems. If the provided solutions do not work, feel free to ask for help on the project’s Discord server or file an issue on the GitHub repository.
Q9: How do I install a custom model?
A9: To install a custom model, copy the model file (.ckpt or .safetensors) to the models\stable-diffusion folder in your installation directory. If the model comes with a .yaml file, place that yaml file next to the model, with the same name. Then, refresh the model list using the “reload”-icon in the “Models” section in the image settings.
Q10: How do I use UI plugins?
A10: To use a plugin, right-click on the plugin link and save the plugin to the plugins\ui folder in your installation directory. The file name must have the suffix .plugin.js. After adding the plugin, refresh the Easy Diffusion server for the changes to take effect.
Q11: How do I use a custom VAE (Variational Auto Encoder)?
A11: To use a custom VAE, put your VAE file ending with .ckpt or .vae.pt inside the models/vae folder. Refresh your browser UI, and you can then select your VAE file in Image Settings.
Q12: How can I join the beta development channel of Easy Stable Diffusion?
A12: To join the beta program, open the “Settings” tab, scroll to the bottom, and enable the “Beta Channel” setting. Save and restart the program. After you restart, you should see a (beta) label next to the version number in the top-left corner of the UI.
Q13: Can I use xFormers with my Easy Stable Diffusion version?
A13: Yes, xFormers are supported experimentally. xFormers can speed up image generation, but can sometimes produce non-deterministic results. To install xFormers, please follow the steps provided in the documentation.
Q14: How do I enter a conda environment in an existing installation?
A14: You can enter a conda environment by running the Developer Console.cmd file (on Windows) or ./developer_console.sh (on Linux) in the terminal. This allows you to run commands and install any required packages.
Q15: What are the Easy Stable Diffusion Local Config settings?
A15: The configuration settings for Easy Stable Diffusion are stored in the following files: scripts/config.json, scripts/user_config.sh, scripts/user_config.bat. These files can be used to set environment variables for some of the AI runtimes.
A16: If you use multiple Stable Diffusion UIs, you can save disk space by keeping a common copy of the model files. You can create a linked folder to share the models folder between the different Stable Diffusion software.
Q17: How can I troubleshoot common issues like CUDA out of memory, urllib.error.URLError, etc?
A17: Many common issues can be resolved by adjusting settings or verifying your network and hardware. For example, if you encounter a CUDA out of memory error, try setting a lower “VRAM Usage Level” setting in the “Settings” tab, or generate smaller-sized images. If you encounter a urllib.error.URLError, check if your Firewall/Antivirus/Proxy/VPN is blocking your network connections.
Q18: Can I use Easy Stable Diffusion with multiple GPUs?
A18: Yes, Easy Stable Diffusion supports multi-GPU operations. It automatically distributes tasks across multiple GPUs if they are available. Users have the option to manually select the GPUs to be used via the “Settings” tab.
Q19: What is automatic GPU selection?
A19: Automatic GPU selection is a feature that allows the program to decide which GPUs to use based on their free memory. It’s recommended to use this feature as it will automatically stop using GPUs that you’re using for something else and start using them again once they become free.
Q20: How can I use Easy Stable Diffusion’s model merging feature?
A20: To use the model merging feature, you first need to open the “Merge models” tab at the top of the UI. From there, you select the two model files you want to merge, choose the merge ratio, and set the filename for the merged model. Once you’ve done that, simply click the “Merge models” button to produce the merged model file(s).
Please note that this is a general FAQ and it may not cover every specific issue or feature. For more detailed information and support, please refer to the official documentation and community forums.