Welcome to the feature showcase page for the Stable Diffusion Web UI Features. This page highlights the extensive and versatile capabilities of this powerful AI Image Generator tool.
Please note that, unless otherwise stated, all examples presented here are not cherry-picked. They are random outcomes generated by the Stable Diffusion Web UI Online features to provide a realistic demonstration of the tool’s performance.

Stay tuned as we navigate through the stunning functionalities of this remarkable tool, designed to spark your creativity and enhance your image-generation projects.
Contents
- 1 Variations with Stable Diffusion 2.0 Models
- 2 Implementing InstructPix2Pix in Stable Diffusion Web UI Features
- 3 Expanding Stable Diffusion Web UI Features with Extra Networks
- 4 Advanced Stable Diffusion Web UI Features: Textual Inversion, LoRA, and Hypernetworks
- 5 Alt-Diffusion: Multilingual Image Generation
- 6 Stable Diffusion 2.0: Enhanced Image Generation
- 7 Outpainting Stable Diffusion Web UI Features: Expanding the Artistic Canvas
- 8 Inpainting: Filling in the Blanks
- 9 Prompt Matrix as one of the Features of Online Stable Diffusion
- 10 Stable Diffusion Upscale Feature
- 11 Infinite Prompt Length Stable Diffusion Feature
- 12 Using BREAK Keyword Feature in Stable Diffusion
- 13 How to use Attention / Emphasis Feature “()”in Stable Diffusion Online
- 14 Stable Diffusion Loopback Feature
- 15 X/Y/Z Plot Feature in Stable Diffusion
- 16 Prompts from File or Textbox Stable Diffusion Feature
- 17 Resizing Feature of Stable Diffusion Online
- 18 Stable Diffusion Clip Interrogator Feature
- 19 Prompt Editing Stable Diffusion Feature
- 20 Alternating Words Stable Diffusion Feature
- 21 HiRes and Upscalers Stable Diffusion Features
- 22 Composable Diffusion Feature with Interrupt and 4GB Videocard Support Stable Diffusion Feature
- 23 Face Restoration Stable Diffusion Feature
- 24 FileNames Format and User Scripts as Stable Diffusion Features
- 25 UI Config and ESRGAN Stable Diffusion Features
- 26 img2img Alternative Test Stable Diffusion Web UI Features
- 27 User.CSS Notification.MP3 and Clip Skip as Stable Diffusion Features
- 28 Frequently Asked Questions about Stable Diffusion Web UI features
- 28.1 What are the Stable Diffusion Web UI features?
- 28.2 What are the advanced Stable Diffusion Web UI features?
- 28.3 What is Alt-Diffusion?
- 28.4 What does the Inpainting feature do?
- 28.5 What is the Prompt Matrix feature?
- 28.6 What are the features related to image quality and resolution?
- 28.7 What is the Loopback feature in Stable Diffusion?
- 28.8 What customizability features does the Stable Diffusion UI offer?
- 28.9 What are the Stable Diffusion 2.0 model variations in the Stable Diffusion Web UI Online?
- 28.10 How does the InstructPix2Pix integration work in the Stable Diffusion Web UI Online?
- 28.11 What are the ‘Extra Networks’ in the Stable Diffusion Web UI Online?
- 28.12 How can I use the ‘Extra Networks’ in the Stable Diffusion Web UI Online?
- 28.13 What are Textual Inversion, LoRA, and Hypernetworks in Stable Diffusion Web UI Online?
- 28.14 What is Alt-Diffusion in Stable Diffusion Web UI Online?
- 28.15 What is Stable Diffusion 2.0 in Stable Diffusion Web UI Online?
- 28.16 What is the Depth Guided Model in Stable Diffusion Web UI Online?
- 28.17 What is the Inpainting Model SD2 in Stable Diffusion Web UI Online?
- 28.18 What is the outpainting feature in Stable Diffusion Web UI Online?
- 28.19 What is the inpainting feature in Stable Diffusion Web UI Online?
- 28.20 What is the Specialized Inpainting Model in Stable Diffusion Web UI Online?
- 28.21 What is the Stable Diffusion Upscale feature in Stable Diffusion Web UI Online?
- 28.22 What is the “Infinite Prompt Length” feature in Stable Diffusion Web UI Online?
- 28.23 What is the “BREAK” keyword in Stable Diffusion Web UI Online?
- 28.24 How to use the Attention / Emphasis Feature in Stable Diffusion Online?
- 28.25 What is the “Loopback” feature in Stable Diffusion Web UI Online?
- 28.26 What is the X/Y/Z Plot feature in Stable Diffusion Web UI Online?
- 28.27 What is the “Prompts from file or textbox” feature in Stable Diffusion Web UI Online?
- 28.28 What are the resizing methods available in Stable Diffusion Web UI Online?
- 28.29 What is the Seed Resize feature in Stable Diffusion Web UI Online?
- 28.30 What is the Variations feature in Stable Diffusion Web UI Online?
- 28.31 What is the Styles feature in Stable Diffusion Web UI Online?
- 28.32 What is the Negative Prompt feature in Stable Diffusion Web UI Online?
- 28.33 What is the CLIP Interrogator feature in Stable Diffusion Web UI Online?
- 28.34 What is the Prompt Editing feature in Stable Diffusion Web UI Online?
- 28.35 What is the Alternating Words feature in Stable Diffusion Web UI Online?
- 28.36 What is the HiRes and Upscalers feature in Stable Diffusion Web UI Online?
- 28.37 What is the Composable Diffusion feature in Stable Diffusion Web UI Online?
- 28.38 What is the Face Restoration feature in Stable Diffusion Web UI Online?
- 28.39 What are the Saving, Loading, Caching, Prompt Validation, PNG Info, and Settings features in Stable Diffusion Web UI Online?
- 28.40 How can I customize the filenames of generated images in Stable Diffusion Web UI Online?
- 28.41 What is the User Scripts feature in Stable Diffusion Web UI Online?
- 28.42 What is the UI Config feature in Stable Diffusion Web UI Online?
- 28.43 What is the img2img Alternative Test feature in Stable Diffusion Web UI Online?
- 28.44 What are the User.CSS Notification.MP3 and Clip Skip features in Stable Diffusion Web UI Online?
Variations with Stable Diffusion 2.0 Models
Stable Diffusion Web UI Online supports the Stable Diffusion 2.1 unclip checkpoints. This functionality brings a new layer of flexibility to your image generation process by allowing the production of varied image outcomes.
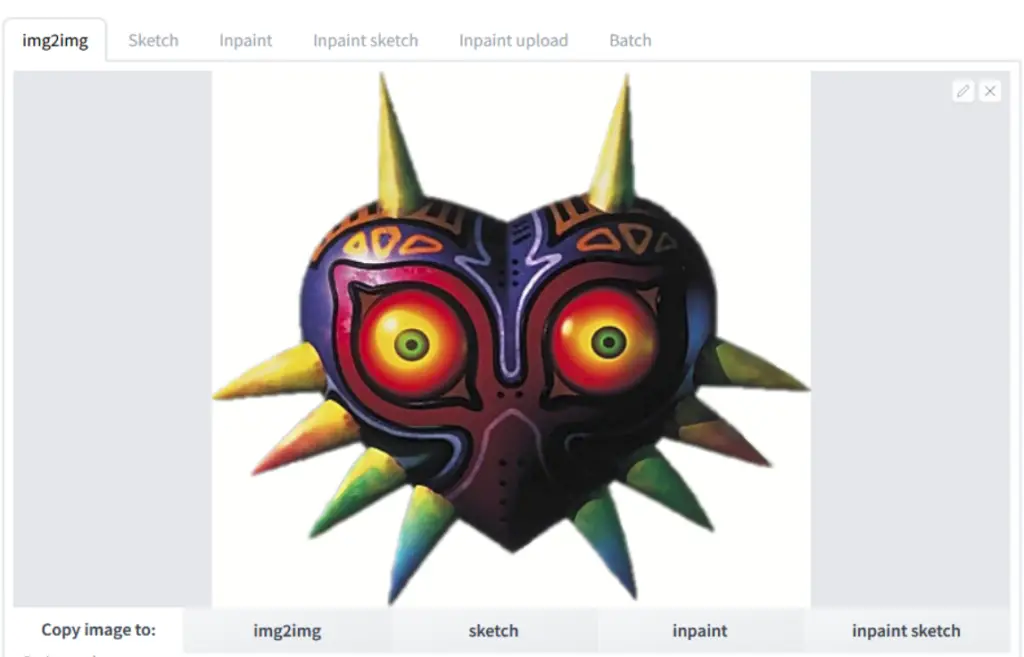
The integration of the SD2.1 variation model operates similarly to the existing support for the SD2.0 depth model. You execute this process from the img2img tab, where the tool extracts information from the input image, specifically leveraging CLIP or OpenCLIP embeddings. This data is then combined with your text prompt and fed into the model.
Typically, you’d set the denoising strength to 1.0 for this operation. This is because you want the specific characteristics extracted from the input image to have the most significant influence on the final image, rather than the generic img2img behaviour. This feature opens up a world of possibilities for creating unique image variations that adhere to your initial prompt while incorporating elements of your chosen input image.
Implementing InstructPix2Pix in Stable Diffusion Web UI Features
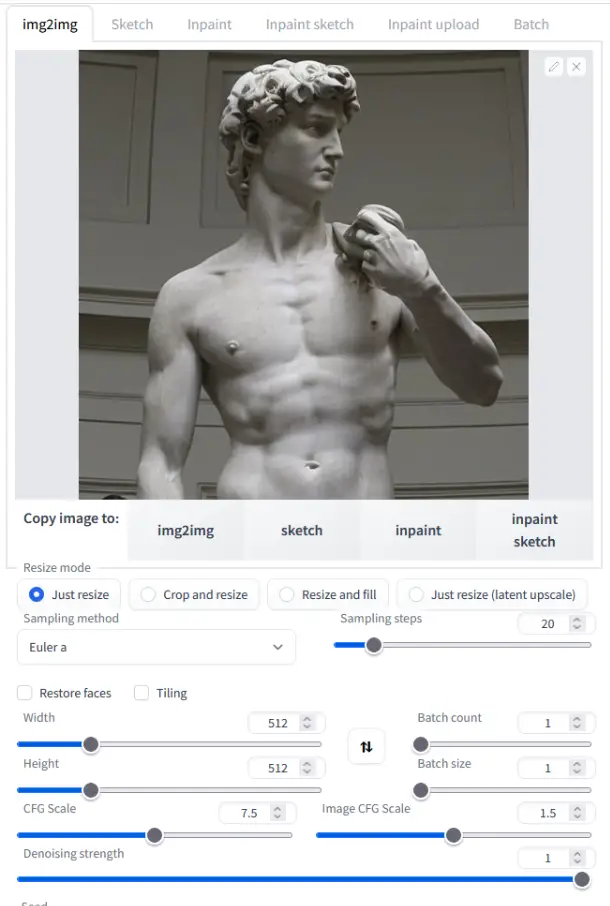
The Stable Diffusion Web UI Online fully supports the integration of the InstructPix2Pix checkpoint in the img2img tab, making the image generation process even more robust. There’s no need for additional steps or external extensions, although previously used extensions should still function if desired. It’s worth noting that a significant portion of the img2img implementation comes from the same contributor who developed the InstructPix2Pix integration.
To mimic the results of the original InstructPix2Pix repository, you should use a denoising value of 1.0 and the Euler a sampler. Furthermore, you’ll need to edit the config in configs/instruct-pix2pix.yaml to reflect the following settings:
use_ema: true
load_ema: true
Instead of the initial:
use_ema: falseBy adopting these settings, you can leverage the InstructPix2Pix model effectively within the Stable Diffusion Web UI Online, thereby enriching your image generation endeavors.
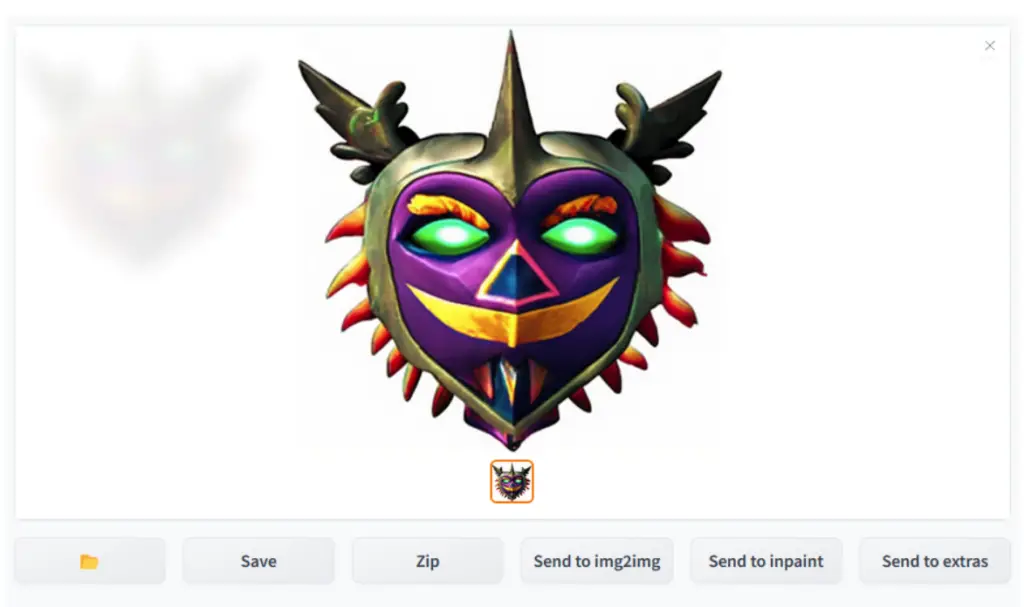
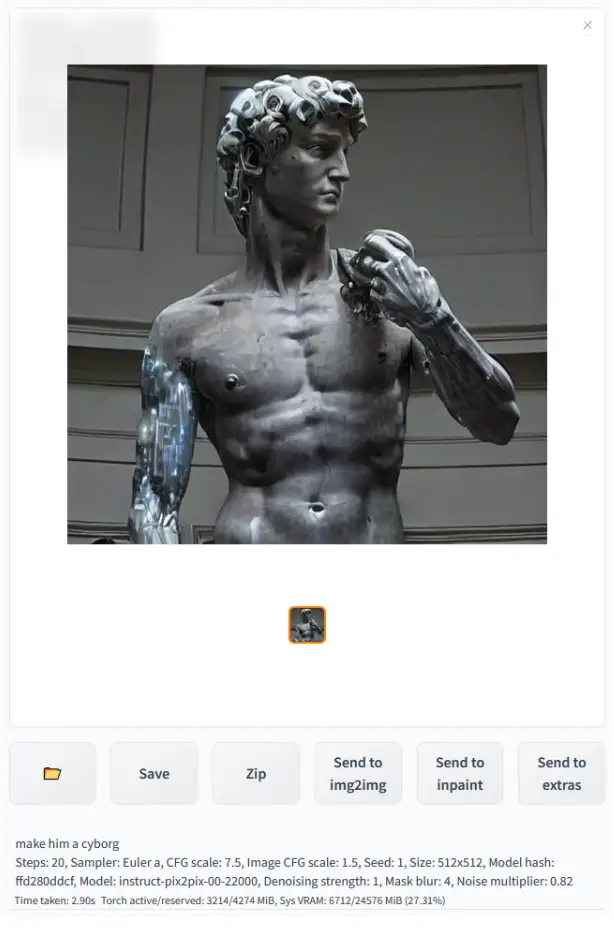
Example:
Turn the statue of David into a cyborg.

Input:
Output:
Expanding Stable Diffusion Web UI Features with Extra Networks
In the Stable Diffusion Web GUI Online, you’ll find a unique feature represented by a single button with a picture of a card on it. This feature, known as ‘Extra Networks’, integrates several additional methods for enhancing your image generation into a single, user-friendly interface.
You can locate the ‘Extra Networks’ button next to the prominent ‘Generate’ button.

Clicking on this button will reveal a set of cards. Each card corresponds to a file containing a part of the model that you either train yourself or source from elsewhere. By selecting a card, you add its associated model to your prompt, influencing the generation process.

The ‘Extra Networks’ feature supports different types of networks and their respective files:
- Textual Inversion: Found in the ’embeddings’ directory and represented by ‘*.pt’ files and images. You can use these in your prompt by referencing the embedding’s filename.
- LoRA: Stored in the ‘models/Lora’ directory, these are ‘.pt’ or ‘.safetensors’ files. You can include them in your prompt using the ” syntax.
- Hypernetworks: Located in the ‘models/hypernetworks’ directory, these are ‘.pt’, ‘.ckpt’, or ‘*.safetensors’ files. You can incorporate them into your prompt using the ” syntax.

By employing these ‘Extra Networks’ Stable Diffusion Web UI Features, you can drastically expand the capabilities of your Stable Diffusion Web GUI Online, leading to richer and more intricate image generation results.
Advanced Stable Diffusion Web UI Features: Textual Inversion, LoRA, and Hypernetworks
The Stable Diffusion Web UI Online boasts advanced features that allow you to fine-tune the weights for the language model and the actual image de-noiser used by Stable Diffusion. These features are known as Textual Inversion, LoRA, and Hypernetworks.
Textual Inversion
Textual Inversion is a technique for fine-tuning weights for a token in CLIP, the language model used by Stable Diffusion as of summer 2021.
By utilizing Textual Inversion, you can more accurately guide the AI in image generation based on the textual prompts. For more details on this method, refer to the author’s site or the comprehensive guide on Textual Inversion.
LoRA
LoRA is a method that fine-tunes weights for both CLIP and Unet, the language model and the image de-noiser used by Stable Diffusion. This technique was published in 2021 and can be effectively trained using tools like kohya-ss. Extension available here.
While support for LoRA is built directly into the Web UI, there’s also an extension with the original implementation by kohya-ss. Note that LoRA networks for Stable Diffusion 2.0+ models are currently unsupported by the Web UI.
To add LoRA to the prompt, use the syntax <lora:filename:multiplier>.
Hypernetworks
Hypernetworks is a method contributed by our friends at Novel AI in autumn 2022. This technique fine-tunes weights for both CLIP and Unet, similar to LoRA. However, it shares weights for some layers, allowing for a different approach to fine-tuning.
You can control the influence of the hypernetwork on the output through a multiplier. To add Hypernetworks to the prompt, use the syntax <hypernet:filename:multiplier>.
By utilizing these advanced features, you can greatly enhance the flexibility and precision of your image generation using the Stable Diffusion Web UI Online.
Alt-Diffusion: Multilingual Image Generation
Alt-Diffusion is a unique model that is trained to accept inputs in different languages, further expanding the versatility of the Stable Diffusion Web UI Online.
This feature opens up new avenues for non-English speakers, allowing them to generate images using prompts in their native languages. For more information, visit the original PR.
To use Alt-Diffusion, you will need to download the checkpoint from Hugging Face. Simply click on the down arrow to initiate the download. Once the file is downloaded, place it into the models/Stable-Diffusion directory.
Please note a few things when using Alt-Diffusion:
- Although the attention/emphasis mechanism is supported mechanically, it seems to have a much lesser effect, likely due to the implementation of Alt-Diffusion.
- The Clip skip is not supported, and the setting is ignored.
- Running Alt-Diffusion with
--xformersis recommended. However, adding additional memory-saving flags like--xformers --medvramdoes not work.
By harnessing the power of Alt-Diffusion, users can generate bespoke images using prompts in various languages with the Stable Diffusion Web UI Online.
Stable Diffusion 2.0: Enhanced Image Generation
Stable Diffusion 2.0 represents a significant improvement in the image generation capabilities of the Stable Diffusion Web UI Online. To use it, you will need to download the checkpoint file from Hugging Face. Simply click on the down arrow to initiate the download. Once the file is downloaded, place it into the models/Stable-Diffusion directory.
Stable Diffusion 2.0 comes in the following versions:
Depth Guided Model
The Depth Guided Model, which is only operable in the img2img tab, allows for more precise image generation. For more information, visit the original PR.
You can download the Depth Guided Model in the following versions:
- 512 depth (2.0) – (model+yaml) – .safetensors
- 512 depth (2.0) – (model, yaml)
Inpainting Model SD2
Specifically designed for inpainting, the Inpainting Model SD2 is trained on SD 2.0 512 base. It can be downloaded in the following version:
- 512 inpainting (2.0) – (model+yaml) – .safetensors
This model also supports the inpainting_mask_weight or inpainting conditioning mask strength.
By leveraging these advanced models, users can generate highly realistic and detailed images with the Stable Diffusion Web UI Online.
Outpainting Stable Diffusion Web UI Features: Expanding the Artistic Canvas
The Stable Diffusion Web UI Online’s outpainting feature is a unique tool that allows users to extend their original images creatively. It accomplishes this by creating additional empty space around the original image and then filling that space with relevant content, effectively “outpainting” the original image.
To illustrate, consider the following example:
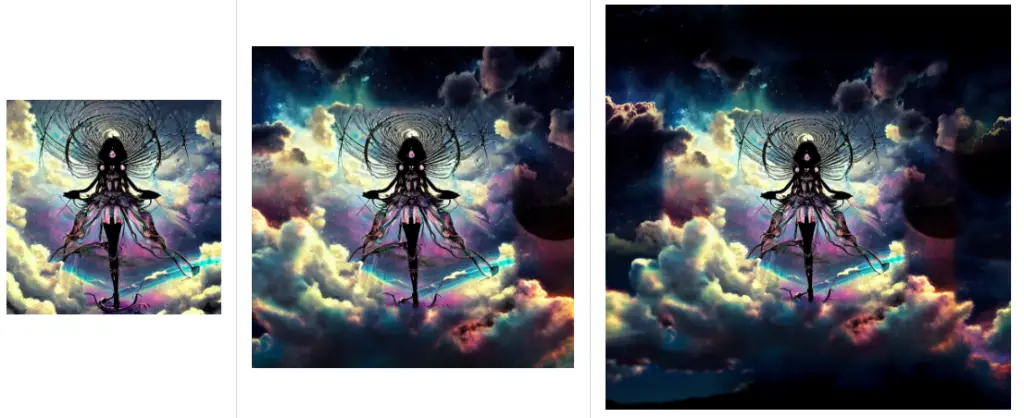
The image on the left is the original, the middle image is the result after the first outpainting, and the image on the right is the result after a second round of outpainting.
You can find the outpainting feature in the ‘img2img’ tab under ‘Script -> Poor man’s outpainting.’
It’s worth noting that outpainting, unlike standard image generation, tends to yield better results with a larger step count.
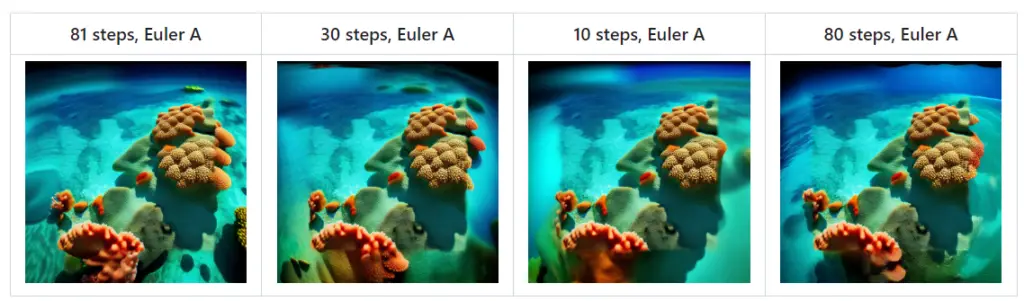
For optimal outpainting, it is recommended to use a precise prompt that matches the picture, set the sliders for denoising and CFG scale to max, and select a step count of 50 to 100 with either Euler ancestral or DPM2 ancestral samplers.
This will allow you to expand your artistic canvas in a consistent and aesthetically pleasing manner.
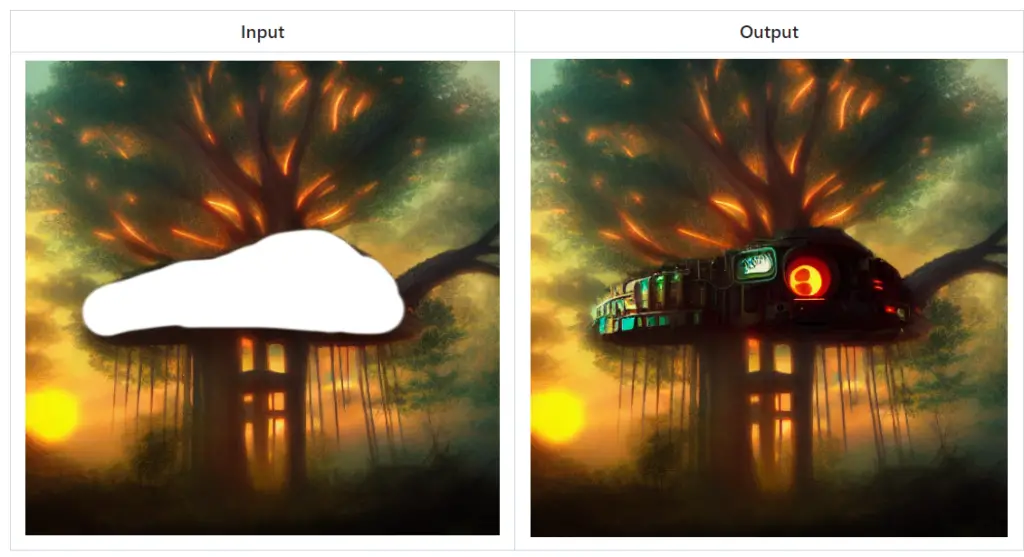
Inpainting: Filling in the Blanks
Stable Diffusion Web UI Online’s inpainting feature is an innovative tool that can fill in specific portions of an image. This is done by overlaying a mask on parts of the image, which the tool then “in-paints.”
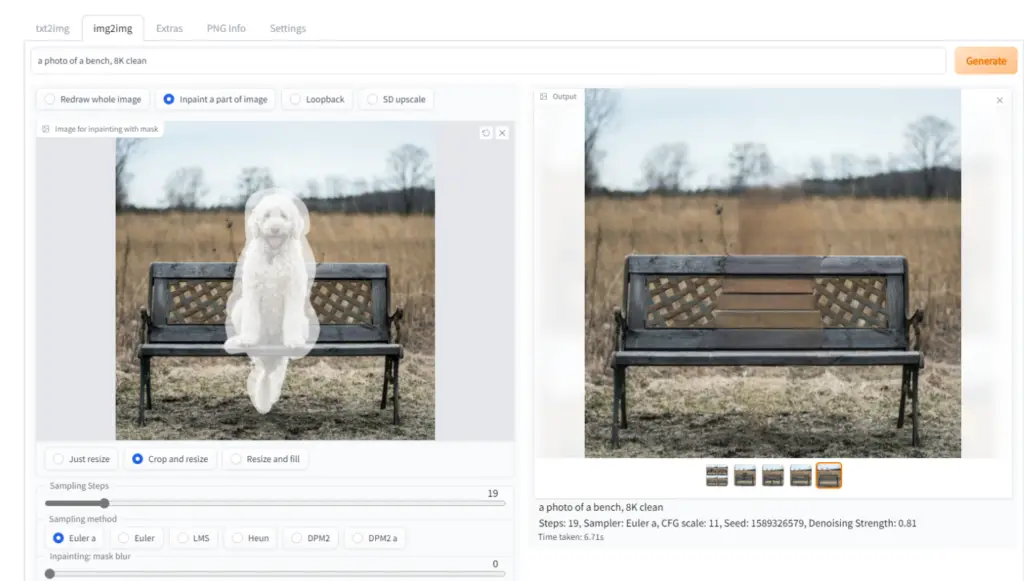
You can inpaint an image in the ‘img2img’ tab by drawing a mask over a part of the image you wish to inpaint.
There are several options for inpainting:
- Draw a mask directly in the web editor.
- Erase a part of the picture in an external editor and upload a transparent picture. The tool will inpaint any slightly transparent areas. However, keep in mind that some editors default to saving completely transparent areas as black.
- Change the mode (found at the bottom right of the picture) to “Upload mask” and choose a separate black and white image for the mask (white=inpaint).
Specialized Inpainting Model
RunwayML has trained an additional model specifically designed for inpainting. This model accepts additional inputs – the initial image without noise plus the mask – and seems to be much better at the task.
To use the model, you must rename the checkpoint so that its filename ends in inpainting.ckpt, for example, 1.5-inpainting.ckpt. After that, just select the checkpoint as you’d usually select any checkpoint, and you’re good to go.
Inpaint Area
With ‘Inpaint area: Only masked’ enabled, only the masked region is resized, and after processing it is pasted back to the original picture.
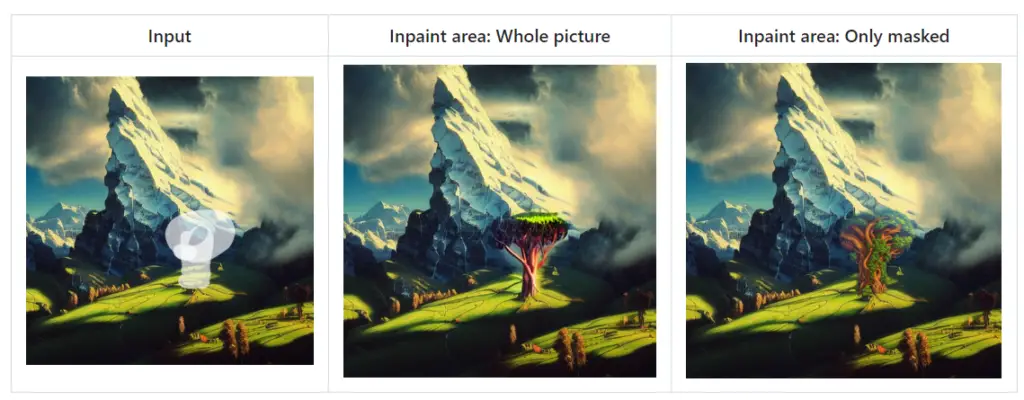
This allows you to work with large pictures and render the inpainted object at a much larger resolution.
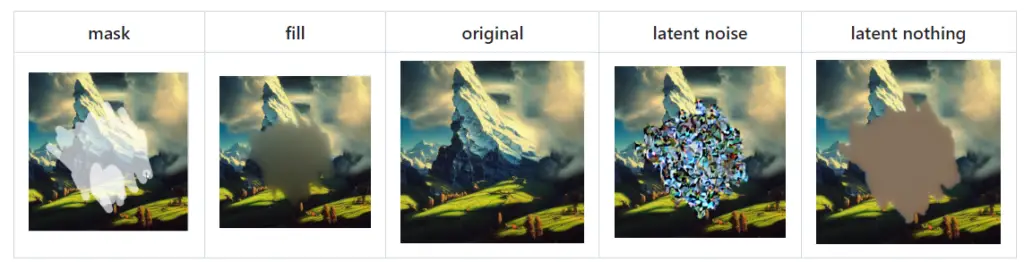
Masking Mode
There are two options for masked mode:
- Inpaint masked: the region under the mask is inpainted
- Inpaint not masked: under the mask is unchanged, everything else is inpainted
Alpha Mask & Color Sketch
The ‘Alpha mask’ feature enables transparency in the masked region, and the ‘Color Sketch’ tool offers a basic coloring tool for the ‘img2img’ tab.
Through these features, the Stable Diffusion Web UI Online provides a wealth of options for creatively manipulating and enhancing your images.
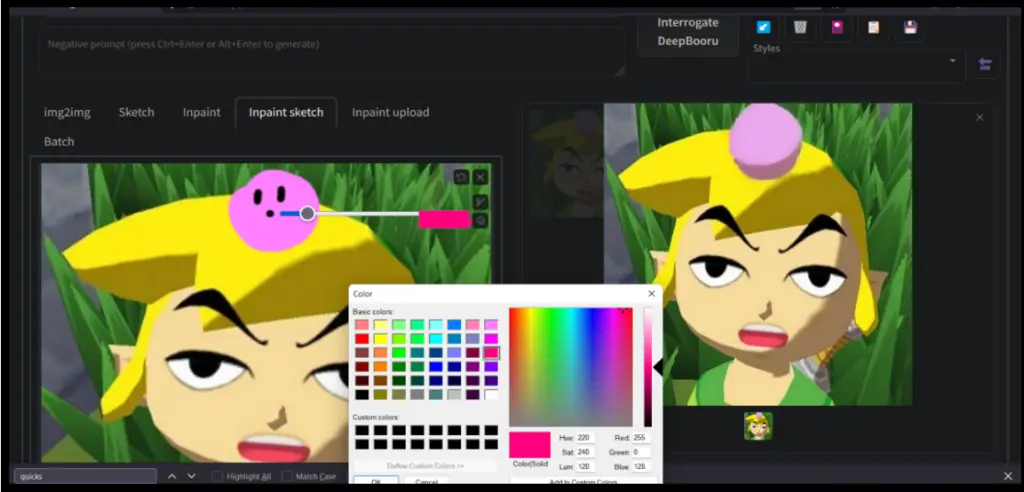
The Stable Diffusion Web UI Online’s img2img tab features a basic coloring tool. This tool allows users to add color to different parts of an image, enhancing the creative possibilities of the platform.
Prompt Matrix as one of the Features of Online Stable Diffusion
If you’re using a Chromium-based browser (such as Google Chrome, Microsoft Edge, or Brave), the coloring tool also supports a dropper tool. This tool allows you to select and use an existing color from the image, which can be very useful for maintaining color consistency or for color matching.
To use the coloring tool, simply select the color you want to use and apply it to the desired area of the image. This feature, in combination with the platform’s other tools, provides a wide range of possibilities for image editing and creation.
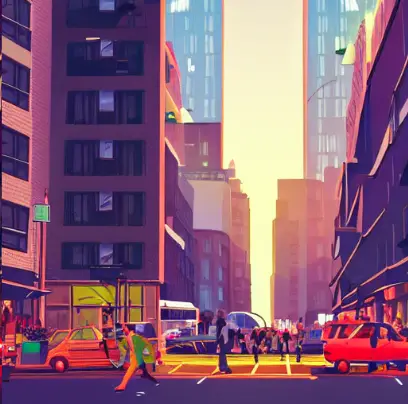
Imagine the power of a tool that allows you to control the various facets of image generation with granular precision. That’s precisely what the Prompt Matrix offers. This innovative feature is designed to create a spectrum of image variations based on the prompts you provide, all separated by the simple use of the “|” character.
When using the Prompt Matrix, each prompt you insert is taken into account to generate a unique image. For instance, consider the prompt “a busy city street in a modern city|illustration|cinematic lighting.” This isn’t just one prompt, but a combination of three separate ideas. As a result, the Prompt Matrix can produce four distinct images, each reflecting a different combination of these prompts:
An image depicting “a busy city street in a modern city”
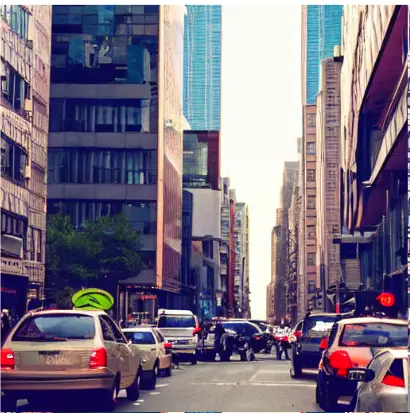
An “illustration” style image of “a busy city street in a modern city”

An image of “a busy city street in a modern city” with “cinematic lighting”
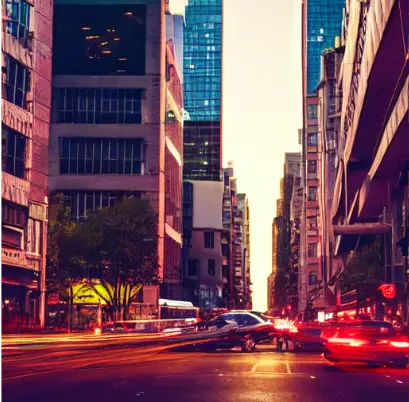
An “illustration” of “a busy city street in a modern city” featuring “cinematic lighting”
The order of image generation follows the sequence of the prompts, and each image is produced with the same seed for consistency.
Consider a more complex scenario involving five prompts. This could result in a whopping 16 image variations, each one a unique blend of the prompts provided.
This powerful feature is conveniently located under the Script section, labeled as “Prompt Matrix.” It’s a groundbreaking way to explore the full breadth of creative possibilities in image generation, catering to the diverse needs of tech enthusiasts.
Stable Diffusion Upscale Feature
The “Stable Diffusion Upscale” feature is an innovative approach to image enhancement. Inspired by the original concept from this GitHub repository, this tool allows you to upscale images using the power of RealESRGAN/ESRGAN technology, followed by a further refining process using the img2img algorithm. This method allows for high-quality image upscaling with an impressive level of detail.
For those enthusiasts who prefer to manually upscale their images using an external program, there’s no need to worry. The Stable Diffusion Upscale feature provides an option for you to handle the initial upscaling step, leaving the tile refinement to the img2img algorithm.
To leverage this tool, simply select ‘SD upscale’ from the scripts dropdown menu found within the img2img tab. The process is intuitive and user-friendly, making it an accessible feature for all tech enthusiasts.
To use this feature,
select SD upscale from the scripts dropdown selection (img2img tab).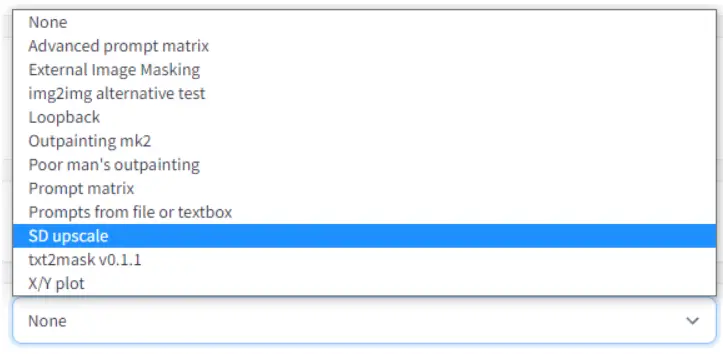
One key aspect to note is that the input image will be upscaled to twice its original dimensions, in terms of both width and height. The UI provides width and height sliders that allow you to dictate the size of individual tiles.
This is a critical aspect of the upscaling process as it directly influences the final image quality. For instance, a 512×512 image would require nine 512×512 tiles due to overlap. However, if the tile size is increased to 640×640, only four tiles would be needed. Thus, the tile size plays a pivotal role in determining the efficiency and quality of the upscaling process.
With the Stable Diffusion Upscale feature, you’re in the driver’s seat, steering the process of image enhancement to meet your unique creative vision.
For those ready to delve into the world of image upscaling with the Stable Diffusion Upscale feature, here are some recommended parameters to get you started:
- Sampling Method: Opt for the ‘Euler a’ method. This technique is known for its efficiency and accuracy in numerical computing, making it a prime choice for this process.
- Denoising Strength: Starting at 0.2 is a safe bet. However, if you’re feeling daring and want to push the boundaries a little, you can venture up to a denoising strength of 0.4.
However, a word of caution: when upscaling with the Stable Diffusion method, it’s important to remember that larger denoising strengths can lead to issues. This stems from the fact that the process works in tiles, which means the diffusion process may struggle to pay attention to the entirety of the image. As such, a balance must be struck between noise reduction and maintaining the overall integrity of the image.

These parameters serve as a starting point, but remember, the beauty of tech is in its versatility and the room it leaves for personalization. Feel free to experiment and find the perfect balance that works for your specific needs.
Infinite Prompt Length Stable Diffusion Feature
The “Infinite Prompt Length” feature represents a significant evolution in the realm of Stable Diffusion technology, empowering users to exceed the standard 75 token limit traditionally accepted by Stable Diffusion. By intelligently segmenting your prompt into 75-token chunks and processing each separately, this feature effectively expands the prompt size limit.
How does it work? Let’s break it down. Suppose you have a prompt comprising 120 tokens, exceeding the standard limit. This feature will divide your prompt into two segments: the first containing 75 tokens and the second containing the remaining 45 tokens. Each segment is then padded to reach a consistent size of 75 tokens, with the addition of start/end tokens taking the total to 77.
These prepared chunks are then individually processed using CLIP’s state-of-the-art Transformers neural network. The result of this process is two tensors, each with a shape of (1, 77, 768).
The magic happens when these tensors are concatenated. The resulting tensor has a shape of (1, 154, 768), doubling the initial token capacity. This expanded tensor is then seamlessly fed into the next component of Stable Diffusion, the Unet, without any issues.
This game-changing feature thus allows for a level of flexibility and creativity in prompt creation that was previously unattainable, breaking down the barriers of token limits and opening up a world of possibilities for tech enthusiasts.
Using BREAK Keyword Feature in Stable Diffusion
Introducing the “BREAK” keyword, a powerful tool designed to give you greater control over your image generation process.
This unique feature, which must be input in uppercase for it to function, acts as a signal to the system to fill the current chunks with padding characters.
Imagine you’re working on an intricate prompt that needs a clear division. Inserting the “BREAK” keyword effectively creates that division by filling up the remaining space in the current chunk with padding characters.
This ensures that your next piece of text starts in a fresh, new chunk, allowing for a clear delineation between different sections of your prompt.
This keyword is a simple yet ingenious tool that gives you the power to control the structure of your prompts with precision. It’s an invaluable resource for those complex creations that require specific segmentations.
The “BREAK” keyword is another example of how technology is continuously evolving to provide more control and flexibility to its users.
How to use Attention / Emphasis Feature “()”in Stable Diffusion Online
In the world of image generation, every word in your prompt is essential. However, there are times when you might want to give certain words more weight, to ensure they play a more significant role in the generated image. Conversely, there may be words that you want to de-emphasize. To facilitate this, the system provides a unique attention/emphasis feature.
How does it work? The use of parentheses and brackets plays a key role. Enclosing a word within parentheses increases the model’s attention to it, while brackets decrease it. And that’s not all – you can also stack these modifiers to further enhance or reduce attention.
Here’s a quick guide:
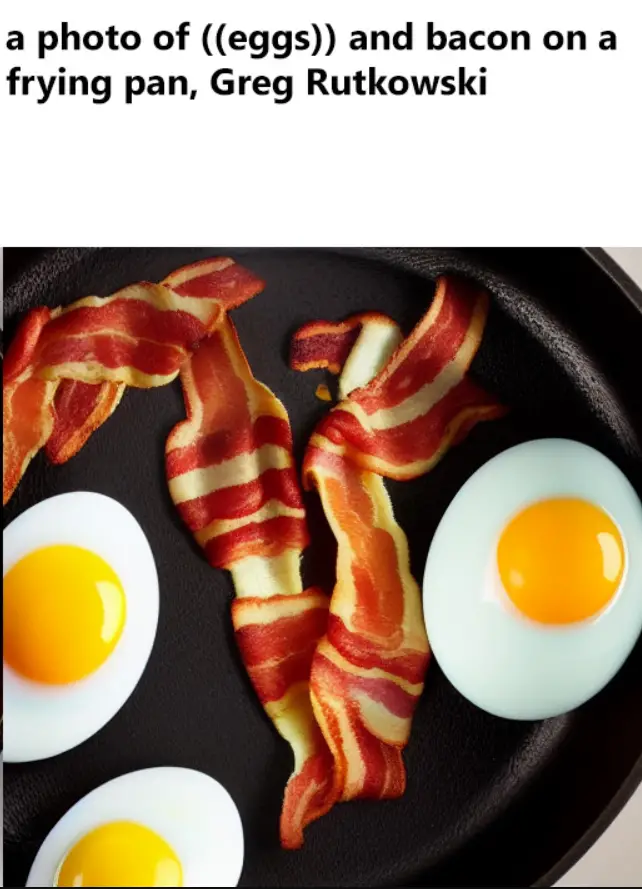
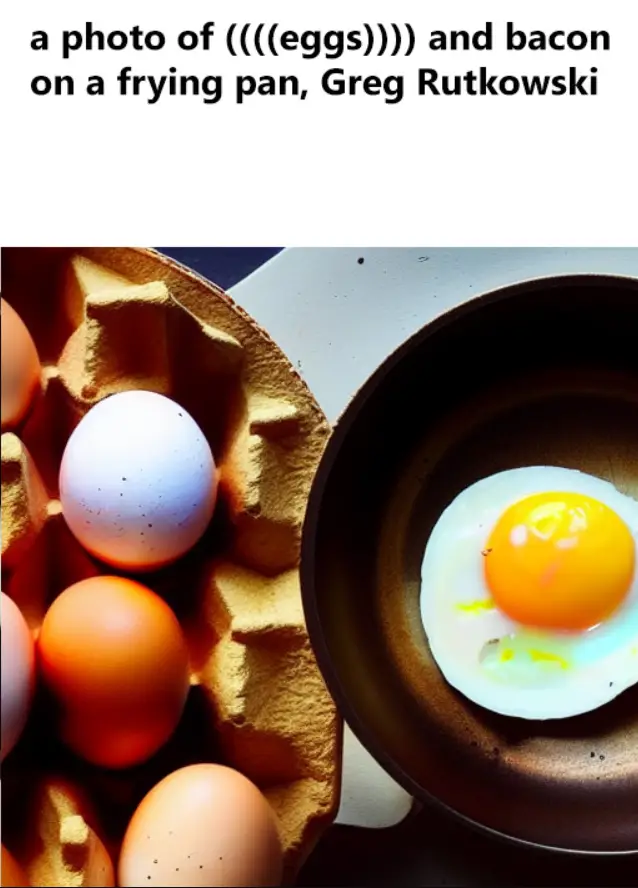
“a (word)” will increase attention to the word by a factor of 1.1.
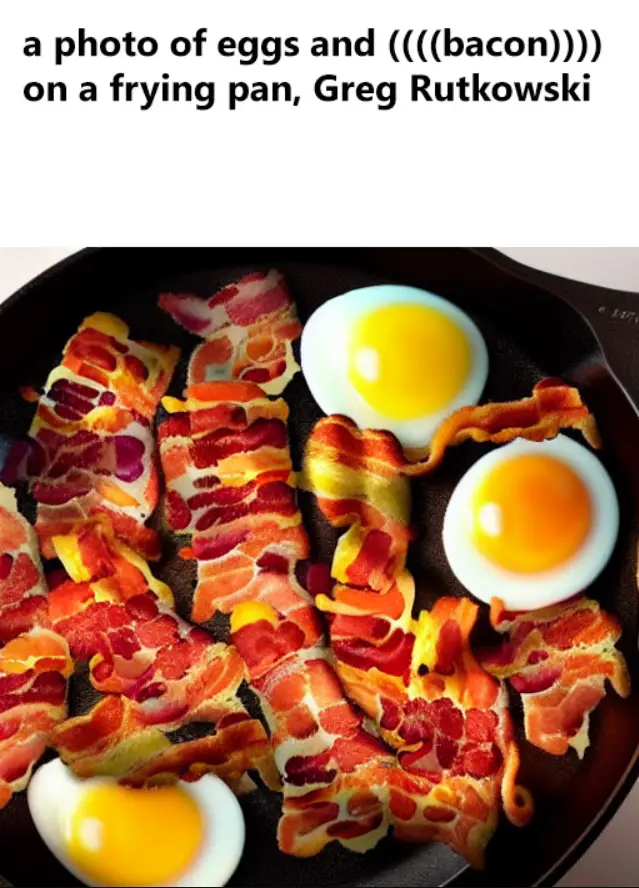
“a ((word))” will increase attention by a factor of 1.21 (1.1 * 1.1).
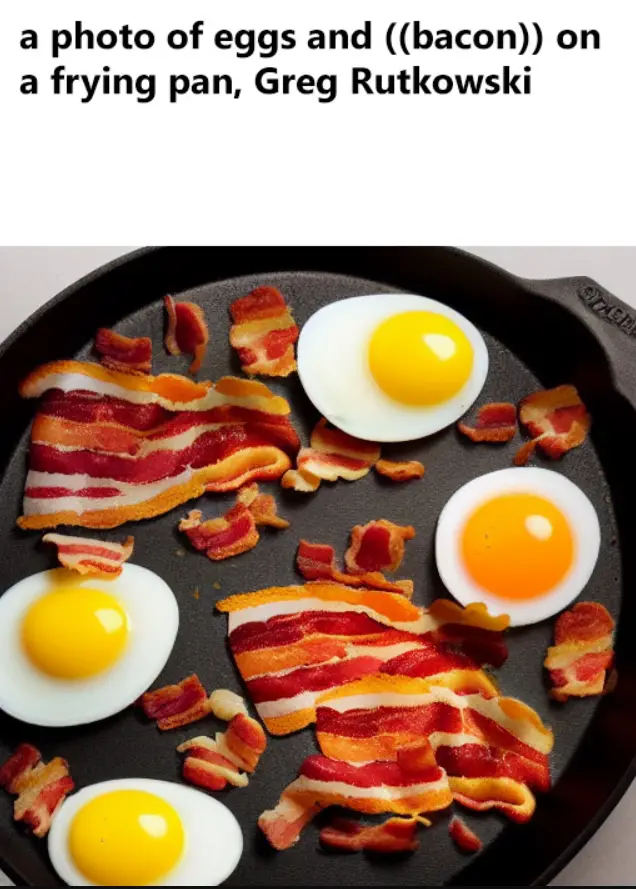
“a [word]” will decrease attention by a factor of 1.1.
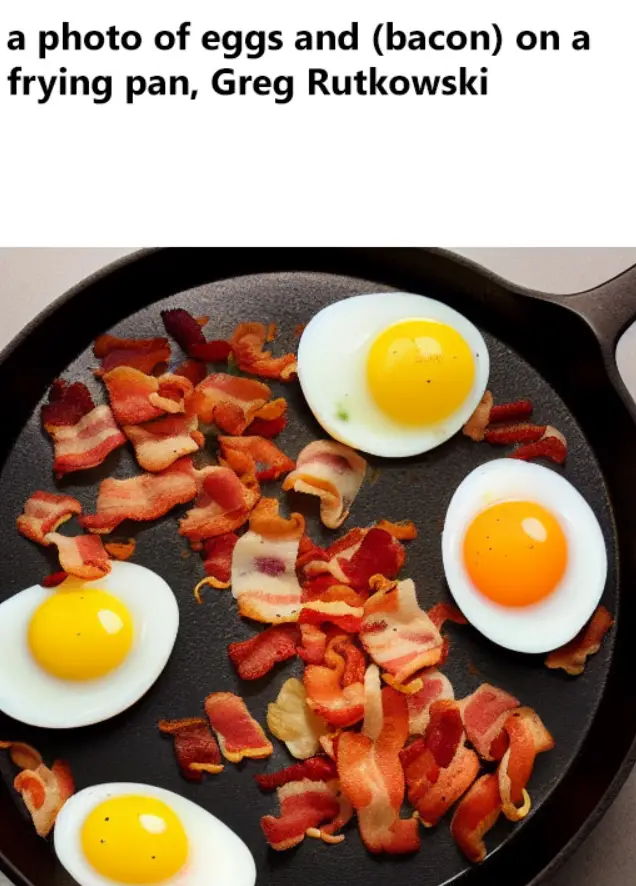
“a (word:1.5)” will increase attention by a factor of 1.5.
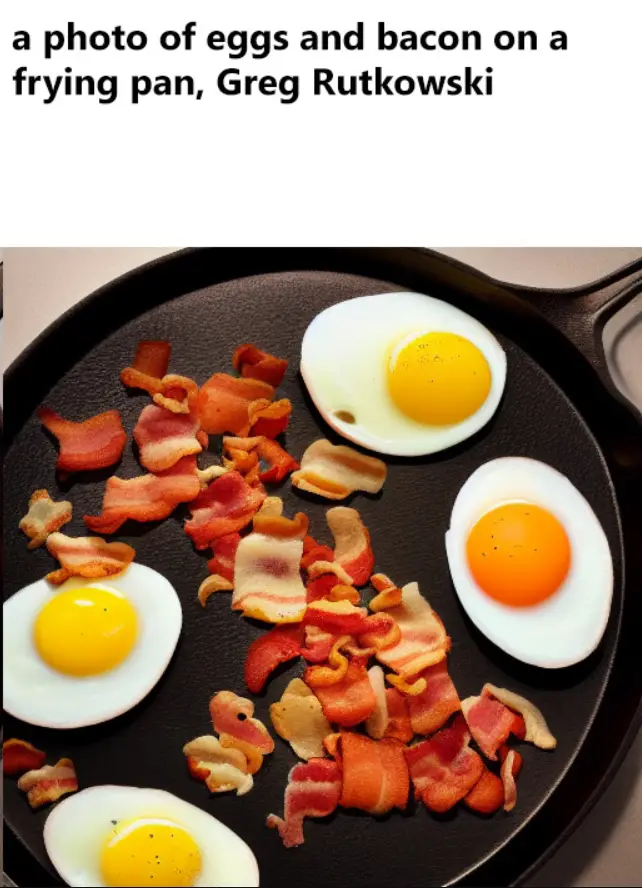
“a (word:0.25)” will decrease attention by a factor of 4 (1 / 0.25).
If you need to use the literal characters ()[] in your prompt, simply use a backslash to escape them, like so: anime_(character).
As of September 29, 2022, a new implementation was introduced that supports escape characters and numerical weights. However, this new version differs slightly from the old one in terms of handling text.

For instance, in the old version, the prompt “a (((farm))), daytime” would become “a farm daytime”, omitting the comma. The new version, however, preserves all the text correctly. If you find this difference impactful, you have the option to use the old implementation via the settings.
It’s also worth noting the differences with NAI’s implementation, which uses the multiplier 1.05 and employs curly braces instead of parentheses. Therefore, their {word} is equivalent to our (word:1.05), and their [word] is equivalent to our (word:0.952).
This attention/emphasis feature is a powerful tool for fine-tuning the influence of specific words in your prompts, giving you more control over the final image.
Stable Diffusion Loopback Feature
Enter the realm of recursive image generation with the “Loopback” feature. This feature, available within the img2img script selection, is designed to take the output image from one batch and use it as the input for the next. This creates a chain of iterations that can lead to some incredibly unique and fascinating results. Essentially, it’s akin to saving the output image and manually replacing the input image with it, but automated for your convenience.
The “Batch count” setting provides control over the number of iterations this loopback process will run for. While it’s common to manually select one image from the many generated for the next iteration, this feature does it automatically, potentially raising questions about its usefulness. However, it’s worth noting that this automatic process has been known to yield some extraordinary outputs that may not have been achievable through manual selection.
Take, for instance, this carefully selected example:

This image was originally provided by an anonymous user from 4chan. The loopback feature has transformed it into something completely new and distinct. This showcases the power of this feature to take an existing image and evolve it into a unique piece of art through iterative, recursive image generation. So, to all the tech enthusiasts out there, don’t shy away from exploring the potential of the loopback feature. You might be pleasantly surprised by the results.
X/Y/Z Plot Feature in Stable Diffusion
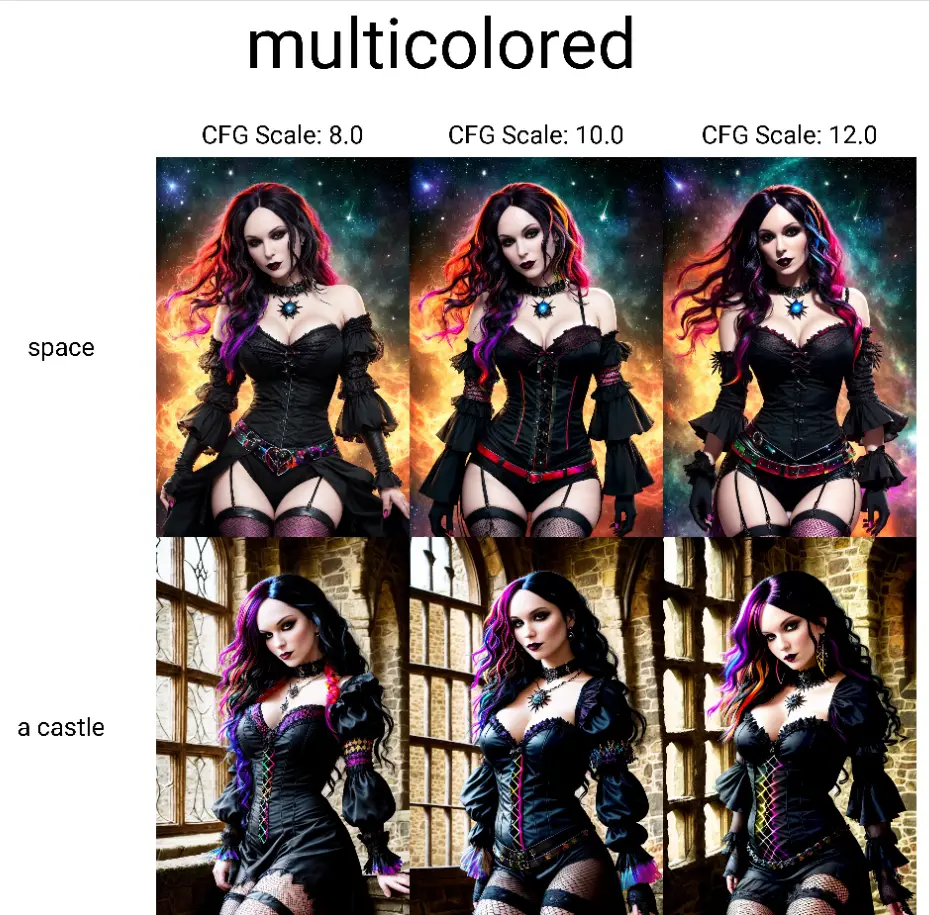
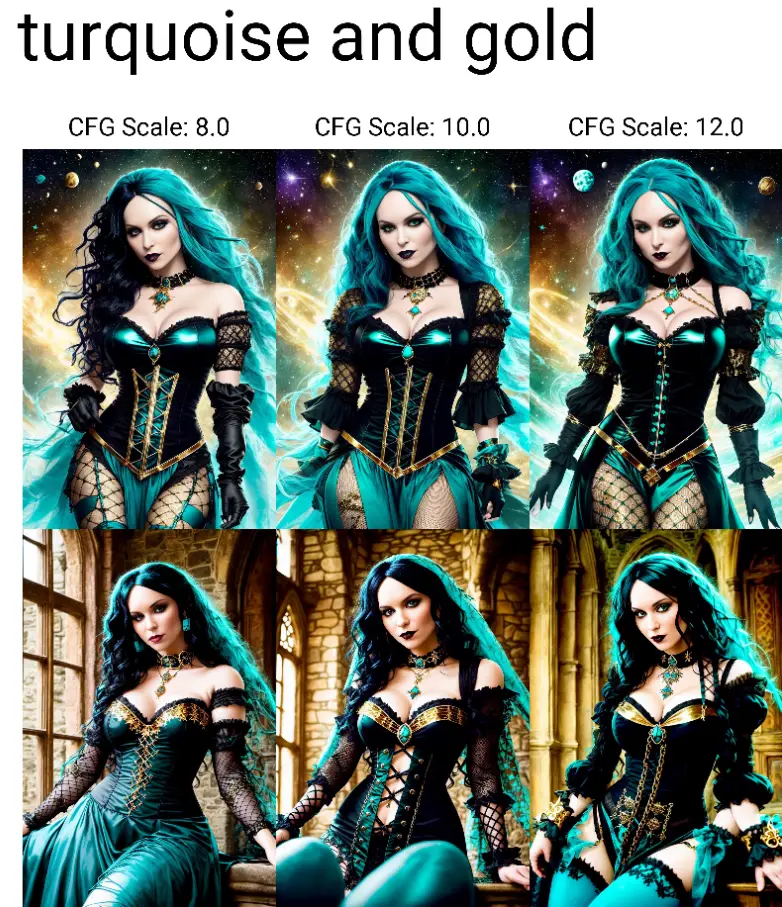
Unleash the power of parameter variation with the X/Y/Z plot feature. This tool allows you to create multiple grids of images, each one reflecting a different set of parameters. In this scheme, X and Y represent the rows and columns of the grid, while the Z grid introduces a third dimension – the batch dimension.
To use this feature, you simply select which parameters should correspond to the rows, columns, and batch by using the X type, Y type, and Z Type fields. Then, input these parameters, separated by commas, into the X/Y/Z values fields. This tool supports integer and floating-point numbers, as well as ranges. Here are some examples of range usage:
- “1-5” will yield the sequence 1, 2, 3, 4, 5.
- “1-5 (+2)” will produce 1, 3, 5.
- “10-5 (-3)” will generate 10, 7.
- “1-3 (+0.5)” will result in 1, 1.5, 2, 2.5, 3.
- “1-10 [5]” will yield 1, 3, 5, 7, 10.
- “0.0-1.0 [6]” will generate 0.0, 0.2, 0.4, 0.6, 0.8, 1.0.
One particularly powerful aspect of the X/Y/Z plot feature is the Prompt S/R mode. S/R stands for search/replace, and it does precisely that. You input a list of words or phrases; the system treats the first item as a keyword and replaces all instances of that keyword with the other entries on the list.
For instance, if you start with the prompt “a man holding an apple, 8k clean” and use the Prompt S/R with “an apple, a watermelon, a gun,” you’ll end up with three unique prompts:
- “a man holding an apple, 8k clean”
- “a man holding a watermelon, 8k clean”
- “a man holding a gun, 8k clean”
The list uses the same syntax as a line in a CSV file. If you wish to include commas in your entries, encase the text in quotes and ensure there’s no space between the quotes and separating commas.
The X/Y/Z plot feature opens up a new world of possibilities in image generation, allowing you to explore a vast range of parameter combinations with ease.
Prompts from File or Textbox Stable Diffusion Feature
Welcome to the world of batch processing in image generation with the “Prompts from file or textbox” script. This tool allows you to create a list of jobs, each with its own unique parameters, to be executed sequentially. This automated process significantly reduces the manual effort and time required to generate a series of images.
Consider the following example:
--prompt "photo of sunset"

--prompt "photo of sunset" --negative_prompt "orange, pink, red, sea, water, lake" --width 1024 --height 768 --sampler_name "DPM++ 2M Karras" --steps 10 --batch_size 2 --cfg_scale 3 --seed 9

--prompt "photo of winter mountains" --steps 7 --sampler_name "DDIM"

--prompt "photo of winter mountains" --width 1024
This input results in a series of images that are generated one after the other, each according to the specific parameters provided.
This script supports a wide range of parameters, including:
- “sd_model”, “outpath_samples”, “outpath_grids”, “prompt_for_display”, “prompt”, “negative_prompt”, “styles”, “seed”, “subseed_strength”, “subseed”,
- “seed_resize_from_h”, “seed_resize_from_w”, “sampler_index”, “sampler_name”, “batch_size”, “n_iter”, “steps”, “cfg_scale”, “width”, “height”,
- “restore_faces”, “tiling”, “do_not_save_samples”, “do_not_save_grid”
Whether you want to change the prompt, the size of the output image, the number of steps, or even the batch size, this script puts you in control. It’s an efficient way to generate a series of unique images, each tailored to your specific requirements.
Resizing Feature of Stable Diffusion Online
When it comes to image manipulation, resizing is a fundamental operation. In the img2img mode, there are three primary methods for adjusting the size of your input images:
- Just Resize: This is the simplest method, which directly resizes the source image to the target resolution. However, it may lead to an altered aspect ratio and potentially distort the image.
- Crop and Resize: This method maintains the original aspect ratio of the source image while resizing. It first resizes the image so that it fully occupies the target resolution. If any parts of the image exceed the target dimensions, they are cropped out to ensure a perfect fit.
- Resize and Fill: With this method, the source image is resized while preserving its aspect ratio, ensuring that the entire image fits within the target resolution. If there’s any empty space left after the resize, it’s filled with rows/columns from the source image, providing a seamless look.
Here’s an example illustrating these three methods:

Each of these methods has its own strengths, and the choice between them depends on your specific needs and the characteristics of the source image. Whether you need to maintain the original aspect ratio, fill in empty spaces, or simply stretch the image to fit the target dimensions, these resizing options offer the flexibility you need to achieve your desired outcome.
In the dynamic world of image generation, the ability to customize and control the process is key. The system offers several features that allow you to make the most of your creative endeavours, including a selection of sampling methods for txt2img, Seed resize, and Variations.
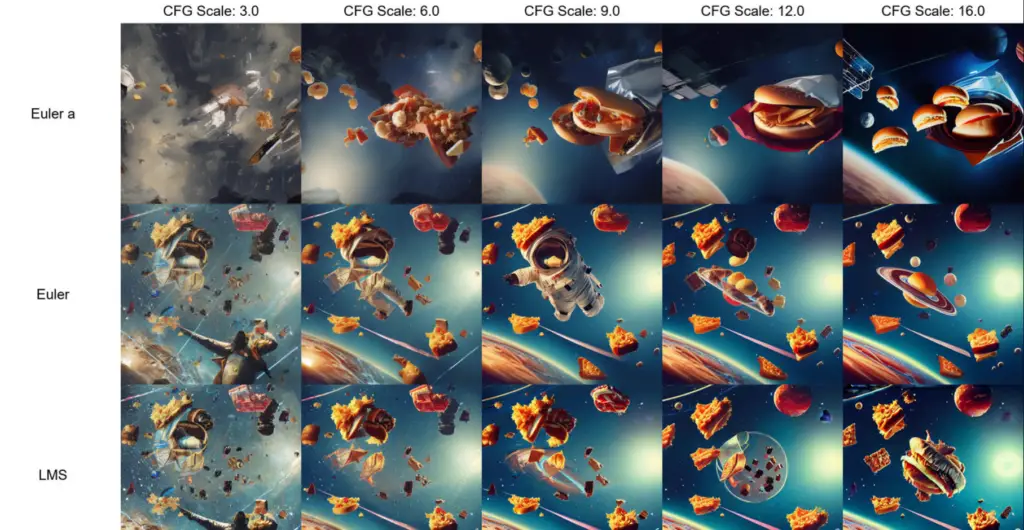
Sampling Method Selection: You can choose from multiple sampling methods for txt2img, each providing a unique approach to image generation.
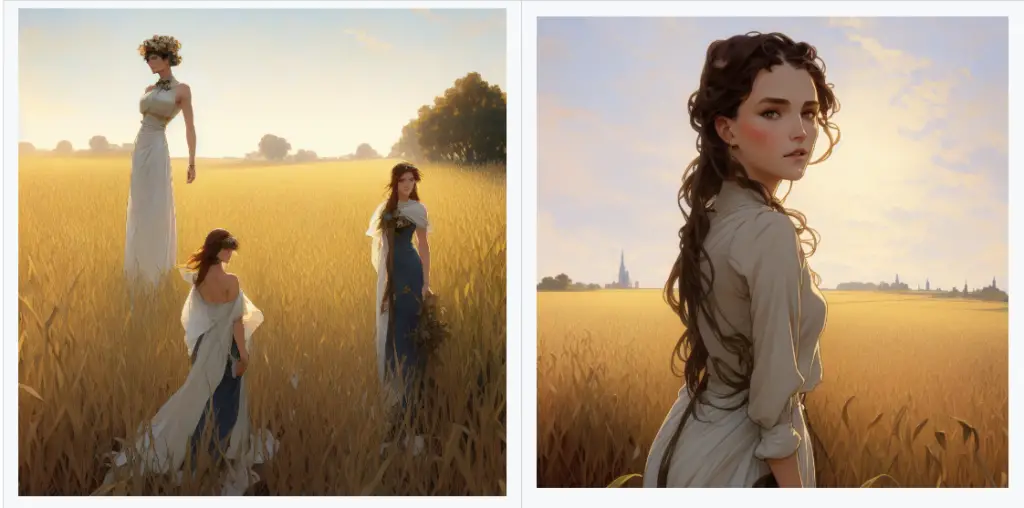
Seed Resize: This feature allows you to generate images from known seeds at various resolutions. Typically, altering the resolution changes the entire image, even if all other parameters, including the seed, remain the same. With seed resizing, you specify the original image’s resolution, and the model will strive to produce something very similar, even at a different resolution. As seen in the example, the leftmost image is 512×512, and the others are produced with the exact same parameters but with an increased vertical resolution.
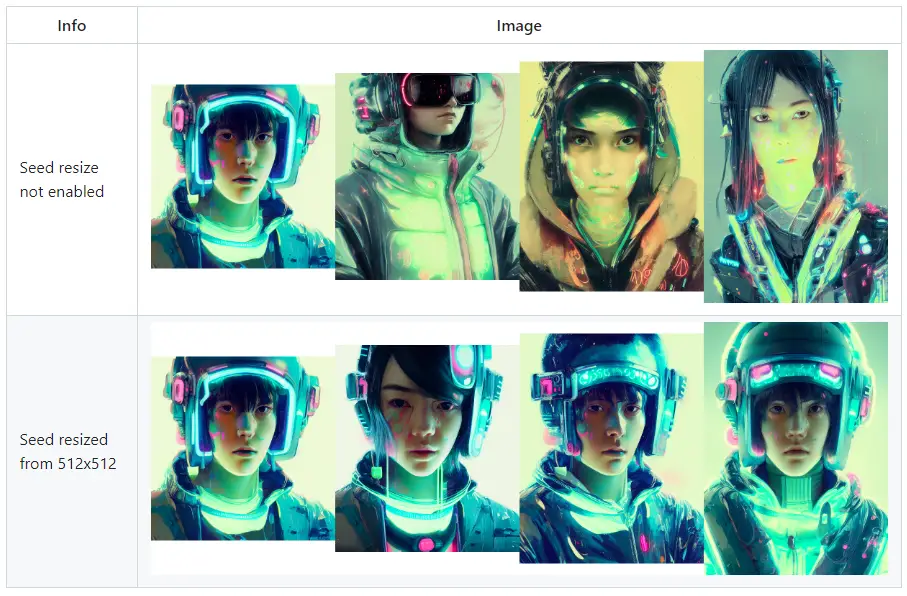
Do note that ancestral samplers are slightly less effective at this than other methods. You can find this feature by clicking the “Extra” checkbox near the seed.
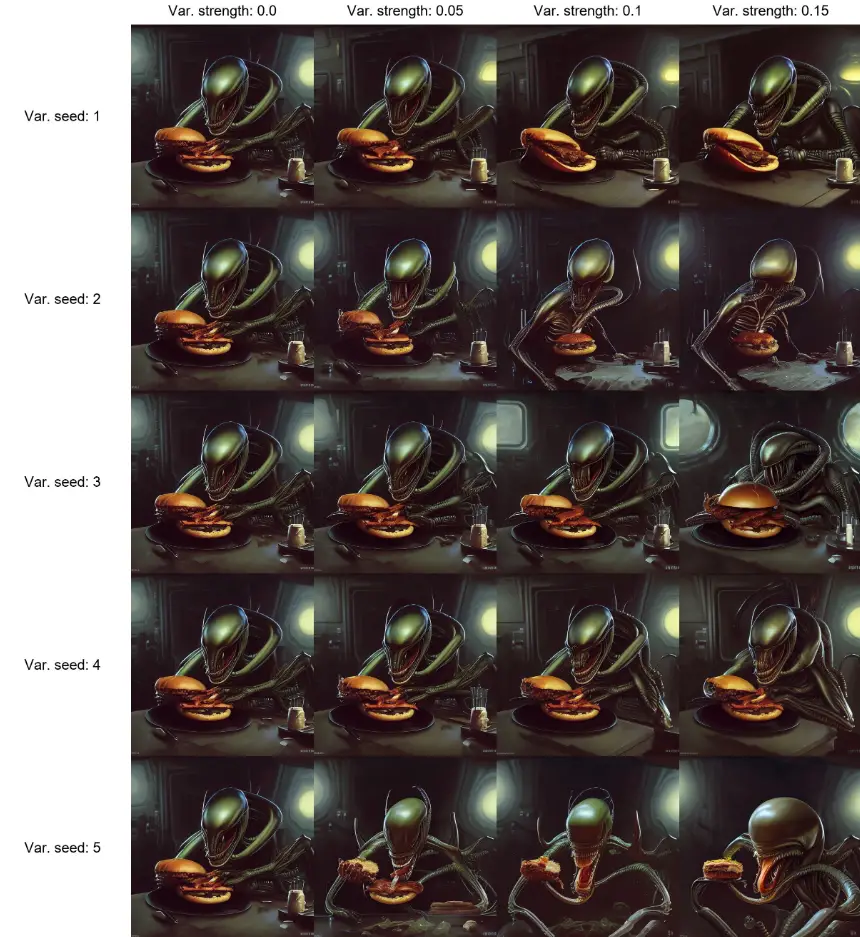
Variations: The “Variation strength” slider and “Variation seed” field allow you to dictate how much the existing image should be altered. At maximum strength, you will get pictures with the Variation seed, while at minimum strength, you’ll get pictures with the original Seed. This applies except when using ancestral samplers.
Harnessing the power of styles and negative prompts can take your image generation to the next level. Here’s how:
Styles: You can save your current prompt as a style by pressing the “Save prompt as style” button. This action records your prompt in the styles.csv file, a repository for a collection of styles. Once saved, your style will be available for selection from a dropdown menu located to the right of the prompt input. Choosing a style from the dropdown will automatically append it to your current prompt.
If you wish to incorporate the current prompt within your style, use the special string {prompt} in your style. This will substitute the current prompt at the location of the {prompt} string, rather than just appending the style at the end.
To delete a style, you’ll need to manually remove it from the styles.csv file and restart the program.
Negative Prompt: This feature allows you to input a prompt containing elements that the model should avoid while generating the image. This works by using the negative prompt for unconditional conditioning during the sampling process.
Here’s a comparison using negative prompts:
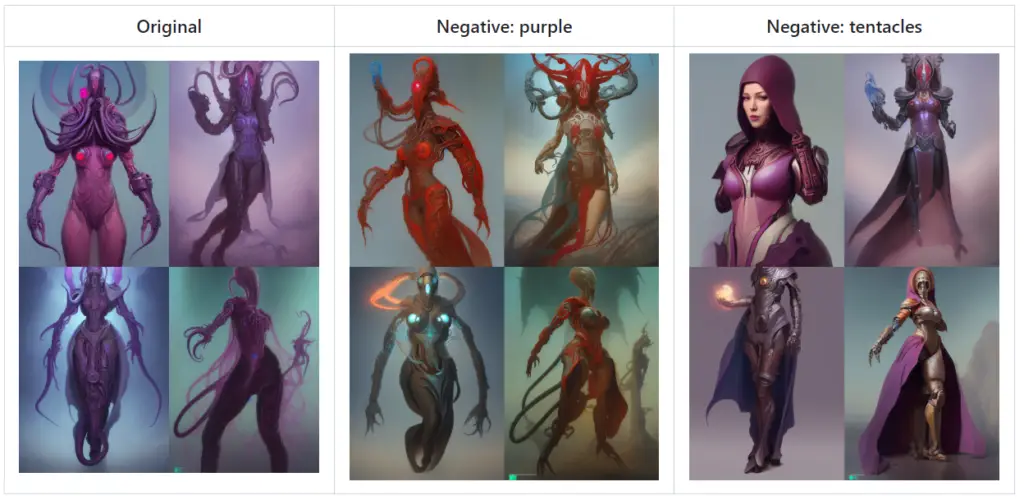
In the original image, no negative prompts are used. In the second image, “purple” is used as a negative prompt, causing the model to avoid generating purple elements. In the third image, the negative prompt is “tentacles,” leading the model to avoid creating any tentacle-like features.
These advanced features provide greater control and customization options, allowing you to steer the image generation process to align with your specific vision. You can find this feature by clicking the “Extra” checkbox near the seed. These features offer a broad palette of creative options, enabling you to generate images that are tailored to your specific needs and preferences.
Stable Diffusion Clip Interrogator Feature
The CLIP Interrogator is a powerful tool that allows you to reverse-engineer the prompt from a given image. Originally developed by this GitHub user, the tool won’t necessarily reproduce the exact image from the retrieved prompt, but it provides a strong starting point for understanding the components that may have contributed to the image’s creation.

When using the CLIP Interrogator for the first time, be prepared for a substantial download as the system acquires the necessary models.
The tool comprises two parts: the BLIP model, which generates a textual description from the image, and the CLIP model, which selects a few relevant lines from a predefined list. By default, the list comprises artists (from artists.csv), but you can expand it with additional lists by creating an ‘interrogate’ directory and populating it with text files, each containing relevant descriptions on each line.
For example, you can find suitable text files at this GitHub location. Feel free to use the files there, but remember to skip artists.txt, as you already have a list of artists in artists.csv. Each file you add will contribute an additional line of text to the final description.
You can also customize the number of relevant lines added from each file by including “.top3.” in the filename, for instance, “flavors.top3.txt”. This will add the three most relevant lines from the file to the prompt. You can replace ‘3’ with any number that suits your needs.
There are also settings that specifically relate to this feature, including:
- Interrogate: keep models in VRAM – Retains the Interrogate models in memory after use. Useful for users with abundant VRAM.
- Interrogate: use artists from artists.csv – Incorporates artists from artists.csv when interrogating. This can be disabled if you have your list of artists in the ‘interrogate’ directory.
- Interrogate: num_beams for BLIP – This parameter influences the level of detail in the descriptions generated by the BLIP model.
- Interrogate: minimum/maximum description length – Defines the length boundaries for the BLIP model’s text.
- Interrogate: maximum number of lines in text file – Defines the maximum number of first lines in a file the interrogator will consider. The default is 1500, which is suitable for a 4GB video card.
The CLIP Interrogator is a fantastic tool for gaining insights into the creative process behind image generation, offering a new perspective on how prompts and images interact.
Prompt Editing Stable Diffusion Feature
The Prompt Editing feature is a powerful tool that enables you to dynamically switch between different image prompts during the image generation process. This unique function allows the model to start drawing one scene and then transition to another, resulting in a blend of the two concepts.
The syntax for this operation is as follows:
from:to:when
In this syntax, ‘from’ and ‘to’ are the initial and target prompts, respectively, while ‘when’ is a number that defines the point in the sampling cycle when the switch should occur. If ‘when’ is a number between 0 and 1, it represents the fraction of the number of steps after which the switch should be made. If it’s an integer greater than 0, it’s the step at which the switch should occur.
For instance, consider the prompt “a [fantasy:cyberpunk:16] landscape”. Initially, the model will start creating a fantasy landscape. However, after the 16th step, it will transition to a cyberpunk landscape, continuing from where it left off with the fantasy theme.
You can also nest one prompt edit inside another.
Additional functionalities include:
- [to:when] – Adds ‘to’ to the prompt after a specific number of steps (‘when’).
- [from::when] – Removes ‘from’ from the prompt after a specific number of steps (‘when’).
A caveat to note is that this syntax doesn’t work with extra networks, such as LoRA. For similar functionality, see the sd-webui-loractrl extension.
Check out this gradual conversion of a male general to a female one in a series of 5 prompt edits:
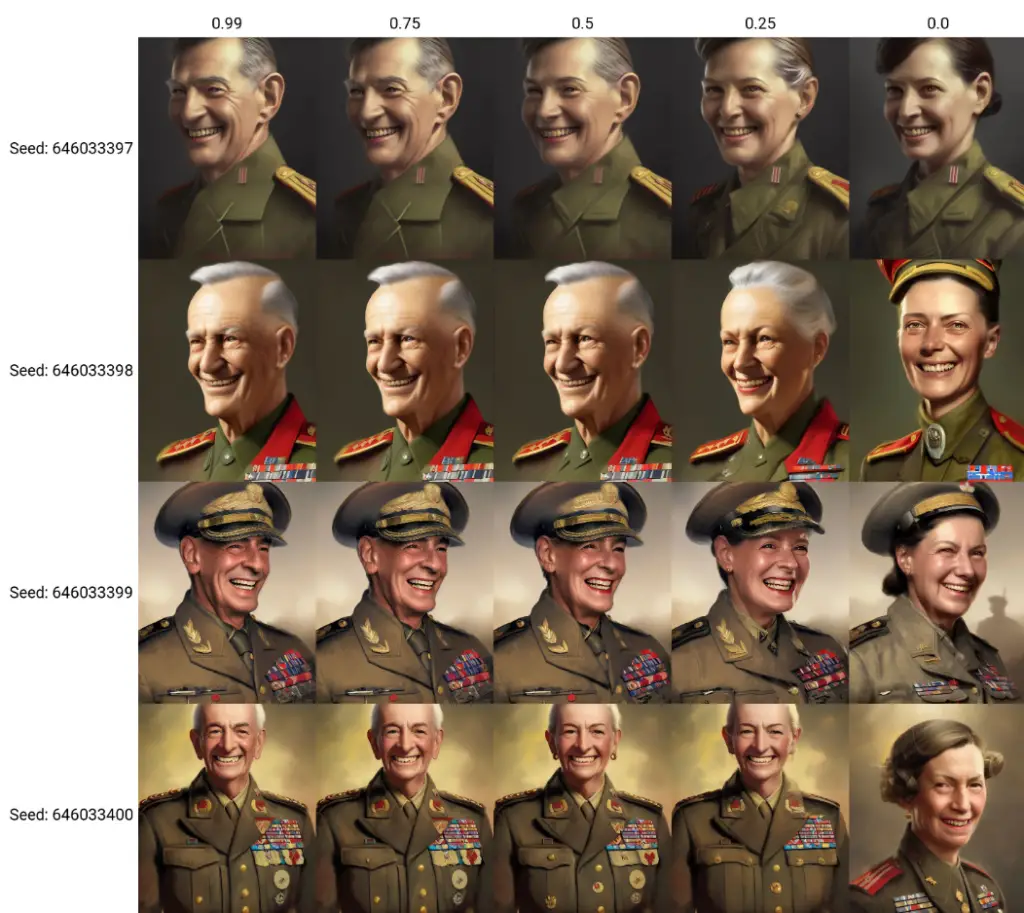
The Prompt Editing feature adds a layer of dynamism and creativity to your image generation process, allowing for a more nuanced exploration of the infinite possibilities of AI-generated art.
Alternating Words Stable Diffusion Feature
The Alternating Words feature offers a unique and flexible way to dynamically switch between different image prompts during the image generation process. With this feature, you can alternate between different prompts on each step, creating a sequence of images that alternate between the defined subjects.
The syntax for this operation is simple: word1∣word2
For instance, with the prompt “[cow|horse] in a field”, the model will generate an image of a “cow in a field” on the first step. On the second step, the prompt changes to “horse in a field”. This alternation continues with each subsequent step.
The feature is not limited to two alternating words. You can add as many words as you like, as shown in this more complex example: “[cow|cow|horse|man|siberian tiger|ox|man] in a field”. In this case, on the eighth step, the sequence loops back to the first word, “cow”.
This alternating words syntax was first implemented by Doggettx in this Reddit post.
Please note that this syntax doesn’t work with extra networks, such as LoRA. For similar functionality, you can refer to the sd-webui-loractrl extension.
The Alternating Words feature adds a new dimension of creativity to the image generation process, allowing you to create a sequence of images that alternate between different subjects, providing a dynamic and versatile approach to AI-generated art.
HiRes and Upscalers Stable Diffusion Features
The “Hires. fix” is a handy feature that allows you to efficiently generate high-resolution images. Without this feature, generating high-resolution images directly can often yield unsatisfactory results. The “Hires. fix” resolves this by partially rendering your image at a lower resolution, upscaling it, and then adding details at a high resolution.
To enable this feature, simply check the “Hires. fix” checkbox on the txt2img page.
Here’s how the different settings work:
- Small picture rendering: The small picture is rendered at the resolution set using the width/height sliders.
- Large picture dimensions: The dimensions of the large picture are controlled by three sliders:
- “Scale by” multiplier (Hires upscale)
- “Resize width to”
- “Resize height to” (Hires resize)
If “Resize width to” and “Resize height to” are 0, the “Scale by” value is used. If “Resize width to” is 0, “Resize height to” is calculated from width and height. If “Resize height to” is 0, “Resize width to” is calculated from width and height. If both “Resize width to” and “Resize height to” are non-zero, the image is upscaled to at least those dimensions, and some parts are cropped.
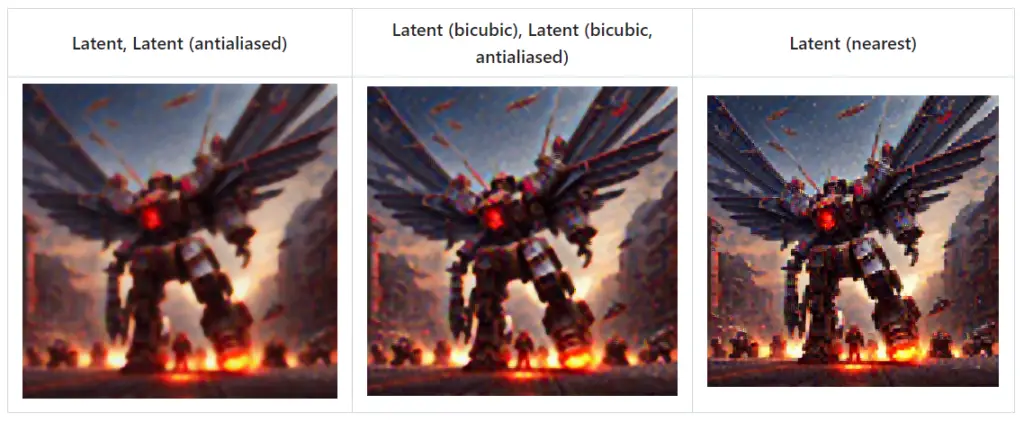
Upscalers: A dropdown menu allows you to select the type of upscaler to use for resizing the image. In addition to all upscalers available on the extras tab, there’s an option to upscale a latent space image, which is what stable diffusion works with internally.
The different latent upscale modes render different results. For instance, antialiased variations, which were PRd in by a contributor, seem to be the same as non-antialiased.
The “Hires. fix” feature is a practical solution for generating high-quality, high-resolution images with stable diffusion. It’s a valuable tool for creating detailed and visually appealing AI-generated art.
Composable Diffusion Feature with Interrupt and 4GB Videocard Support Stable Diffusion Feature
Composable Diffusion is a powerful tool that allows you to combine multiple prompts to create more intricate image generations. By using the term ‘AND’ in uppercase, you can instruct the model to incorporate multiple elements into the generated image.
For example, the prompt “a cat AND a dog” would yield an image featuring both a cat and a dog.
You can also assign weights to each prompt to influence their prominence in the final image. For instance, the prompt “a cat :1.2 AND a dog AND a penguin :2.2″ assigns a weight of 1.2 to the cat and 2.2 to the penguin, with the dog receiving a default weight of 1.
This feature is particularly useful when combining multiple embeddings, such as in the prompt “creature_embedding in the woods:0.7 AND arcane_embedding:0.5 AND glitch_embedding:0.2”. Note that using a weight lower than 0.1 will have little effect on the final image.
The Interrupt button allows you to halt the current processing operation at any time.
For users with lower-spec GPUs, the software offers support for 4GB video cards. Two optimizations, –lowvram and –medvram, can help generate 512×512 images on video cards with 4GB of memory, albeit at slower speeds. These optimizations, originally conceived by basujindal, work by managing the allocation of GPU memory more efficiently during the image generation process.
In conclusion, the Composable Diffusion feature and the various optimization options make it possible to create complex and high-quality AI-generated images, even on lower-spec hardware.
Face Restoration Stable Diffusion Feature
Face Restoration is a specialized feature that allows you to enhance faces in images using either GFPGAN or CodeFormer. These are advanced machine-learning models specifically designed to improve the quality of faces in images.
You can activate the Face Restoration feature through a checkbox available in every tab. Additionally, a dedicated tab is available, which includes a slider to control the intensity of the effect. You can choose between the GFPGAN and CodeFormer methods in the settings.
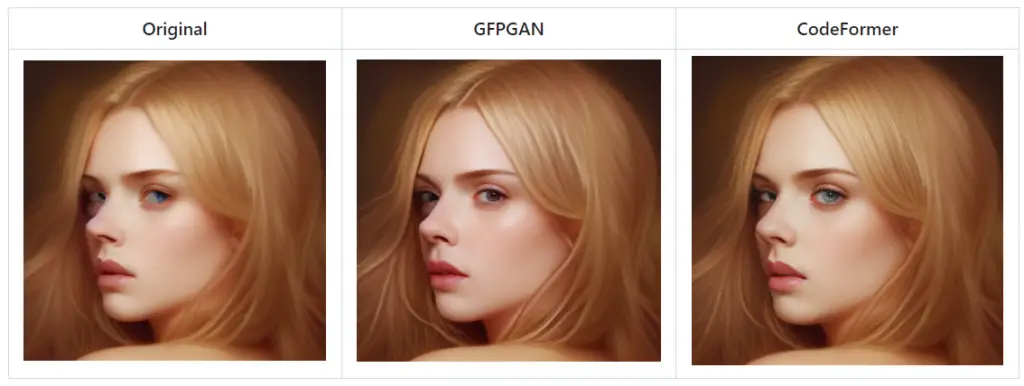
The GFPGAN method focuses on enhancing the facial features and textures, while the CodeFormer method attempts to restore the overall facial structure. Both methods have their strengths and can significantly improve the quality of faces in images.
Keep in mind that the results may vary depending on the quality and resolution of the original image. The better the original image quality, the more effective the face restoration feature will be.
Saving Loading Caching Prompt Validation PNG Info and Settings | Stable Diffusion Features
The AI model generation tool incorporates a number of key features designed to enhance your user experience:
Saving: Once an image has been generated, you can save it by clicking on the “Save” button located beneath the output section. The saved images are stored in a directory specified in the settings. In addition, the parameters used for generating the image are recorded in a CSV file in the same directory.
Loading: To optimize processing speeds, the UI replaces the loading progress animation with static “Loading…” text. If you’d prefer to see the loading animations, you can disable this feature using the –no-progressbar-hiding command-line option.
Model Caching: To expedite the process of swapping between models, you can increase a counter in the settings. This function keeps the models you’ve switched out from in your RAM. However, be mindful of your available RAM when adjusting this number.
Prompt Validation: Stable Diffusion has a character limit for input text. If your prompt exceeds this limit, a warning will appear in the text output field, indicating which sections of your text were truncated and ignored by the model.
PNG Info: The tool inserts information about the generation parameters into the PNG file as a text chunk. This information can be viewed later using any software that supports viewing PNG chunk info.
Settings: The tool provides a settings tab where you can adjust more than half of the parameters previously only available via command line. The settings are saved in the config.js file. Any settings that need to be established at startup remain as command-line options.
These features offer greater flexibility and control over the image generation process, ensuring a user-friendly and efficient experience.
FileNames Format and User Scripts as Stable Diffusion Features
The AI model generation tool incorporates flexible customization options for your convenience.
Filenames format: You can customize the filenames of the images generated by txt2img and img2img. The “Images filename pattern” field in the Settings tab lets you define which generation parameters you want to include in the filenames and in what order.
Available tags include parameters like
[seed], [steps], [cfg], [width], [height], [styles], [sampler], [model_hash], [model_name], [date], [datetime], [job_timestamp], [prompt_hash], [prompt], [prompt_no_styles], [prompt_spaces], [prompt_words], [batch_number], [generation_number], [hasprompt], [clip_skip], [denoising], and more. These tags can be used to generate meaningful filenames that carry key information about each image.
For instance, a pattern like
[seed]-[steps]-[cfg]-[sampler]-[prompt_spaces] could be used to create filenames that include the seed, number of steps, cfg value, sampler type, and the prompt used (with spaces intact).
You can also include non-tag words in the pattern to make filenames more descriptive, for example:
s=[seed],p=[prompt_spaces].If you leave this field empty, the default pattern ([seed]-[prompt_spaces]) will be applied.
User scripts: If the program is launched with the –allow-code option, an additional text input field for script code will be available.
This allows you to input Python code that manipulates the image. In your code, you can access parameters from the web UI using the ‘p’ variable and provide outputs for the web UI using the display(images, seed, info) function. You can also access all globals from the script.
This degree of customization allows you to tailor the tool to your exact requirements, providing you with a powerful platform for generating AI images.
UI Config and ESRGAN Stable Diffusion Features
The AI model generation tool provides a customizable user interface that enhances your experience.
UI Config: You can adjust the parameters for the UI elements in the ‘ui-config.json’ file, which is automatically generated when the program first starts. For instance:
- For radio groups, you can set the default selection.
- For sliders, you can set the default value, minimum, maximum, and step size.
- For checkboxes, you can set the checked state.
- For text and number inputs, you can set default values.
Note that checkboxes, which would normally expand a hidden section, will not do so initially when set as UI config entries.
ESRGAN: The tool provides the capability to use Enhanced Super Resolution Generative Adversarial Network (ESRGAN) models, both in the Extras tab and in the Stable Diffusion upscale. These models are useful for image upscaling tasks.
To use the ESRGAN models, you need to place them into the ESRGAN directory located in the same location as the webui.py file. Files with the ‘.pth’ extension will be loaded as models. You can obtain these models from the Model Database.
It’s important to note that not all models from the database are supported. Particularly, most 2x models are likely not supported. This customizable and flexible interface ensures that you have control over the image generation process, enabling you to create images that align with your specific requirements.
img2img Alternative Test Stable Diffusion Web UI Features
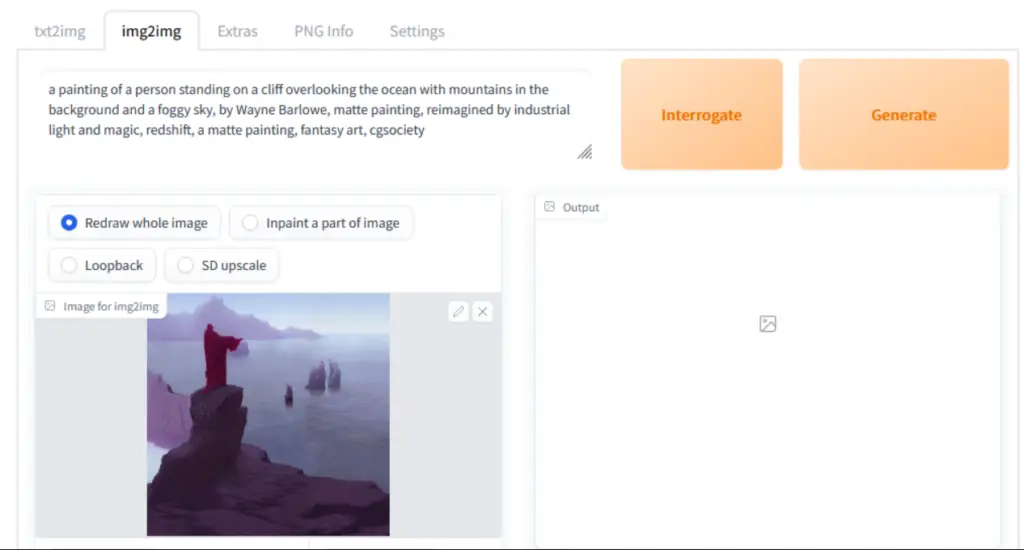
With img2img Stable Diffusion AI model generation tool you can create an alternative testing feature in the img2img mode, allowing you to deconstruct an input image and then reconstruct it with alterations based on your specifications. This feature uses a reverse of the Euler diffuser to generate the noise pattern required for constructing the input prompt.
Here’s how to use this feature:
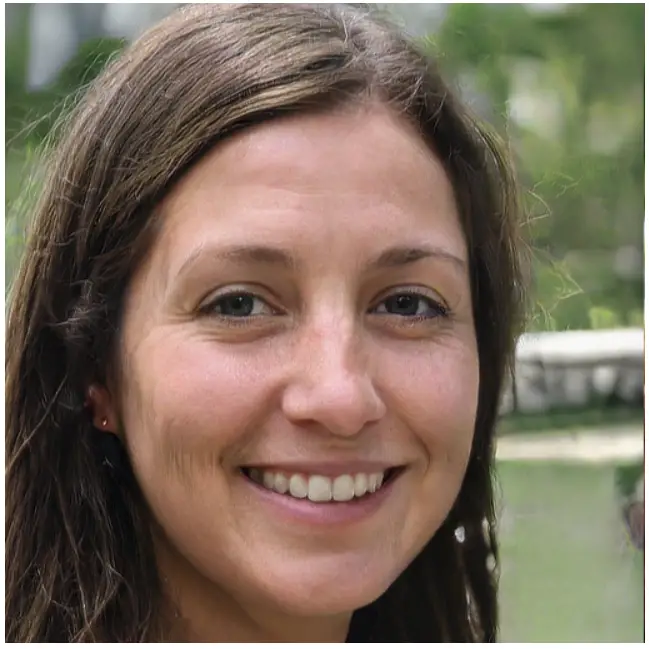
- Select an image: Choose an image you want to deconstruct and reconstruct. For example, you could use an image of a smiling woman with brown hair.
- Choose the script: Select the ‘img2img alternative test’ from the scripts section.
- Set your settings: Adjust the settings for the reconstruction process as follows:
- Starting prompt: Use a brief description of the scene, such as “A smiling woman with brown hair.” Describing features you want to change can be beneficial. This will serve as your starting prompt, and you should also set ‘Original Input Prompt’ in the script settings.
- Sampling method: You must use the Euler sampling method, as this script heavily relies on it.
- Sampling steps: Set this to 50-60. Note that this must match the decode steps value in the script.
- CFG scale: Set this to 2 or lower. For this demo, use 1.8.
- Denoising strength: Contrary to what old documents might suggest, this does matter. Set it to 1.
- Width/Height: Use the width and height of the input image.
- Seed: You can ignore this, as the reverse Euler method will generate the noise for the image.
- Decode cfg scale: A value lower than 1 is typically ideal. For the demo, use 1.
- Decode steps: As mentioned, this should match your sampling steps. Use 50 for the demo.
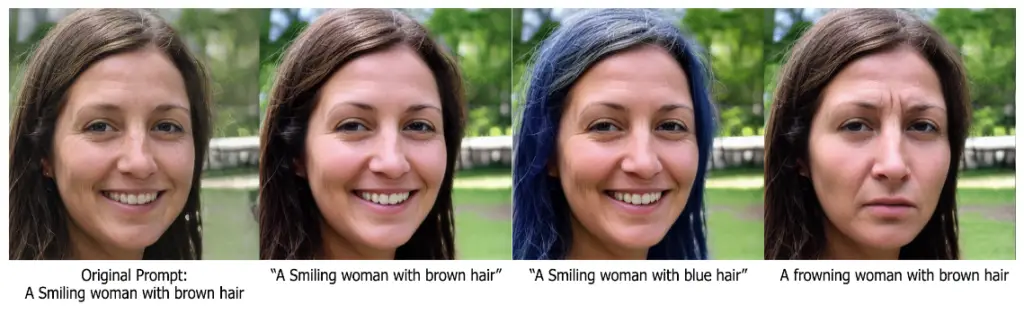
Once you’ve adjusted these settings, you can hit “Generate.” The tool will return an image that closely resembles the original. After confirming that the script accurately regenerates the source photo, you can experiment with changing the details of the prompt. Major variations from the original prompt will likely result in an image with a completely different composition than the source.
So, whether you want to change the color of the woman’s hair or turn her frown into a smile, this feature gives you the freedom to experiment with and modify the details of your image to your liking.
User.CSS Notification.MP3 and Clip Skip as Stable Diffusion Features
The AI model generation tool provides a range of customization options for an enhanced user experience:
- Custom CSS: If you wish to modify the appearance of the tool’s interface, you can create a file named ‘user.css’ in the same directory as ‘webui.py’. Here, you can insert your own CSS code. For instance, you can increase the height of the gallery by adding the following lines:
#txt2img_gallery, #img2img_gallery{
    min-height: 768px;
}- Dark Theme: To enable a built-in dark theme, append ‘/?__theme=dark’ to your webui URL. Alternatively, you can add ‘–theme=dark’ to the set
COMMANDLINE_ARGS=in ‘webui-user.bat’. - Notification Sound: The tool supports audio notifications upon completion of the image generation process. To enable this feature, place an audio file named ‘notification.mp3’ in the root folder of webui. You can find suitable sound effects on websites like Pixabay.
- Clip Skip: This is a slider in the settings tab that determines the point at which the processing of the prompt by the CLIP network should be halted. The CLIP network is a neural network that transforms your prompt text into a numerical representation, which is then fed into the model involved in the stable diffusion’s method of producing images. With the Clip Skip slider, you can choose to stop this process early, using the output of one of the earlier layers instead of the last one. This can help improve results with certain models.
These customization options provide you with greater control over the look, feel, and functionality of the tool, allowing you to tailor it to your specific needs and preferences.
For more Stable Diffusion terms – check out our glossary
Frequently Asked Questions about Stable Diffusion Web UI features
What are the Stable Diffusion Web UI features?
The Stable Diffusion Web UI offers numerous features to enhance your image generation projects. These include variations with Stable Diffusion 2.0 models, implementation of InstructPix2Pix, integration of extra networks, advanced features like textual inversion, LoRA, hypernetworks, and many more.
What are the advanced Stable Diffusion Web UI features?
The advanced features include textual inversion, LoRA, and hypernetworks. Textual inversion allows the inversion of text prompts into images. LoRA, or Localized Receptive Attention, helps the model to focus on the relevant parts of the image. Hypernetworks are smaller networks that generate weights for larger networks, allowing for faster and more efficient processing.
What is Alt-Diffusion?
Alt-Diffusion is a feature that enables multilingual image generation.
What does the Inpainting feature do?
The Inpainting feature, which includes specialized inpainting models and various inpainting areas, allows you to fill in the blanks or missing parts of an image. This feature is particularly useful in restoration projects or when you need to complete an incomplete image.
What is the Prompt Matrix feature?
The Prompt Matrix feature is one of the advanced features of the Stable Diffusion UI that allows for complex and nuanced image generation by providing multiple prompts and controlling their influence on the final image.
The Stable Diffusion UI offers HiRes and upscalers features for improving the resolution and quality of the generated images. There’s also a resizing feature that allows you to adjust the size of the output image according to your needs.
What is the Loopback feature in Stable Diffusion?
The Loopback feature in Stable Diffusion allows for continuous, looping image generation, creating a sense of animation or movement in the images.
What customizability features does the Stable Diffusion UI offer?
The Stable Diffusion UI offers numerous customizability features like the ability to use prompts from a file or textbox, editing prompts, alternating words, and more. It also provides support for user scripts and a UI config feature for personalizing the user interface.
What are the Stable Diffusion 2.0 model variations in the Stable Diffusion Web UI Online?
Stable Diffusion Web UI Online supports the Stable Diffusion 2.1 unclip checkpoints, which allows the production of varied image outcomes. The SD2.1 variation model operates similarly to the existing support for the SD2.0 depth model. It extracts information from the input image, specifically leveraging CLIP or OpenCLIP embeddings, combines it with your text prompt, and feeds it into the model.
How does the InstructPix2Pix integration work in the Stable Diffusion Web UI Online?
The Stable Diffusion Web UI Online fully supports the integration of the InstructPix2Pix checkpoint in the img2img tab. To mimic the results of the original InstructPix2Pix repository, you should use a denoising value of 1.0 and the Euler a sampler. Additionally, you’ll need to edit the config in configs/instruct-pix2pix.yaml to reflect certain settings.
What are the ‘Extra Networks’ in the Stable Diffusion Web UI Online?
The ‘Extra Networks’ feature integrates several additional methods for enhancing your image generation into a single, user-friendly interface. It supports different types of networks and their respective files, including Textual Inversion, LoRA, and Hypernetworks.
How can I use the ‘Extra Networks’ in the Stable Diffusion Web UI Online?
Each network type corresponds to a file containing a part of the model that you either train yourself or source from elsewhere. By selecting a card (each card corresponds to a network type), you add its associated model to your prompt, influencing the generation process. The network type files are located in different directories, and you can incorporate them into your prompt using the respective syntax.
What are Textual Inversion, LoRA, and Hypernetworks in Stable Diffusion Web UI Online?
Textual Inversion, LoRA, and Hypernetworks are advanced features in Stable Diffusion Web UI Online that allow for fine-tuning the weights for the language model and the image de-noiser used by Stable Diffusion. Textual Inversion is a technique for fine-tuning weights for a token in CLIP. LoRA is a method that fine-tunes weights for both CLIP and Unet. Hypernetworks is a method that fine-tunes weights for both CLIP and Unet but shares weights for some layers, allowing for a different approach to fine-tuning.
What is Alt-Diffusion in Stable Diffusion Web UI Online?
Alt-Diffusion is a unique model that is trained to accept inputs in different languages, expanding the versatility of the Stable Diffusion Web UI Online. This feature opens up new avenues for non-English speakers, allowing them to generate images using prompts in their native languages.
What is Stable Diffusion 2.0 in Stable Diffusion Web UI Online?
Stable Diffusion 2.0 represents a significant improvement in the image generation capabilities of the Stable Diffusion Web UI Online. It comes in several versions and requires the download of a checkpoint file from Hugging Face.
What is the Depth Guided Model in Stable Diffusion Web UI Online?
The Depth Guided Model, operable in the img2img tab, allows for more precise image generation. It comes in several versions and requires the download of a model file.
What is the Inpainting Model SD2 in Stable Diffusion Web UI Online?
The Inpainting Model SD2 is specifically designed for inpainting, which is the process of filling in the blanks or missing parts of an image. This model is trained on SD 2.0 512 base and requires the download of a model file.
What is the outpainting feature in Stable Diffusion Web UI Online?
The outpainting feature is a unique tool that allows users to extend their original images creatively. It creates additional empty space around the original image and then fills that space with relevant content, effectively “outpainting” the original image. You can find this feature in the ‘img2img’ tab under ‘Script -> Poor man’s outpainting’.
What is the inpainting feature in Stable Diffusion Web UI Online?
The inpainting feature in Stable Diffusion Web UI Online is a tool that can fill in specific portions of an image. This is done by overlaying a mask on parts of the image, which the tool then “in-paints.” The inpainting feature is located in the ‘img2img’ tab, where users can draw a mask over a part of the image they wish to inpaint.
What is the Specialized Inpainting Model in Stable Diffusion Web UI Online?
The Specialized Inpainting Model is an additional model in Stable Diffusion Web UI Online specifically designed for inpainting. It accepts additional inputs—the initial image without noise plus the mask—and seems to be much better at the task of inpainting.
What is the Stable Diffusion Upscale feature in Stable Diffusion Web UI Online?
The “Stable Diffusion Upscale” feature in Stable Diffusion Web UI Online is an innovative approach to image enhancement. This tool allows users to upscale images using the power of RealESRGAN/ESRGAN technology, followed by a further refining process using the img2img algorithm. This method allows for high-quality image upscaling with an impressive level of detail.
What is the “Infinite Prompt Length” feature in Stable Diffusion Web UI Online?
The “Infinite Prompt Length” feature in Stable Diffusion Web UI Online is a tool that allows users to exceed the standard 75 token limit traditionally accepted by Stable Diffusion. This feature works by intelligently segmenting your prompt into 75-token chunks and processing each separately, effectively expanding the prompt size limit.
What is the “BREAK” keyword in Stable Diffusion Web UI Online?
The “BREAK” keyword in Stable Diffusion Web UI Online is a tool designed to give users greater control over their image generation process. This feature acts as a signal to the system to fill the current chunks with padding characters. Inserting the “BREAK” keyword effectively creates a division in your prompt by filling up the remaining space in the current chunk with padding characters.
How to use the Attention / Emphasis Feature in Stable Diffusion Online?
The Attention / Emphasis feature in Stable Diffusion Online allows users to give certain words more weight in their prompts, ensuring they play a more significant role in the generated image. Users can increase the model’s attention to a word by enclosing it within parentheses and decrease it by enclosing it in brackets. The feature also supports the stacking of these modifiers to further enhance or reduce attention.
What is the “Loopback” feature in Stable Diffusion Web UI Online?
The “Loopback” feature in Stable Diffusion Web UI Online is a tool designed for recursive image generation. It works by taking the output image from one batch and using it as the input for the next, creating a chain of iterations that can lead to unique and fascinating results.
What is the X/Y/Z Plot feature in Stable Diffusion Web UI Online?
The X/Y/Z Plot feature in Stable Diffusion Web UI Online is a tool that allows you to create multiple grids of images, each one reflecting a different set of parameters. In this scheme, X and Y represent the rows and columns of the grid, while the Z grid introduces a third dimension – the batch dimension.
What is the “Prompts from file or textbox” feature in Stable Diffusion Web UI Online?
The “Prompts from file or textbox” feature in Stable Diffusion Web UI Online is a tool that allows you to create a list of jobs, each with its own unique parameters, to be executed sequentially. This automated process significantly reduces the manual effort and time required to generate a series of images.
What are the resizing methods available in Stable Diffusion Web UI Online?
Stable Diffusion Web UI Online offers three methods for resizing images:
– Just Resize: The simplest method, which directly resizes the source image to the target resolution, potentially distorting the image.
– Crop and Resize: Resizes the image to fully occupy the target resolution while maintaining the original aspect ratio. Any parts of the image that exceed the target dimensions are cropped out.
– Resize and Fill: Preserves the source image’s aspect ratio while resizing. If there’s any empty space left after the resize, it’s filled with rows/columns from the source image.
What is the Seed Resize feature in Stable Diffusion Web UI Online?
The Seed Resize feature in Stable Diffusion Web UI Online allows you to generate images from known seeds at various resolutions. With seed resizing, you specify the original image’s resolution, and the model will strive to produce something very similar, even at a different resolution.
What is the Variations feature in Stable Diffusion Web UI Online?
The Variations feature in Stable Diffusion Web UI Online allows you to dictate how much the existing image should be altered. The “Variation strength” slider and “Variation seed” field are used to control this feature.
What is the Styles feature in Stable Diffusion Web UI Online?
The Styles feature in Stable Diffusion Web UI Online allows you to save your current prompt as a style. Once saved, your style will be available for selection from a dropdown menu located to the right of the prompt input. Choosing a style from the dropdown will automatically append it to your current prompt.
What is the Negative Prompt feature in Stable Diffusion Web UI Online?
The Negative Prompt feature in Stable Diffusion Web UI Online allows you to input a prompt containing elements that the model should avoid while generating the image. This works by using the negative prompt for unconditional conditioning during the sampling process.
What is the CLIP Interrogator feature in Stable Diffusion Web UI Online?
The CLIP Interrogator feature in Stable Diffusion Web UI Online allows you to reverse-engineer the prompt from a given image. This tool comprises two parts: the BLIP model, which generates a textual description from the image, and the CLIP model, which selects a few relevant lines from a predefined list. This feature provides a strong starting point for understanding the components that may have contributed to the image’s creation.
What is the Prompt Editing feature in Stable Diffusion Web UI Online?
The Prompt Editing feature in Stable Diffusion Web UI Online is a powerful tool that enables you to dynamically switch between different image prompts during the image generation process. The syntax for this operation is from:to:when, where from and to are the initial and target prompts, respectively, while when is a number that defines the point in the sampling cycle when the switch should occur.
What is the Alternating Words feature in Stable Diffusion Web UI Online?
The Alternating Words feature in Stable Diffusion Web UI Online offers a unique and flexible way to dynamically switch between different image prompts during the image generation process. With this feature, you can alternate between different prompts on each step, creating a sequence of images that alternate between the defined subjects. The syntax for this operation is word1|word2.
What is the HiRes and Upscalers feature in Stable Diffusion Web UI Online?
The HiRes and Upscalers feature in Stable Diffusion Web UI Online allows you to generate high-resolution images efficiently. It does this by partially rendering your image at a lower resolution, upscaling it, and then adding details at a high resolution. It provides a selection of upscalers for resizing the image and offers different modes for high-resolution rendering
What is the Composable Diffusion feature in Stable Diffusion Web UI Online?
The Composable Diffusion feature in Stable Diffusion Web UI Online allows you to combine multiple prompts to create more intricate image generations. By using the term ‘AND’ in uppercase, you can instruct the model to incorporate multiple elements into the generated image. You can also assign weights to each prompt to influence their prominence in the final image.
What is the Face Restoration feature in Stable Diffusion Web UI Online?
The Face Restoration feature in Stable Diffusion Web UI Online allows you to enhance faces in images using either GFPGAN or CodeFormer. These are advanced machine-learning models specifically designed to improve the quality of faces in images. You can activate the Face Restoration feature through a checkbox available in every tab.
What are the Saving, Loading, Caching, Prompt Validation, PNG Info, and Settings features in Stable Diffusion Web UI Online?
These features in Stable Diffusion Web UI Online enhance your user experience. You can save generated images, load models more quickly with model caching, validate prompts to check for character limits, view generation parameters in the PNG file, and adjust various settings that were previously only available via the command line.
How can I customize the filenames of generated images in Stable Diffusion Web UI Online?
You can customize the filenames of the images generated by Stable Diffusion Web UI Online using the “Images filename pattern” field in the Settings tab. This field lets you define which generation parameters you want to include in the filenames and in what order. You can include tags like [seed], [steps], [cfg], [sampler], [prompt], etc., to generate meaningful filenames that carry key information about each image.
What is the User Scripts feature in Stable Diffusion Web UI Online?
The User Scripts feature in Stable Diffusion Web UI Online allows you to input Python code that manipulates the image. You can access parameters from the web UI using the ‘p’ variable and provide outputs for the web UI using the display(images, seed, info) function. This feature is available when the program is launched with the –allow-code option.
What is the UI Config feature in Stable Diffusion Web UI Online?
The UI Config feature in Stable Diffusion Web UI Online allows you to adjust the parameters for the UI elements in the ‘ui-config.json’ file, such as default selection for radio groups, default value, minimum, maximum, and step size for sliders, checked state for checkboxes, and default values for text and number inputs.
What is the img2img Alternative Test feature in Stable Diffusion Web UI Online?
The img2img Alternative Test feature in Stable Diffusion Web UI Online allows you to deconstruct an input image and then reconstruct it with alterations based on your specifications. This feature uses a reverse of the Euler diffuser to generate the noise pattern required for constructing the input prompt.
What are the User.CSS Notification.MP3 and Clip Skip features in Stable Diffusion Web UI Online?
The User.CSS Notification.MP3 and Clip Skip features in Stable Diffusion Web UI Online provide additional customization options. You can modify the appearance of the tool’s interface with custom CSS, enable a dark theme, get audio notifications upon completion of the image generation process with Notification.MP3, and determine the point at which the processing of the prompt by the CLIP network should be halted with Clip Skip.